How to Access Settings in Windows 11


The Settings app in Windows 11 is the central hub where you control display preferences, Wi-Fi connections, privacy options, and system updates. Pressing the Win and the letter I together opens it instantly on any Windows 11 computer, whether it runs Home or Pro.
This shortcut skips the menus, so you can change a setting or start fixing a problem right away. The sections below cover that shortcut and five other ways to open Settings . They also cover moving around the app, what to do if it won’t open, and how to build a shortcut to a specific Settings page. Those other methods are useful when a keyboard shortcut is blocked or a menu is missing.
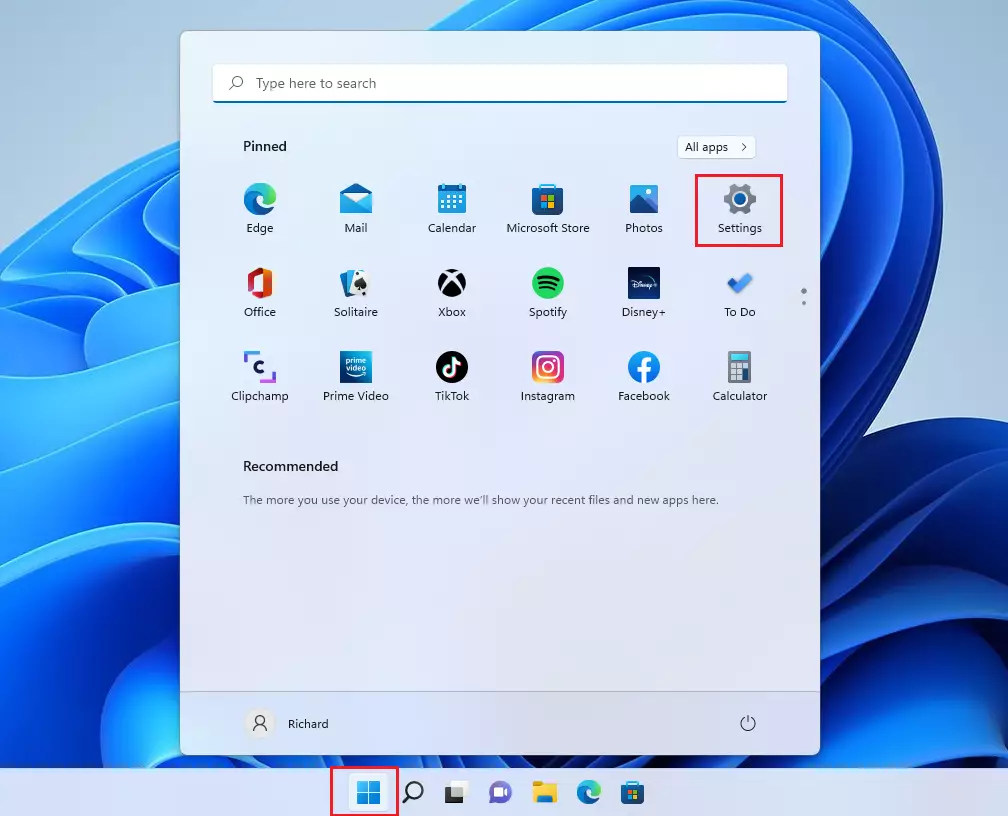
Press Win+I to open Settings on Windows 11. If that shortcut doesn’t work, click the Start button , find the gear-shaped Settings icon in pinned apps, and click it. You can also right-click the Start button and select Settings from the menu.
The Fastest Ways to Access Settings in 🪟 Windows 11
Method 1Use the Keyboard Shortcut
This is the fastest method and works from almost anywhere in Windows.
- Press and hold the Win.
- Tap the I key, then release both keys.
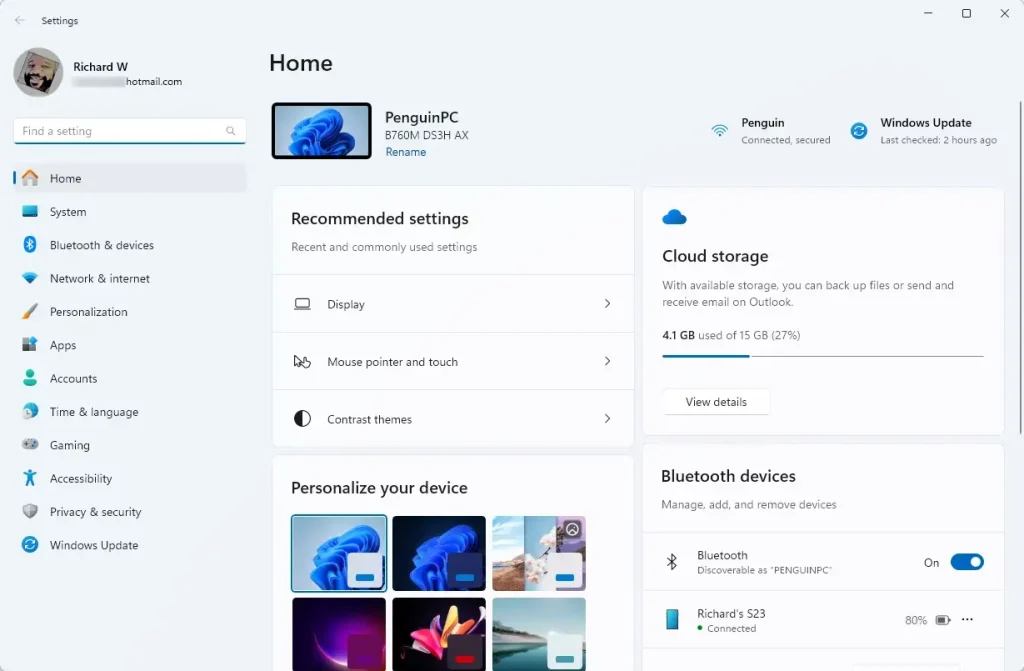
- Wait a moment. The Settings window opens, with the category sidebar on the left and the System page on the right.
If nothing happens, a keyboard utility or a work policy may be blocking it. Use one of the other methods below instead.
Method 2Use the Start Menu
Use this method if you prefer the mouse or don’t have a Win.
- Click the Start button on the taskbar, or press the Win on its own.
- Look for the gear-shaped Settings icon in the pinned apps area.
- Click it. The Settings app opens.
If the gear isn’t pinned, because someone unpinned it or your organization changed the layout, click All apps in the top right of the Start menu and scroll to Settings. You can also type “Settings” into the search box at the top of Start and press Enter. To pin it again, right-click the Settings entry and choose Pin to Start .
Method 3Use the Power User Menu
This menu is handy because it stays available even if the Start menu layout has been changed.
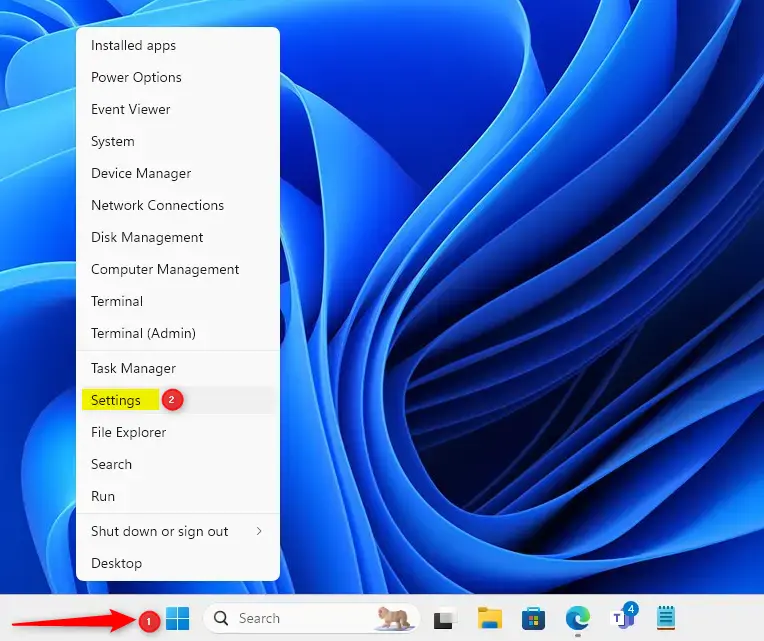
- Right-click the Start button. A contextual menu appears above the taskbar.
- Click Settings in the list. The Settings app opens.
You can also press Windows key + X to open the same menu from the keyboard, then press the key for Settings or click it.
Method 4Use Quick Settings
Quick Settings is the small panel for Wi-Fi, volume, brightness, and similar toggles. It also leads to the full app.
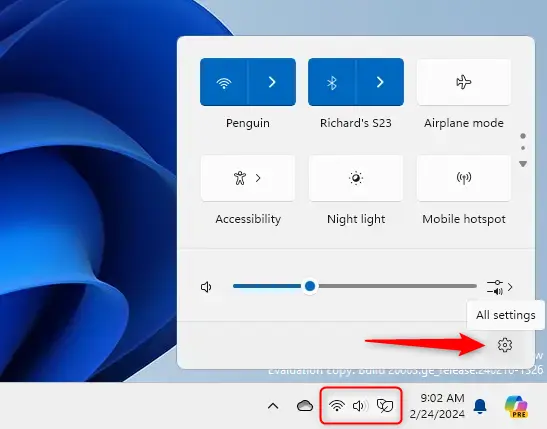
- Press Windows key + A. A small panel opens in the bottom right corner of the screen, just above the taskbar.
- Click the "All settings" button to expand this into the full Settings app.
The button wording and position can differ between Windows 11 builds. If you don't see it, use another method in this guide. You can also open the panel by clicking the Wi-Fi, speaker, or battery icons in the taskbar tray. Press Esc to close the panel without changing anything.
Method 5Use the Run Box
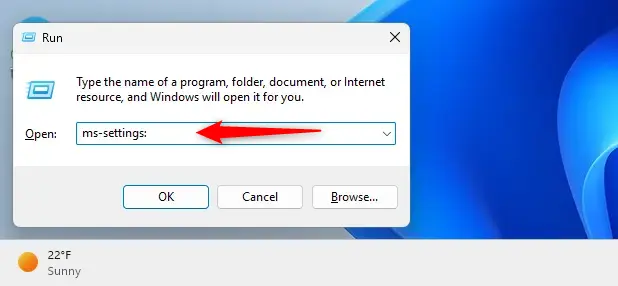
- Press Windows key + R on the keyboard. The Run dialog box opens in the lower left corner of the screen.
- Type
ms-settings:in the Open field. - Press Enter or click OK. The Settings app launches immediately.
A typo makes Windows show an error saying it cannot find the file. This method is quick if you already have your hands on the keyboard and know the command.
Method 6Use Windows Terminal
Windows Terminal provides another way in, and it is useful when you are already working on the command line or connected to a machine remotely.
- Right-click the Start button and open Terminal, or search for "Terminal" or "PowerShell" in Start.
- Type
start ms-settings:at the prompt. PowerShell and Command Prompt both accept this command. - Press Enter. The command runs and brings up the Settings app.
You don't need administrator rights for this. A normal, non-elevated window is fine.
Understanding Settings Hierarchy and Navigation
Windows 11 organizes navigation through a sidebar on the left side of the window. Categories like System, Bluetooth & devices, and Personalization sit in this menu so you can switch between them quickly. Click a category and its options appear on the right.
Click the Home icon at the top of the sidebar to return to the main dashboard. If you can't find a setting, use the search box at the top of the sidebar. Type a word such as "VPN" or "night light" and pick a result from the list.
Troubleshooting: What to Do If Settings Crashes
If Settings won't open, or opens and closes at once, work through a few checks in order.
- Try a second method from this guide. If one works, the problem is the shortcut or menu, not the app.
- Restart the computer and try again. This clears most temporary glitches.
- Install any pending Windows updates, if you can reach them another way, since a broken build can cause the app to fail.
- If it still fails, re-register the app using the command shown below.
Get-AppxPackage *windows.immersivecontrolpanel* | Foreach {Add-AppxPackage -DisableDevelopmentMode -Register "$($_.InstallLocation)\AppXManifest.xml"}Executing this command re-registers the package and resolves launch failures. Run it in PowerShell, and open Terminal as administrator if it reports access errors. Wait for it to finish. Red error text can appear and is not always a sign of failure. Restart the PC afterward, then try Windows key + I again.
Power User Tips: ms-settings URI Schemes
Windows 11 uses URI (Uniform Resource Identifier) commands to jump straight to specific pages. Custom desktop shortcuts use these protocols well. The steps below build a direct link to display settings.
- Right-click an empty spot on the desktop.
- Choose New Shortcut The Create Shortcut wizard opens.
- Paste a command like
ms-settings:displayinto the location box. It builds a direct link to display configurations. - Click Next.
- Type a name for the shortcut, such as "Display settings".
- Click Finish. The new icon appears on the desktop.
- Double-click the icon to check that it opens the right page.
To remove the shortcut later, right-click it and choose Delete. Deleting it doesn't affect Settings itself.
Summary
Keyboard shortcuts like Windows key + I, Start menu entries, and command-line protocols give you reliable ways to reach Windows 11 Settings. Learn the keyboard shortcut for daily use, and keep one or two of the other methods in mind for when it fails. If the app itself won't open, restart first and re-register it if needed.
Have a question about this guide?
Answered by AI from this guide. Good questions may be added to this page — please don't include personal details.
Did this guide fix your problem?

About the Author
Richard
Tech Writer, IT Professional
Richard is a writer at Geek Rewind who turns complex IT tasks into clear, step-by-step guides. He draws on years of hands-on experience in system administration and enterprise IT operations, focusing on Windows, Linux and WordPress: the problems people actually run into, and the fixes that work. His server and WordPress guides come from systems he runs himself. Richard builds and maintains the platform behind Geek Rewind, from its Ubuntu servers and Nginx configuration to its custom WordPress plugins. Many new tutorials start with readers' questions, and he's always glad to answer them in the comments.
[…] First, open the Windows Settings app. […]
[…] First, open the Windows Settings app. […]
[…] First, open the Windows Settings app. […]
[…] First, open the Windows Settings app. […]
[…] First, open the Windows Settings app. […]
[…] First, open the Windows Settings app. […]
[…] First, open the Windows Settings app. […]
[…] open the Settings […]
[…] First, open the Settings app. […]
[…] First, open the Windows Settings app. […]
[…] First, open the Windows Settings app. […]
[…] First, open the Windows Settings app. […]
[…] First, open the Windows Settings app. […]
[…] First, open the Windows Settings app. […]
[…] First, open the Windows Settings app. […]
[…] First, open the Windows Settings app. […]
[…] open the Settings […]
[…] First, open the Windows Settings app. […]
[…] First, open the Settings app. […]
[…] First, open the Settings app. […]
[…] open the Windows 11 Settings app using the search function or pressing the Windows logo key + […]
[…] First, open the Windows Settings app. […]
[…] First, open the Windows Settings app. […]
[…] First, open the Windows Settings app. […]
[…] you can view these devices directly from the Windows Settings app. Use the steps below to access devices linked to your Microsoft account from Windows […]
[…] First, open the Windows Settings app. […]
[…] First, open the Windows Settings app. […]
[…] First, open the Windows Settings app. […]
[…] First, open the Windows Settings app. […]
[…] First, open the Windows Settings app. […]
[…] First, open the Windows Settings app. […]
[…] First, open the Windows Settings app. […]
[…] First, open the Windows Settings app. […]
[…] First, open the Windows Settings app. […]
[…] First, open the Windows Settings app. […]
[…] First, open the Windows Settings app. […]
[…] First, open the Windows Settings app. […]
[…] First, open the Windows Settings app. […]
[…] First, open the Windows Settings app. […]
[…] First, open the Windows Settings app. […]
[…] First, open the Windows Settings app. […]
[…] First, open the Windows Settings app. […]
[…] First, open the Windows Settings app. […]
[…] First, open the Windows Settings app. […]
[…] check the evaluation expiration date for your Insider Preview build, use the Settings app in Windows […]
[…] name in Windows refers to the full name of an account shown on the Sign-in screen, Start Menu, and Settings. This name can differ from the username used to sign in to the […]
[…] First, open the Windows Settings app. […]
[…] First, open the Windows Settings app. […]
[…] First, open the Windows Settings app. […]
[…] First, open the Settings app. […]
[…] First, open the Windows Settings app. […]
[…] First, open the Windows Settings app. […]
[…] First, open the Windows Settings app. […]
[…] First, open the Windows Settings app. […]
[…] First, open the Windows Settings app. […]
[…] First, open the Windows Settings app. […]
[…] First, open the Windows Settings app. […]
[…] has a built-in search feature that lets users search and find help content, apps, files, folders, settings, and quick answers from the web like weather reports, stock prices, currency converter, and much […]
[…] First, open the Windows Settings app. […]
[…] First, open the Settings app. […]
[…] open the Windows Settings […]
[…] First, open the Windows Settings app. […]
[…] First, open the Windows Settings app. […]
[…] First, open the Windows Settings app. […]
[…] First, open the Windows Settings app. […]
[…] First, open the Windows Settings app. […]
[…] First, open the Windows Settings app. […]
[…] First, open the Windows Settings app. […]
[…] Once enabled, open the Windows Settings app. […]
[…] Once enabled, open the Windows Settings app. […]
[…] To get started, first, open the Windows Settings app. […]
[…] For more step-by-step guides, visit how to use the Settings app in Windows 11. […]
[…] For more tips on using Windows 11, visit this easy guide. […]
[…] For more tips on using Windows 11, visit the Windows Settings guide. […]
[…] Open Windows Settings: Click the Start button and then the gear icon, or press Windows + I on your keyboard. More about opening Settings […]
[…] Open Windows Settings:You can do this by clicking the Start menu button (the Windows icon at the bottom-left corner) and then clicking Settings, or simply press Windows key + I on your keyboard. Learn more about opening Settings […]
[…] Learn more about opening Settings […]
[…] the Settings app on your PC. You can do this by clicking the Start menu and selecting Settings, or by pressing the […]
[…] Open the Settings app: Click the Start menu (the Windows icon on the bottom-left), then click Settings. Or press Windows key + I on your keyboard to open Settings right away. Learn more about opening Settings […]
[…] the Settings app. You can do this by clicking the Start menu and then Settings, or just press Windows key + I on […]
[…] the Windows Settings app. You can do this […]
[…] Open Windows Settings: Click the Start menu (the Windows icon at the bottom left), then click Settings. Or, press Windows key + I on your keyboard to open Settings directly. Learn more about opening Settings. […]
[…] Open the Settings app: […]
[…] Settings: Click the Start menu and choose Settings, or press Windows key + I on your keyboard. Learn more about opening Settings. Click System in […]
[…] Learn more about accessing Settings here: Open Settings in Windows 11. […]
[…] Open the Settings app: Click the Start menu (the Windows icon in the bottom-left corner), then click Settings. Or, press the keyboard shortcut Windows key + I to open Settings quickly. Learn more about opening Settings. […]
[…] We hope this guide helped you customize your touchscreen settings! If you want to learn more about Windows 11 tips, check out this guide on using the Settings app. […]
[…] How to Open the Settings App in Windows 11 […]
[…] the Windows Settings app. You can do this by clicking the Start button and selecting the gear icon, or by pressing Windows […]
[…] First, open the Settings app. […]
[…] Open the Windows Settings app: Click the Start menu button. Then click Settings. Or press Windows key + I on your keyboard. Learn more about opening Settings. […]
[…] the Windows Settings app. Click the Start button. Choose Settings. Or press Windows key + I on your […]
[…] Open Windows Settings: Click the Start menu (the Windows icon at the bottom left), then click Settings. Or press Windows key + I on your keyboard to open Settings quickly. Learn more about opening Settings […]
[…] Learn more about opening Settings […]
[…] More info on opening Settings: How to Access Settings in Windows 11 […]
[…] Open Settings: Click the Start menu (Windows icon at the bottom left) and select Settings, or press Windows key + I on your keyboard. Learn more about opening Settings […]
[…] in Windows 11. Then, one had to use the classic Control Panel app. Now, users can use the Windows Settings app to change what happens when the sleep button is […]
[…] First, open the Windows Settings app. […]
[…] Click the Start menu and select Settings. Or use the keyboard shortcut (Windows key + I) to open the Settings app. […]