How to Change WiFi Network Profile in Windows 11


Your network profile tells Windows 11 how much to trust the network you are on. It decides whether your PC is visible to other devices and whether file and printer sharing works. Windows has two main profile types for this: Public and Private.
A Public profile hides your PC on untrusted networks like coffee shops, hotels and airports. A Private profile allows printer sharing and device discovery, which suits a trusted home or office network. You can change the setting at any time in the Settings app under Network & internet. This guide covers three ways to do it: Settings, PowerShell and the Registry Editor.
Change your WiFi network profile in Windows 11 by going to Settings, then Network & internet, and selecting WiFi . Click your network name under Manage known networks and switch the Network profile type between Public and Private.
Quick Summary: Network Profile Settings
| Profile | Best For | Security Level | Sharing |
|---|---|---|---|
| Public | Coffee shops, Airports | High | Disabled |
| Private | Home, Office | Medium | Enabled |
Network profile settings control how your computer talks to other devices on a network. They do this mainly by switching Windows Defender Firewall rules and network discovery on or off for that connection, which helps keep your data safe.
Windows remembers the profile for each network separately. Your home WiFi can be Private while the café WiFi stays Public, and Windows applies the right settings each time you connect.
Understanding Public vs. Private Profiles
Understanding the difference between Public and Private network profiles is key to keeping your Windows 11 PC secure.
- Public: Your PC is hidden from other devices on the network, and sharing features are restricted. Use this for any network you do not control or fully trust. On the Settings page it is labelled as the recommended option.
- Private: Your PC can be discovered by other devices, and printer and file sharing can work. Use this only on networks you trust, such as your own home network.
PCs joined to a work domain may also show a Domain profile. That one is set by your organization and is not something you pick yourself.
Why does my network keep reverting to Public?
Windows sometimes resets the profile to Public for security reasons. If your router settings change or you connect to a new access point, Windows treats it as a fresh, untrusted connection.
When that happens, Windows may ask whether you want other devices to find your PC. Choosing the wrong answer, or dismissing the prompt, can leave you on Public. If your printer or shared folders suddenly vanish from a network that worked before, check the profile first.
Is it safe to set my home network to Public?
Setting the profile to Public blocks your ability to use network printers or shared folders. Only use Public at home if you have no need for local device communication.
The reverse matters too. Do not leave a Private profile on a network you share with strangers, because other devices on it can then see your PC and try to connect.
Method 1Using Windows Settings (Easiest)
Follow these steps to change the profile through the Settings app. No restart is needed, and the change applies straight away. You do not need administrator rights on most PCs, but a work-managed PC may lock the option.
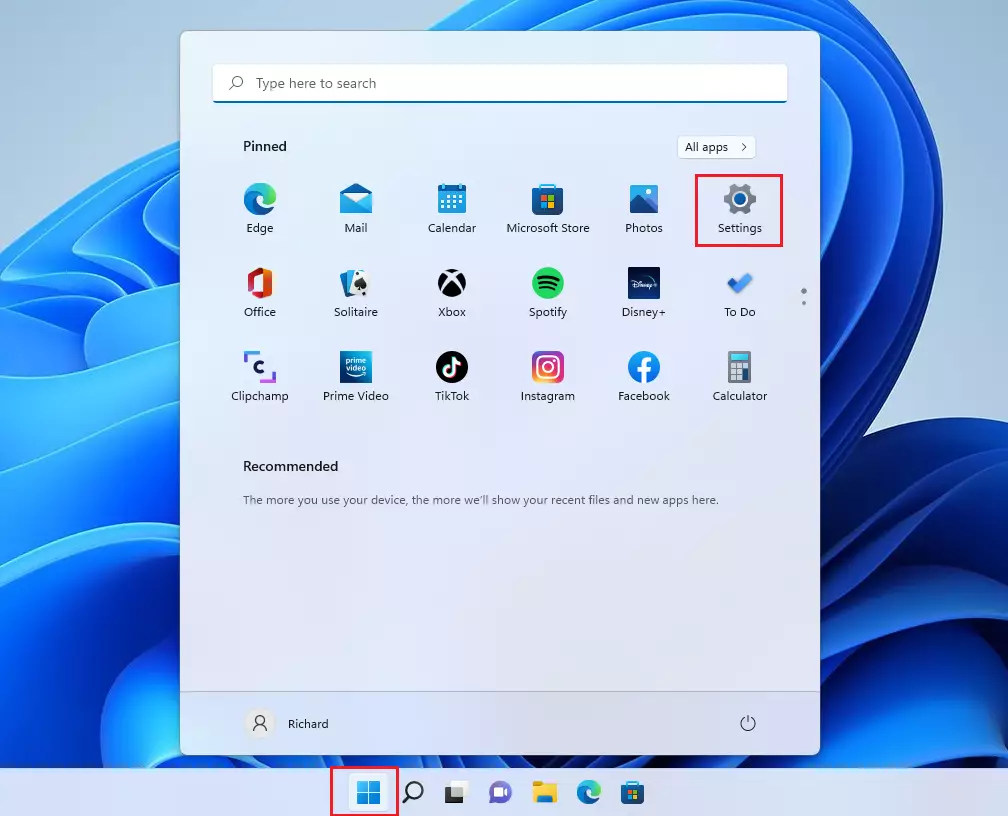
- Open Settings by pressing Windows + I. The Settings window opens.
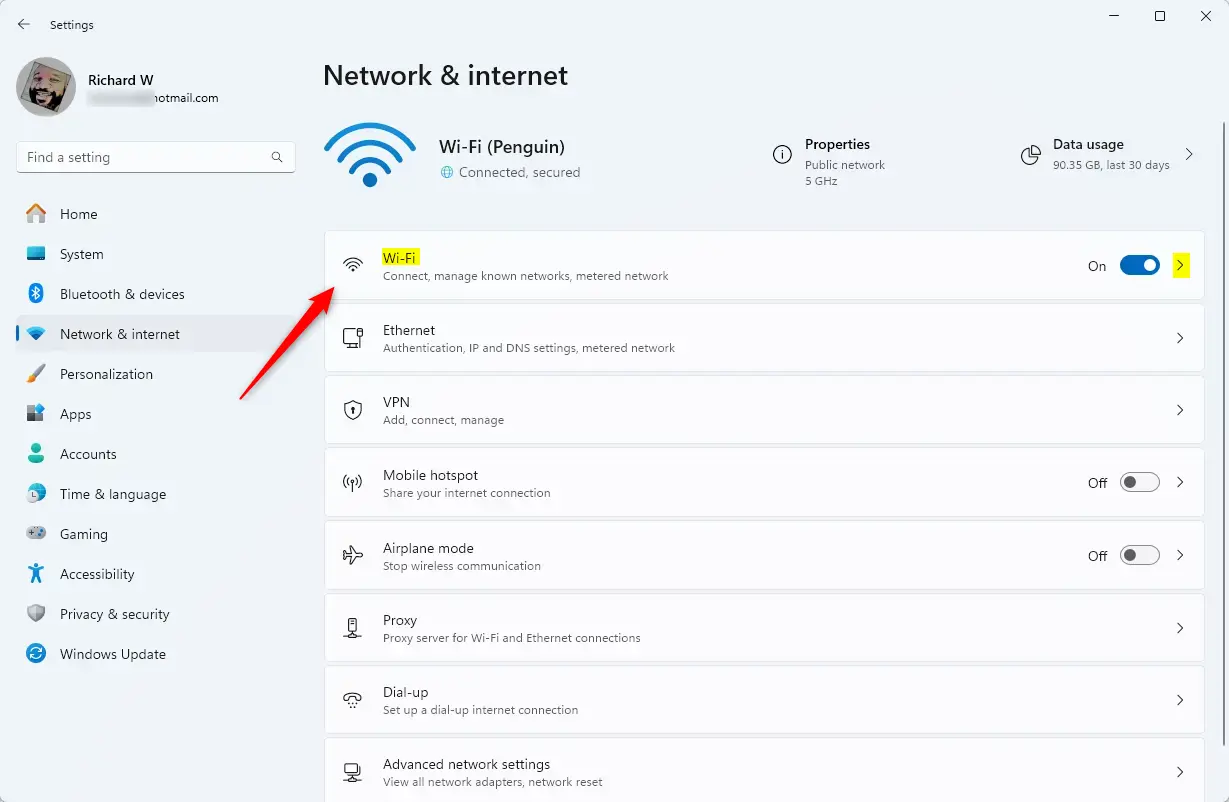
- Go to Network & internet in the left-hand list. The main network options appear on the right.
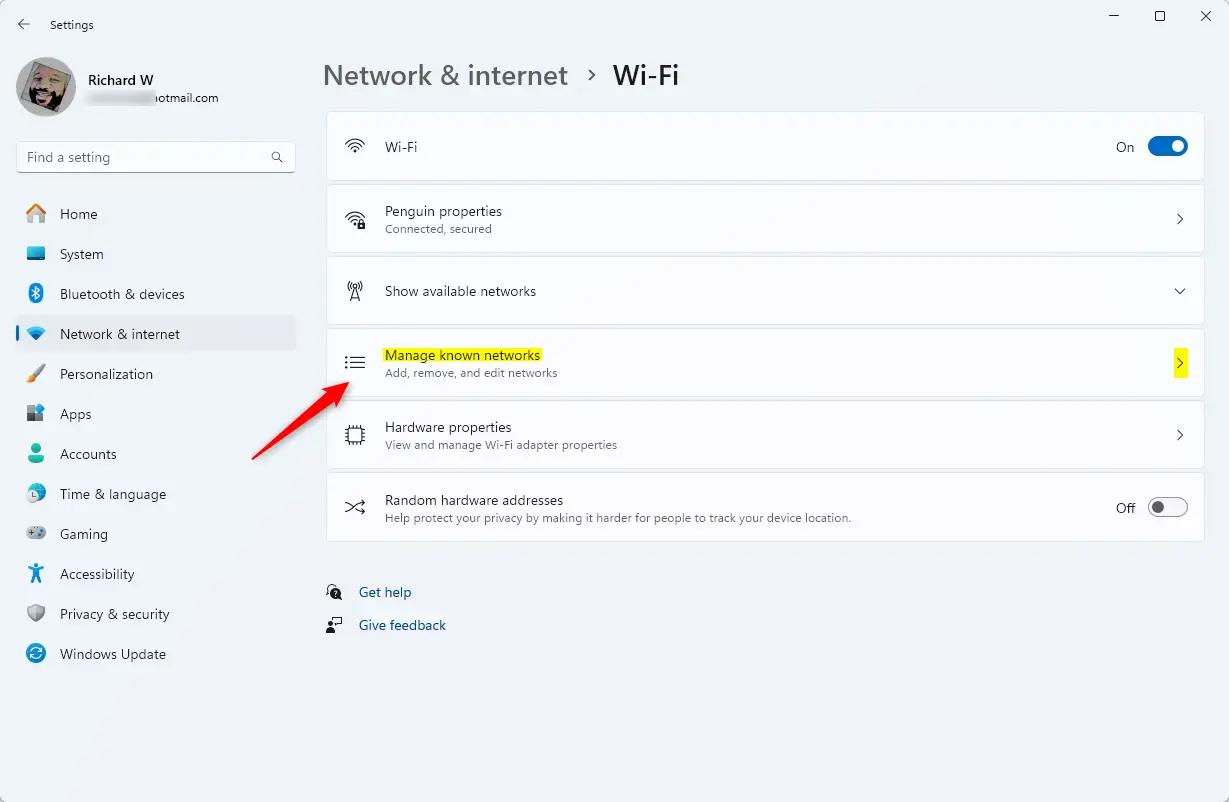
- Click WiFi. You now see the WiFi on/off switch and a list of options such as Show available networks and Manage known networks. If WiFi is missing, your PC may have no WiFi adapter, or the adapter is disabled.
- Select Manage known networks. A list of every WiFi network your PC has saved appears.
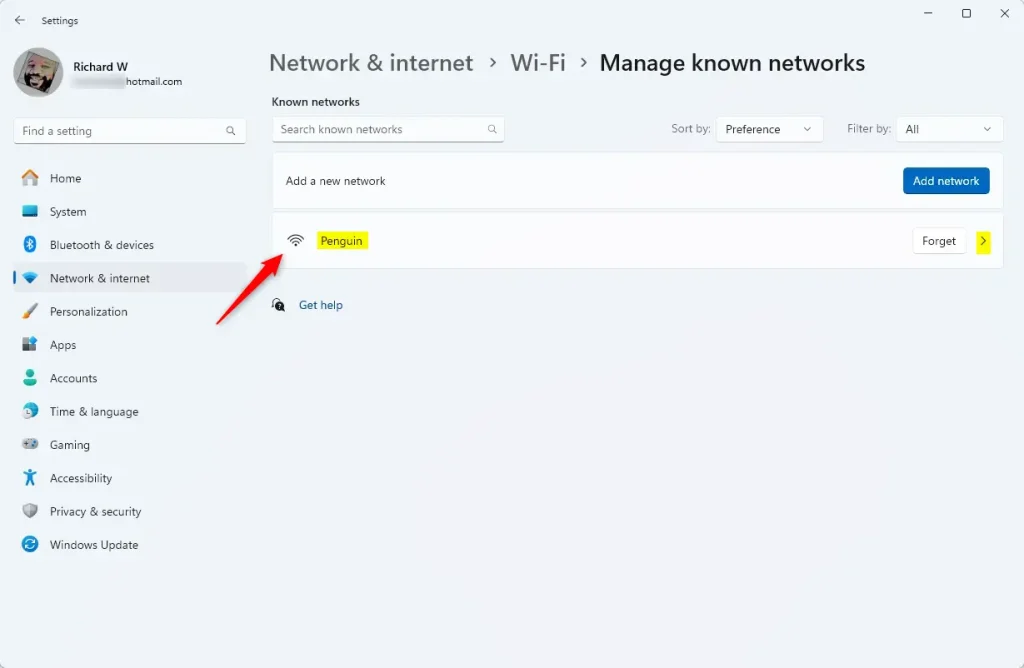
- Click your network name. Its properties page opens.
The profile option is normally available for the network you are connected to right now. If you do not see it, connect to that network first. You can also go back to Network & internet WiFi and open the properties of the connected network from there.
- Under Network profile type, choose Public or Private. The choice takes effect immediately, and the page does not ask you to confirm.
To undo the change, return to the same page and pick the other option.
After you change the setting, the page should show your choice as selected. If you switched to Private, other devices on the network can now find your PC. If you switched to Public, your PC is hidden again.
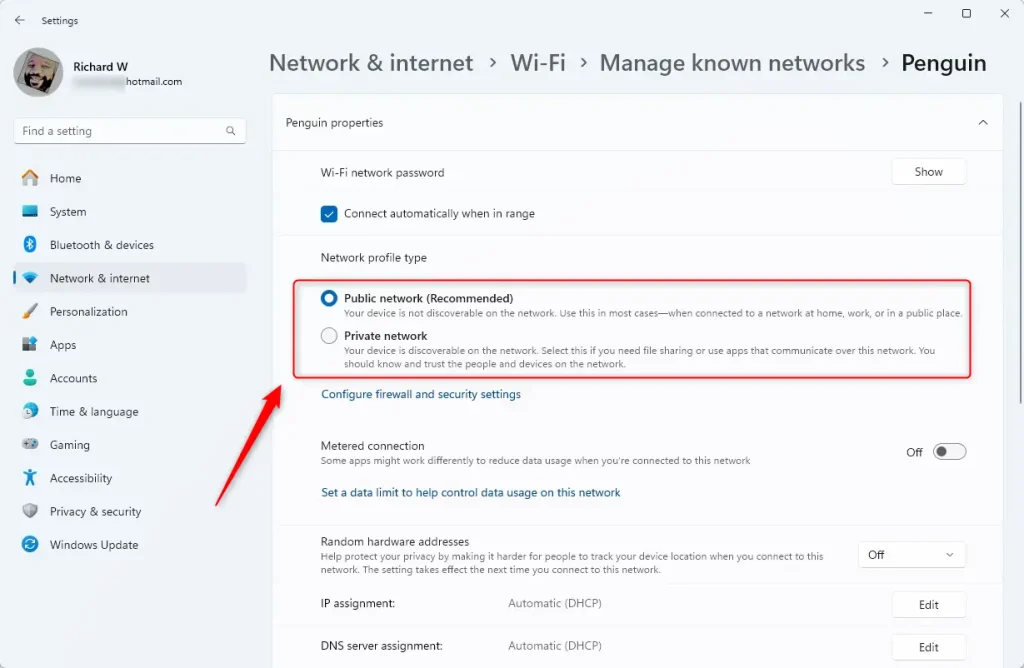
If the Network profile type setting is missing or greyed out, you are probably not connected to that network. A device managed by your employer or school may also restrict it. In those cases, try the PowerShell method below, or ask your IT administrator.
Method 2PowerShell (Admin Required)
PowerShell lets you change your WiFi network profile in Windows 11 using a quick command line tool instead of the main settings app. This method works well if you prefer text commands and need to switch your connection type between public and private without clicking through menus.
Right-click the Start button and choose Terminal (Admin). Approve the User Account Control prompt. Changing a profile from the command line generally needs an elevated window, so a normal window may return an access error.
Use the Get-NetConnectionProfile command to see your current status. It lists each connection with its name and its current category. To change it, use the Set-NetConnectionProfile command:
Set-NetConnectionProfile -Name "YourNetworkName" -NetworkCategory Private
Replace "YourNetworkName" with your actual network name, exactly as it appears in the output of the first command. This works for both WiFi and Ethernet. Run the first command again afterwards to confirm the new category. To undo the change, run the second command again with the other profile type.
Method 3Windows Registry (Advanced)
Registry Editor (a database for low-level system settings) lets you change your WiFi network profile by editing system keys directly when standard settings fail. This advanced method requires you to open the registry and update specific network values manually to force Windows to recognize your network correctly.
Use this method only if the Settings app and PowerShell do not work. A wrong edit in the registry can cause problems, so back up the registry or create a restore point first. You need an administrator account.
- Press Windows + R, type
regedit, and hit Enter. Click Yes if User Account Control asks for permission. Registry Editor opens.
- Navigate to the following location in the Registry Editor:
HKEY_LOCAL_MACHINE\SOFTWARE\Microsoft\Windows NT\CurrentVersion\NetworkList\Profiles. You should see one or more subfolders with long ID names.
- Click each subfolder in turn and look at the ProfileName value in the right-hand pane. Stop when it matches your network name.
- In that same subfolder, double-click the Category value and change it: 0 for Public, 1 for Private. Click OK.
Close Registry Editor, then disconnect and reconnect to the network. If the change does not show up, restart the PC. To undo it, set the value back to what it was before.
Troubleshooting Connectivity
If you cannot see other devices, ensure your profile is set to Private. If you still have issues, check your Windows firewall settings to confirm that file and printer sharing is allowed through the firewall.
Also confirm that the other device is on the same network, and that the profile is Private on both PCs if both run Windows. If the profile keeps switching back to Public, reconnect to the network and check whether Windows asked a question about discovery that you dismissed.
Summary
Always use Public for untrusted networks and Private for home. This adjustment helps balance your security needs with the convenience of sharing files across your local network.
If you are unsure which to choose, pick Public. You can switch to Private later when you actually need to share something.
Review your saved networks now and then in Manage known networks. Remove any you no longer use, so your PC does not reconnect to them automatically.
Have a question about this guide?
Answered by AI from this guide. Good questions may be added to this page — please don't include personal details.
Did this guide fix your problem?

About the Author
Richard
Tech Writer, IT Professional
Richard is a writer at Geek Rewind who turns complex IT tasks into clear, step-by-step guides. He draws on years of hands-on experience in system administration and enterprise IT operations, focusing on Windows, Linux and WordPress: the problems people actually run into, and the fixes that work. His server and WordPress guides come from systems he runs himself. Richard builds and maintains the platform behind Geek Rewind, from its Ubuntu servers and Nginx configuration to its custom WordPress plugins. Many new tutorials start with readers' questions, and he's always glad to answer them in the comments.
[…] default, your Windows device with WiFi adapters will allow users to enable or disable the ability to connect to a WiFi network. No particular […]
[…] More details here: Change network profile in Windows 11 […]