How to Turn On or off File and Printer Sharing in Windows 11

File and printer sharing in Windows 11 lets other computers on your home network see and use your shared folders and printers. You can send a document from a laptop to a printer connected to your desktop PC without a USB cable or a flash drive.
You turn the feature on or off in the network settings, and it only takes a few clicks. This guide covers two ways to do it: the Settings app, and PowerShell commands for people who prefer typing. Turn it on when you want to share, and turn it off again to keep the PC private.
Open Settings , press Win+I, go to Network & internet Advanced network settings Advanced sharing settings, then toggle File and printer sharing On or Off for Private or Public networks. Changes apply immediately without restarting.
What is File and Printer Sharing?
File and Printer Sharing is a built-in Windows 11 feature. It lets you share files, folders, and printers with other computers on your home or office network. Other people can open your documents or use your printer without a USB drive, so moving files between computers is much faster.
- File sharing: Lets others on your network see, copy, or change files in a shared folder.
- Printer sharing: Lets others use a printer connected to your computer.
Windows sorts every connection into a network type: Domain, Private, or Public. Home and small office networks are normally Private. Public is for places like cafes and airports. Domain is for work networks managed by a company server. You can turn sharing on or off for each type separately. That way you can share at home and stay locked down on public Wi-Fi .
Turning this setting on does not share anything by itself. It only allows sharing to work. You still choose which folders and printers to share, and with whom. If you turn it off, other devices lose access to everything you shared. Your shared folder settings stay in place, so they work again when you turn it back on.
If you are using a standard account, Windows will ask for an administrator password.
Option 1Turn File and Printer Sharing On or Off Using Windows Settings
The Settings app is the easiest method because you can see every option on screen. It works the same on Windows 11 Home and Pro. Follow these steps to open the sharing page.
- Press Win + I on your keyboard to open Settings. The Settings window opens.
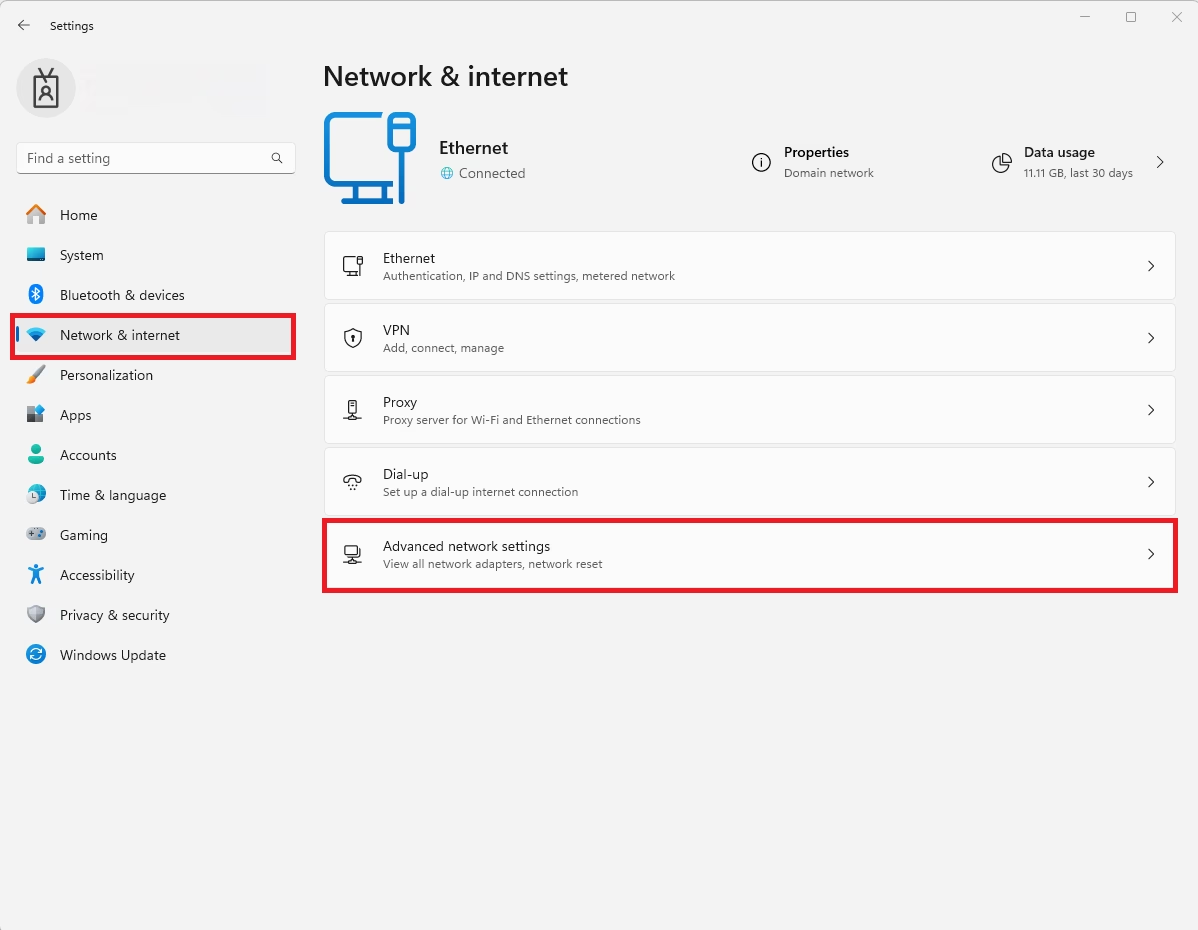
- Click Network & internet on the left side. The right side shows your Wi-Fi or Ethernet connection and other network options.
- On the right, click Advanced network settings. You will see a list of your network adapters and more related options.
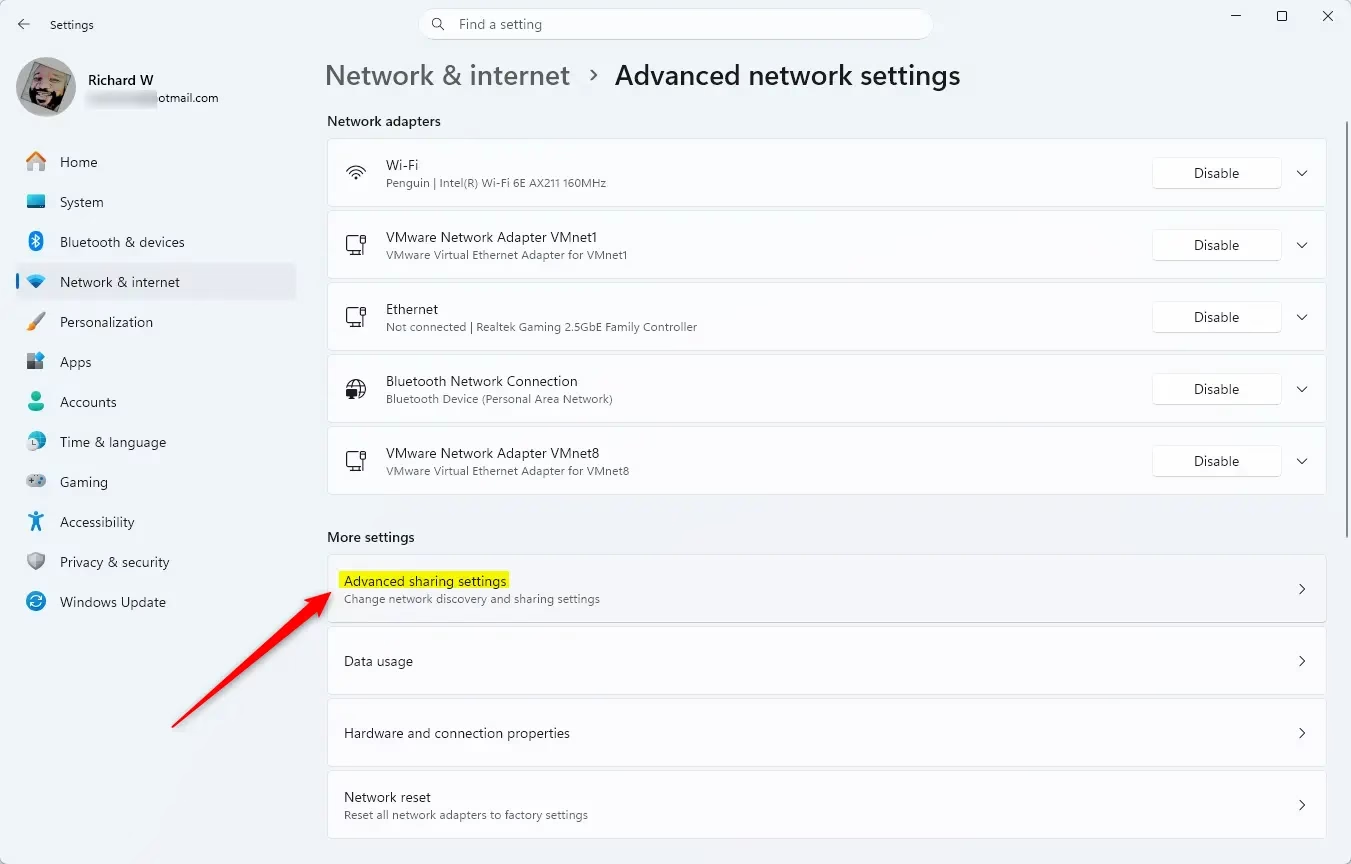
- Under More settings, click Advanced sharing settings. A page opens with a section for each network type.
This page is where Windows 11 keeps the sharing switches. Use it when you want to control network access visually, with no commands to type.
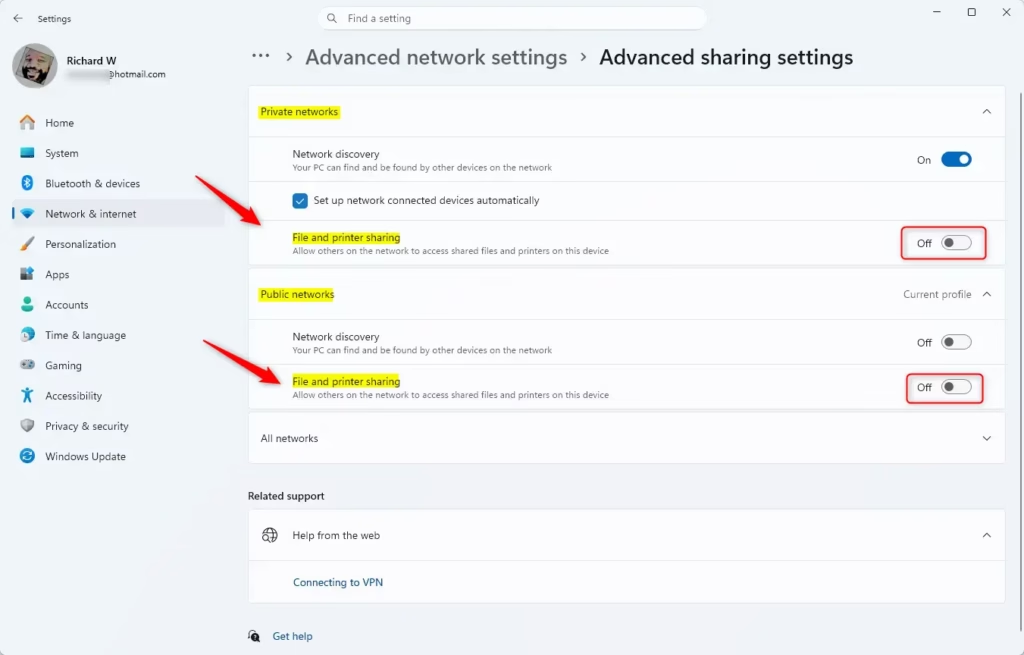
- Click the arrows next to Private networks and/or Public networks to expand each section. Each section shows its own switches, including Network discovery and File and printer sharing.
- Set the File and printer sharing switch to On or Off for each network type as you wish. The switch label changes to match your choice.
By default, file and printer sharing is on for private networks, and off for public networks (to keep you safer). I recommend leaving Public off unless you have a specific reason to change it.
If you are connected to a work or school domain, you may also see a Domain networks section. That section only appears when your PC is joined to a domain. Its settings may be controlled by your organization and can be greyed out or reset by policy.
If other computers still cannot see yours, check that your current connection is set to the network type you changed. In Settings Network & internet, open your Wi-Fi or Ethernet connection and look at Network profile type. A home connection set to Public network will use the stricter Public rules. A third-party firewall or security suite can also block sharing even when the Windows switch is on.
Changes apply right away. You do not need to restart. When you are done, close the Settings window. To undo a change, come back to this page and flip the switch to its old position.
Option 2Turn File and Printer Sharing On or Off Using PowerShell
This option is for users who are comfortable using commands. It is also handy when you want to change several network types at once, or when you manage more than one PC. Both ways change the same underlying setting, so you can use either and check the result in Settings.
- Right-click the Start button and select Windows Terminal (Admin). On newer builds of Windows 11, this entry is labelled Terminal (Admin).
- Click Yes if the User Account Control prompt appears. A Terminal window opens with a prompt.
- Make sure you are in the Windows PowerShell tab. If the tab says something else, such as Command Prompt, open a new tab with the down arrow at the top of the window and choose Windows PowerShell.
To Turn On File and Printer Sharing
Use the commands below to turn File and Printer Sharing on. The first command covers every network profile at once, which saves you clicking through several menus. The other three change only one profile, so choose those if you want sharing on in one place only. Type or paste the command you want at the prompt and press Enter.
- All network profiles:PowerShell
Get-NetFirewallRule -Group '*-28502*' | Where-Object 'Profile' -Match 'Any' | Set-NetFirewallRule -Enabled 'True' - Domain network:PowerShell
Get-NetFirewallRule -Group '*-28502*' | Where-Object 'Profile' -Match 'Domain' | Set-NetFirewallRule -Enabled 'True' - Private network:PowerShell
Get-NetFirewallRule -Group '*-28502*' | Where-Object 'Profile' -Match 'Private' | Set-NetFirewallRule -Enabled 'True' - Public network:PowerShell
Get-NetFirewallRule -Group '*-28502*' | Where-Object 'Profile' -Match 'Public' | Set-NetFirewallRule -Enabled 'True'
If you see an access error, close the window and reopen Terminal as administrator. Avoid turning sharing on for the Public profile unless you really need it, since anyone on that network could try to reach your PC.
To Turn Off File and Printer Sharing
Use the commands below to turn File and Printer Sharing off. The first command stops sharing on all network profiles at once, which is the quickest way to tighten security. The other three turn it off for a single profile only. Run the one that fits, then press Enter.
- All network profiles:PowerShell
Get-NetFirewallRule -Group '*-28502*' | Where-Object 'Profile' -Match 'Any' | Set-NetFirewallRule -Enabled 'False' - Domain network:PowerShell
Get-NetFirewallRule -Group '*-28502*' | Where-Object 'Profile' -Match 'Domain' | Set-NetFirewallRule -Enabled 'False' - Private network:PowerShell
Get-NetFirewallRule -Group '*-28502*' | Where-Object 'Profile' -Match 'Private' | Set-NetFirewallRule -Enabled 'False' - Public network:PowerShell
Get-NetFirewallRule -Group '*-28502*' | Where-Object 'Profile' -Match 'Public' | Set-NetFirewallRule -Enabled 'False'
No restart is needed. To confirm the change, open Settings Network & internet Advanced network settings Advanced sharing settings and check the File and printer sharing switch. To undo it, run the matching command from the turn-on list. When finished, close PowerShell.
Summary
- File and printer sharing lets you share files and printers with other devices on your network.
- You can control sharing separately for different network types: Domain, Private, and Public.
- You can use the easy Settings app or PowerShell commands if you prefer.
- Make sure you are signed in as an administrator before changing these settings.
- Knowing how to manage sharing helps keep your network safe and useful.
You can manage file and printer sharing through either the Settings app or PowerShell commands, depending on how you prefer to work. Control access separately for each network type. That keeps your device secure while still letting trusted computers reach your shared files and printers. Keep sharing on for Private networks you trust, such as your home network, and leave it off for Public ones.
Was this guide helpful?
100% of readers found this helpful (1 votes)

About the Author
Richard
Tech Writer, IT Professional
Richard is a writer at Geek Rewind who turns complex IT tasks into clear, step-by-step guides. He draws on years of hands-on experience in system administration and enterprise IT operations, focusing on Windows, Linux and WordPress: the problems people actually run into, and the fixes that work. His server and WordPress guides come from systems he runs himself. Richard builds and maintains the platform behind Geek Rewind, from its Ubuntu servers and Nginx configuration to its custom WordPress plugins. Many new tutorials start with readers' questions, and he's always glad to answer them in the comments.



No comments yet — be the first to share your thoughts!