How to Share Files with an App in Windows 11

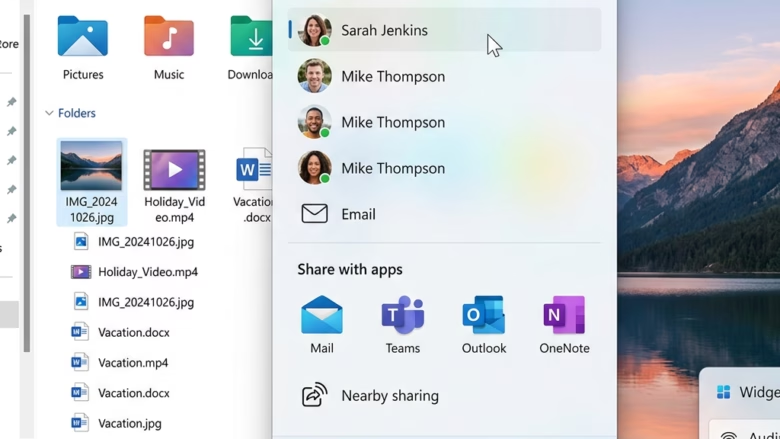
Sharing files with an app in Windows 11 sends documents, photos, and links straight to installed programs from the main share panel. You don’t have to save or upload them first. You can drop a picture into the Photos app or send a link to your messaging app in a few clicks.
Microsoft refined this feature in the Windows 11 22H2 update to speed up file transfers and remove clutter from the menu. Right-click a file, pick the share option, and choose the app you want. The same share panel is used whether you start from File Explorer , a browser, or another app. What you see in the panel depends on which apps you have installed and what type of file you picked.
Right-click a file in File Explorer , select Share, then choose an app from the panel that opens. If your app isn’t listed, click More options at the bottom to see the full list of compatible programs. The file transfers without saving or uploading first.
Find What You Want to Share
Start by finding the file you want to send. Photos, documents, and web links all work with this method.
- Open File Explorer from the taskbar or the Start menu .
- Browse to the folder that holds the file. Use the folder list on the left, or type the file name into the search box at the top right.
- Click the file once to select it. It should now be highlighted.
Windows key + E shortcut on your keyboard.If you want to send several files at once, hold Ctrl while clicking each one. All of them will be highlighted and will go through the share panel together. Some apps accept only one file at a time, so you may need to repeat the steps.
Start the Share Action
Next, open the Share command. There are two ways to do it in File Explorer , and both lead to the same panel.
- Select the file you want to send.
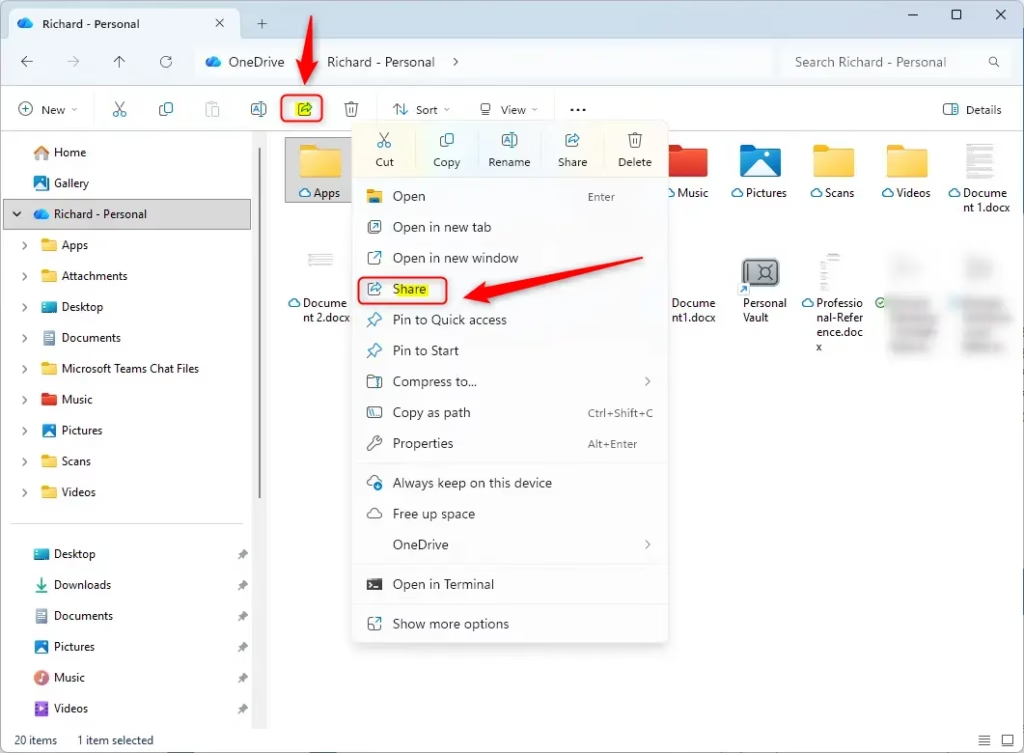
- Right-click the file. In the Windows 11 menu, choose Share. On 22H2 and some other builds this is an icon (an arrow leaving a box) in the row of icons in the menu, not a text label. Hover over the icons if you are not sure which is which.
- Or, with the file still selected, click the Share button at the top of the File Explorer window.
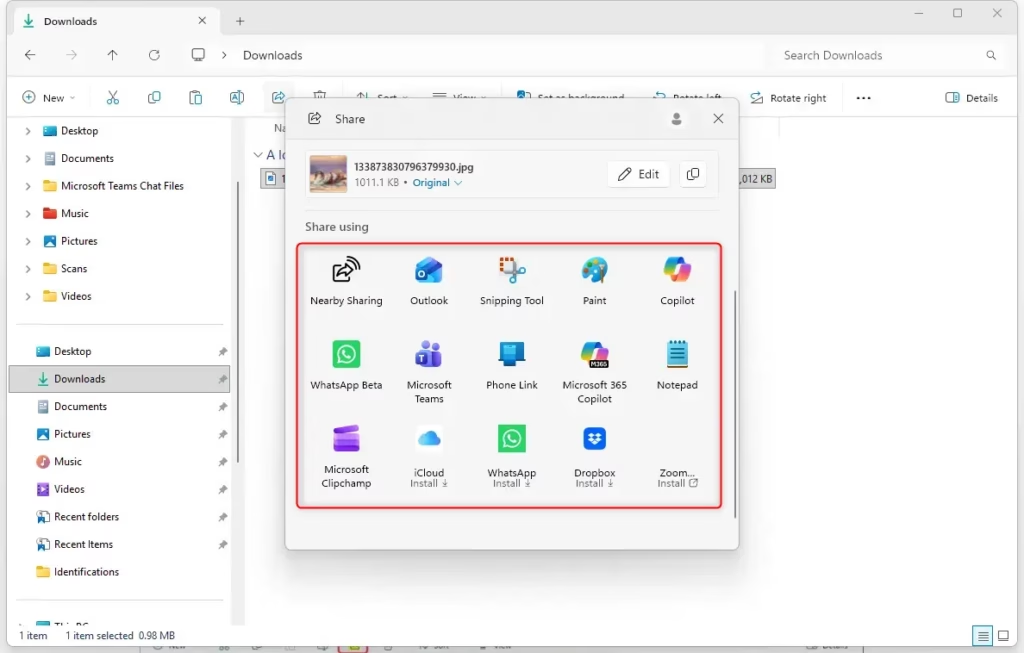
- Wait a moment. The share panel opens and lists compatible apps and nearby devices.
This lets you send documents, photos, or videos to other applications and nearby devices without opening them first. If you can't find Share, check that a file is actually selected. The command is not available when nothing is selected, and it may be missing for some items, such as certain system folders.
You can start a share from other places too:
- In File Explorer: Click on the file you want to share. Look for a "Share" option. In Windows 11, this is often at the top of the File Explorer window. You can also right-click the file and select "Share" from the menu that appears.
- In a Web Browser: Many browsers have a share icon (it might look like an arrow pointing out of a box) or a "Share" option in their menus.
- From Other Apps: Some apps have their own sharing features. Look for a share icon or menu option inside the app itself.
It is easy to click the wrong file in a long list.
See More Sharing Options
The share panel doesn't always show every app at first. If your preferred app is missing, expand the list.
- Look at the bottom of the share panel for More options or the three dots.
- Click it. The list expands.
- Scroll through the list to find your app. The panel now shows every installed program on your computer that can accept the type of file you selected.
Depending on your build, the link may read "(…) More apps" or "More options". Both do the same thing: they expand the view to show the full list of compatible software on the machine.
Tip: A missing app usually means it doesn't support the type of file you chose, or it didn't install fully. Some programs have to be installed from the Microsoft Store to appear in the system share panel. If an app is still missing, check whether it is installed, try reinstalling it from the Store, and then share again.
Choose Where to Send It
Now choose where the file goes. Windows 11 shows every app that can handle it, from email clients to cloud storage services and messaging apps.
- Find the app in the share panel.
- Click its icon.
- Wait for the app to open. Windows launches that program and hands over your file at the same time, so the file should already be loaded in the app's window.
This direct handoff saves you from saving the file and uploading it manually. The target program starts with the file already in place, so there is no import step. If the app asks you to sign in first, do that, and the file should appear afterward.
Finish in the App
The last part happens inside the app that just opened. Windows has delivered the file, but you still have to finish the job there. What you need to do depends on the app:
- If you share a file to an email app, a new email will likely open with the file already attached. You just need to add the recipient's email, a subject, and your message, then click send.
- If you share a link to a webpage to a note-taking app, a new note might be created with the link already there.
- If you share an image to a photo editing app, the image might open right up for you to edit.
For an email, for example, type the recipient address and click Send to complete the transfer.
Practical Tip: Read any prompts the app shows. Some apps ask you to confirm the destination or pick a contact before they send anything, and nothing leaves your PC until you confirm.
Review and Send
Before you click the final send button, double-check the recipient address and the attached contents inside the target application.
- Check the recipient name or address letter by letter. Similar-looking contacts are a common cause of mistakes.
- Check that the attachment or pasted link is the right one. Look at the file name and size.
- Click send only when both are right.
These checks prevent accidental data leaks. For confidential files, confirm that the recipient is the person you intend before you send. Most apps can't take a message back once it is sent.
Reference:
Summary
Sharing a file with an app takes three steps: select the file, click Share, and finish the job in the destination app.
Have a question about this guide?
Answered by AI from this guide. Good questions may be added to this page — please don't include personal details.
Did this guide fix your problem?

About the Author
Richard
Tech Writer, IT Professional
Richard is a writer at Geek Rewind who turns complex IT tasks into clear, step-by-step guides. He draws on years of hands-on experience in system administration and enterprise IT operations, focusing on Windows, Linux and WordPress: the problems people actually run into, and the fixes that work. His server and WordPress guides come from systems he runs himself. Richard builds and maintains the platform behind Geek Rewind, from its Ubuntu servers and Nginx configuration to its custom WordPress plugins. Many new tutorials start with readers' questions, and he's always glad to answer them in the comments.
No comments yet — be the first to share your thoughts!