How to Manage Wi-Fi Settings in Windows 11

Wi-Fi lets your Windows 11 computer connect to the internet without wires. Sometimes, you might want to turn Wi-Fi on or off to save battery or keep your network safe. This guide will show you easy steps to manage your Wi-Fi settings, and how an administrator can stop others from turning Wi-Fi on or off.
Click the Wi-Fi icon on the taskbar and then click the Wi-Fi button to toggle it on or off. Administrators can disable this option entirely by modifying a registry setting.
Turning Wi-Fi On or Off in 🪟 Windows 11
By default, you can turn Wi-Fi on or off anytime on your Windows 11 device. Here’s how:
- Click the Wi-Fi icon on the right side of your taskbar (near the clock).
- Click the Wi-Fi button to toggle it on or off.
- If Wi-Fi is on, your device will try to connect to known networks automatically.

Why You Might Want to Disable Wi-Fi
- Save battery: Turning off Wi-Fi when you don’t need it helps your laptop last longer.
- Control access: If you share your computer, you might want to stop others from turning Wi-Fi on or off.
How Administrators Can Stop Users from Changing Wi-Fi Settings
If you are managing a shared or work computer, you might want to prevent others from turning Wi-Fi on or off. This can be done by changing a setting in the Windows Registry. (Note: This is for advanced users or administrators only. Be careful when using Registry Editor.)
Steps to Restrict Wi-Fi Switching
- Click the Start Menu, type Registry Editor, and open the app.
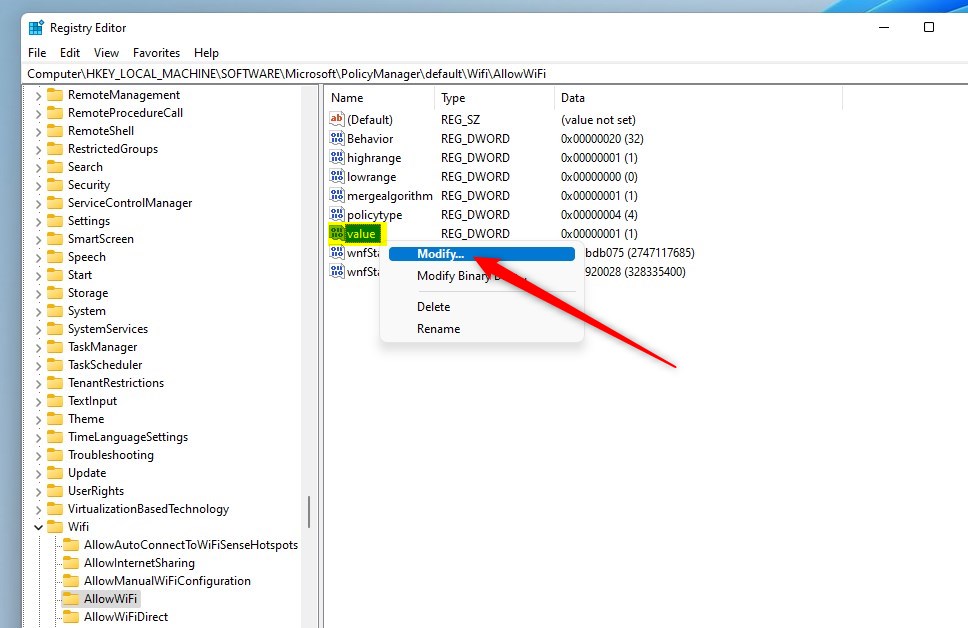
- In the Registry Editor window, find this folder path on the left side (you can copy and paste it into the address bar at the top):
HKEY_LOCAL_MACHINE\SOFTWARE\Microsoft\PolicyManager\default\WifiAllowWiFi - Click on the AllowWiFi folder.
- On the right side, find the entry named value (it should be a type called REG_DWORD).
- Double-click on value to open a small window where you can change the number.
- Set the number to:
- 0 to disallow Wi-Fi (users cannot turn it on or off),
- 1 to allow Wi-Fi (default setting).
- Click OK to save.
- Close Registry Editor.
After this, users will (or won’t) be able to turn Wi-Fi on or off, depending on the value you set.
Summary
- You can easily turn Wi-Fi on or off from the taskbar in Windows 11.
- Turning Wi-Fi off can save battery or prevent unwanted network access.
- Administrators can use Registry Editor to stop users from changing Wi-Fi settings by setting a special value.
If you want to learn more about using Windows 11, check out Geek Rewind for easy guides and tips.
Was this guide helpful?

About the Author
Richard
Tech Writer, IT Professional
Richard, a writer for Geek Rewind, is a tech enthusiast who loves breaking down complex IT topics into simple, easy-to-understand ideas. With years of hands-on experience in system administration and enterprise IT operations, he’s developed a knack for offering practical tips and solutions. Richard aims to make technology more accessible and actionable. He's deeply committed to the Geek Rewind community, always ready to answer questions and engage in discussions.


No comments yet — be the first to share your thoughts!