How to Enable or Disable Indexing File Contents on Specific Drive in Windows 11

Indexing file contents in Windows 11 lets Windows search inside the actual text of your documents, PDFs, and emails rather than just checking file names. Turning this feature on or off for a specific drive helps you speed up searches or save disk space on your PC.
To enable or disable indexing file contents on a specific drive in Windows 11, right-click the drive in “This PC,” select Properties, and then check or uncheck the “Allow files on this drive to have contents indexed” box. Click OK to save.
What is Search Indexing?
Windows search indexing is a built-in feature that creates a catalog of file names, locations, and text contents on your computer. When you use windows indexing file contents, Windows checks this saved list instead of scanning your whole hard drive every time, which lets you find documents and emails much faster through the search bar.
Windows file indexing notes file names and locations. The indexing feature also reads the text within documents, emails, and other files. This capability means you can search for a specific phrase you remember from a document, and Windows can find that document.
However, indexing the text inside every file uses storage space and computer power. For most people, the default settings work fine. But if you are low on space, or if you have a drive where you only need to search by file name, you might want to change these settings. There are two main choices for how Windows indexes files on a drive:
- Properties Only: Windows will index the file name, date, size, and other details about the file. It will not read the text inside. You can still search for file names, but you won’t be able to search for specific words inside documents.
- Properties and Content: This is the default setting. Windows indexes both the file’s details and the text content inside. This offers the most powerful search, letting you find files based on what’s written inside them.
You can control this setting for each drive on your computer separately. Here’s how:
How to Change How Windows Indexes File Contents on a Drive
If you are on your personal computer, you are likely logged in as an administrator. If you are on a work computer, you may need to ask your IT department for help.
Step 1Open "This PC"
Open This PC in File Explorer by pressing the Windows key + E on your keyboard or by clicking the folder icon on your taskbar. This built-in Windows screen displays all your connected hard drives and storage spaces so you can select the specific drive where you want to change windows indexing file contents.
- Press the Windows key + E on your keyboard. This quickly opens File Explorer.
- Click the yellow folder icon on your taskbar.
Once File Explorer is open, click on This PC in the left-hand menu. This shows you all the drives on your computer, like your C: drive and any others.
Step 2Access Drive Properties
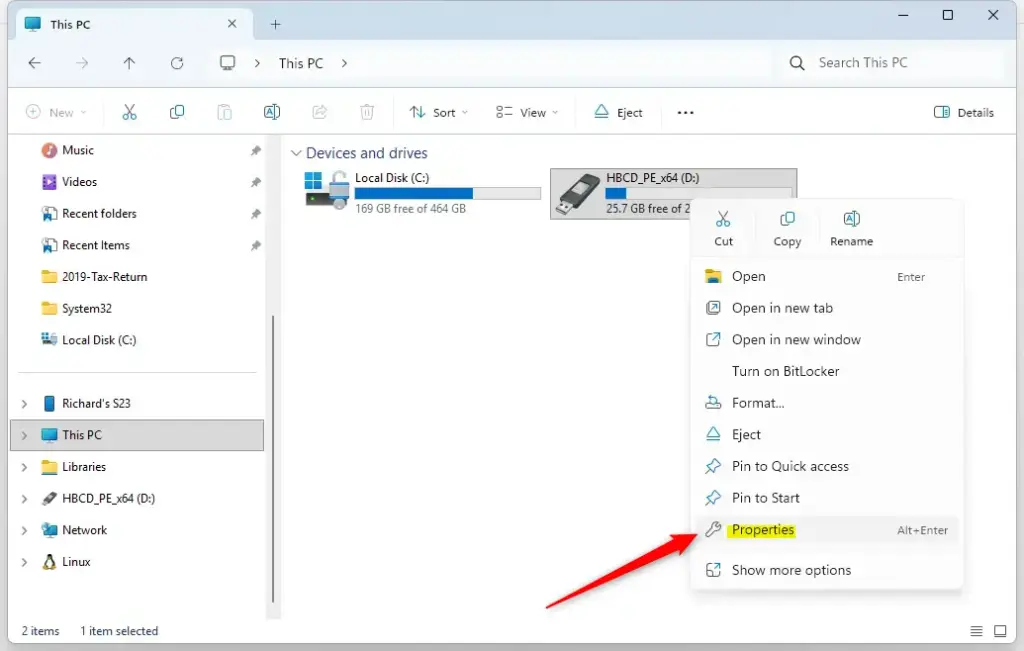
Access drive properties in Windows 11 by opening This PC, right-clicking the specific hard drive you want to change, and selecting Properties from the pop-up menu. This opens a new window containing the file system details, storage space usage, and the controls needed to manage windows indexing file contents on that drive.
Right-click on the drive you chose. A menu will appear. Click on Properties from the menu. This option sits near the bottom.
Step 3Adjust the Indexing Option
Adjust the indexing option by checking or unchecking the box labeled "Allow files on this drive to have contents indexed in addition to file properties" at the bottom of the General tab. Checking this box turns on windows indexing file contents for faster text searches, while unchecking it stops Windows from reading inside your files.
- To Enable Indexing Contents: Make sure this box is checked. This is the default setting and lets Windows read the text inside your files for faster searching.
- To Disable Indexing Contents: Uncheck this box. Windows will then only index file names and properties, not the text inside.
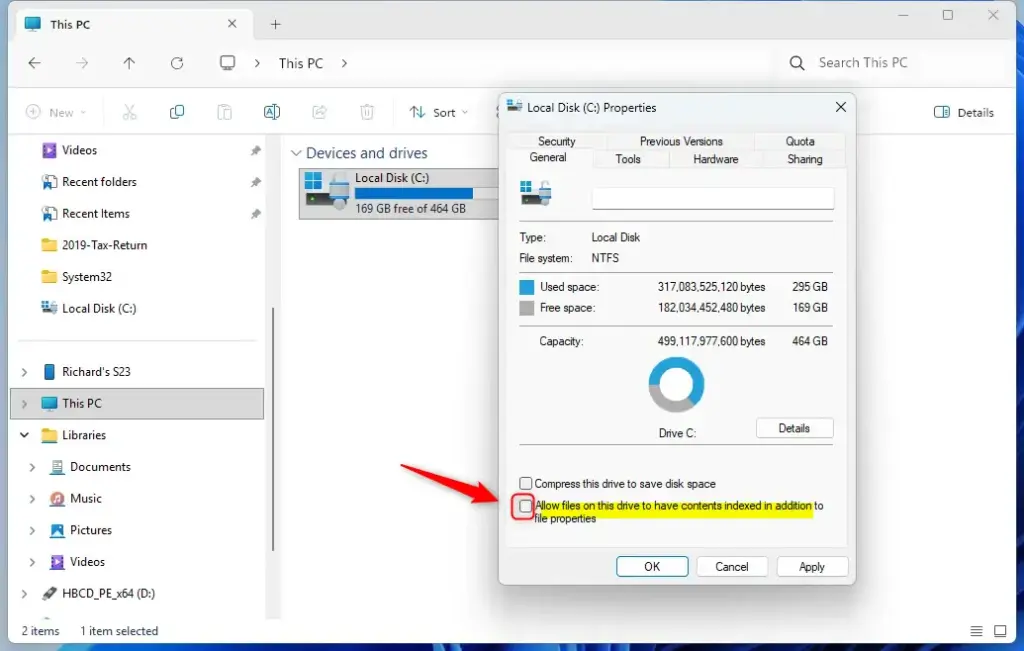
After you make your choice to index or not index file contents, click the OK button at the bottom of the Search Indexing window to save your change. This ensures your selection is applied to the specified drive in Windows 11.
Step 4Choose Where to Apply Changes
Choose where to apply changes by selecting either the main drive only or the drive, subfolders, and all files when Windows prompts you after altering your settings. Applying changes to all subfolders and files is the recommended choice for windows indexing file contents to ensure search works correctly across everything stored there.
- Apply changes to this drive only: This changes the setting only for the drive you selected.
- Apply changes to this drive, subfolders and files (Recommended): This is the default and usually the best choice. It applies the setting to the entire drive, including all folders and files inside. This keeps the setting the same across your drive.
Choose the option that works best for you. For most users, the recommended option (applying to the drive, subfolders, and files) is the best choice. Then, click OK.
Step 5Approve the Changes (If Asked)
Sometimes, especially if you are changing settings on your main Windows drive (C:), a User Account Control (UAC) prompt, which asks for permission to make changes, might appear. If you see this, click Continue to allow Windows to proceed.
Step 6Handling Errors (Don't Worry!)
Handle errors like "Error Applying Attributes" or "Access is Denied" by clicking "Ignore All" when Windows cannot change files that are currently open in other programs. This lets windows indexing file contents finish updating on the remaining files without stopping the entire process because of locked system files.
If you see the "access is denied" error when changing file indexing settings, you can click "Ignore All." Windows will attempt to apply the indexing changes to all accessible files and will skip files it cannot access at that moment. These changes will likely be applied to most of your files, and Windows will continue to update the status of other files in the background.
Step 7Let Windows Finish
Let Windows finish applying your new settings by leaving the progress bar open until the attribute updates are complete on your drive. The time needed for windows indexing file contents depends entirely on how many files and folders you have stored, but you can safely keep using your computer while it runs in the background.
Once it's done, you have successfully updated your indexing settings for that drive!
Remember, turning off content indexing means you won't be able to search for words *inside* files on that drive. You will only be able to search for file names. Consider the benefits against the possible loss of search ability for that specific drive.
References:
Summary
You can control how Windows indexes your file contents to fine-tune your PC's search abilities and manage your system's resources. Follow these steps to turn content indexing on or off for any drive, giving you more control over your Windows experience. Happy searching!
Was this guide helpful?

About the Author
Richard
Tech Writer, IT Professional
Richard is a writer at Geek Rewind who turns complex IT tasks into clear, step-by-step guides. He draws on years of hands-on experience in system administration and enterprise IT operations, focusing on Windows, Linux and WordPress: the problems people actually run into, and the fixes that work. His server and WordPress guides come from systems he runs himself. Richard builds and maintains the platform behind Geek Rewind, from its Ubuntu servers and Nginx configuration to its custom WordPress plugins. Many new tutorials start with readers' questions, and he's always glad to answer them in the comments.

No comments yet — be the first to share your thoughts!