How to Enable or Disable Advanced Options in Indexing Options in Windows 11


Advanced Options in Indexing Options controls whether Windows 11 shows extra settings for your computer’s search index. The index is a behind-the-scenes list of files and emails that helps Windows find things instantly when you search.
With the control on, the Advanced button in Indexing Options is unavailable. You can see this in Control Panel Indexing Options, and in Settings Privacy & security Searching Windows. Hiding these settings stops you or anyone else from accidentally changing file types or moving where the search database lives. You can turn the control on or off whenever you need to lock down your search preferences.
There are two ways to do it: Local Group Policy Editor or the Registry Editor. Both need an administrator account. Use the Registry method on Windows 11 Home, because Group Policy Editor is not available there.
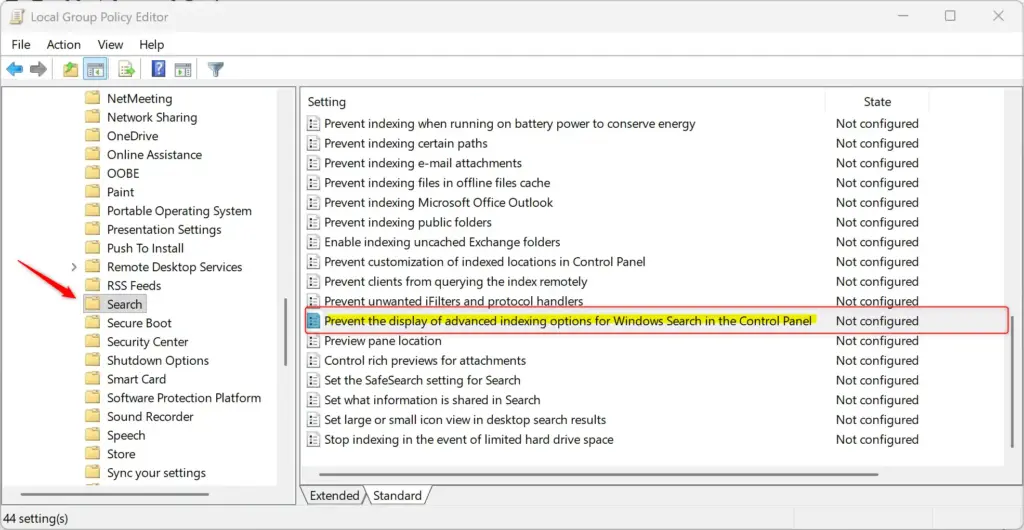
Open the Run dialog with Win+R, type gpedit.msc, and press Enter to access Local Group Policy Editor. Navigate to Computer Configuration Administrative Templates Windows Components Search, double-click Prevent the display of advanced indexing options for Windows Search in the Control Panel , select Not Configured or Disabled, then click OK. The Advanced button in Indexing Options becomes available immediately.
Option 1Using the Local Group Policy Editor
It lets you control Windows 11 indexing options on Pro, Enterprise, and Education editions. It is not included in Home editions, so on Home the gpedit.msc command will fail. Use the registry method further down instead.
- Press Win+R to open the Run dialog, type gpedit.msc, and press Enter. Or type
gpedit.mscinto the Windows search bar and press Enter. The Local Group Policy Editor window opens. If a User Account Control prompt appears, click Yes. - In the left pane, go to this location. Click the arrows to expand each folder. Computer Configuration is the top-level node, and the path continues through Administrative Templates and Windows Components to Search.
Computer Configuration > Administrative Templates > Windows Components > Search
- In the right pane, find the policy named Prevent the display of advanced indexing options for Windows Search in the Control Panel . Double-click it. A settings window opens with the options Not Configured, Enabled, and Disabled.
To Enable Advanced Options
To show the advanced options, set this policy to Not Configured or Disabled. Not Configured is the default and the cleaner choice, because it removes your override completely. Disabled gives the same result.
- Open the policy as described above: Computer Configuration Administrative Templates Windows Components Search Then double-click Prevent the display of advanced indexing options for Windows Search in the Control Panel.
- Select the option Not Configured.
- Click OK. The window closes and the policy now shows as Not Configured in the list.
Close and reopen Indexing Options. The Advanced button should be available again. If it is still unavailable, sign out and back in, or restart the PC, so the policy refreshes.
To Disable Advanced Options
To hide the advanced options, set the same policy to Enabled.
- Go to Computer Configuration Administrative Templates Windows Components Search in the left pane.
- Double-click Prevent the display of advanced indexing options for Windows Search in the Control Panel.
- Select the option Enabled.
- Click OK. The policy now shows as Enabled in the list.
Open Indexing Options again and check the Advanced button. It should now be unavailable. If it still works, sign out and back in or restart. To undo this, set the policy back to Not Configured as shown above.
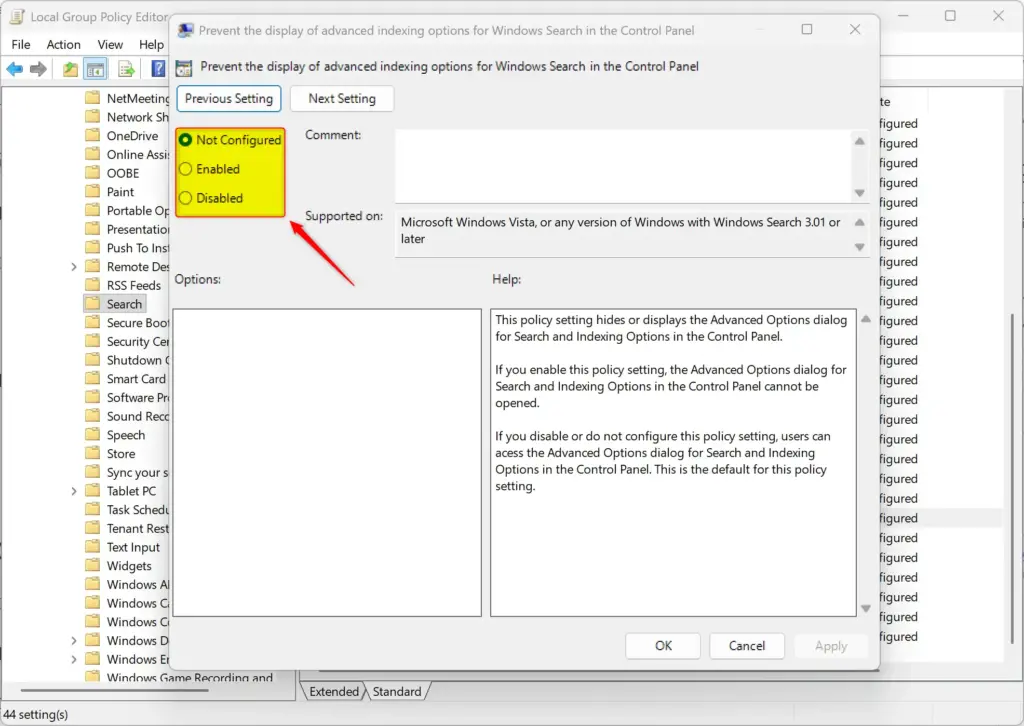
Setting the policy to Enabled is what disables the advanced options. This only affects the settings screen. Windows Search keeps indexing and works as before. Your existing index settings are not changed.
Option 2Using the Registry Editor
It does the same job as the policy, but you edit the value by hand. A wrong edit in the registry can cause problems. Before you start, back up the key you are about to change. In Registry Editor, select the key, then click File Export and save the .reg file somewhere safe. Double-click that file later to restore it.
To Enable Advanced Options
This is the default setting. Showing the advanced options means removing the value that hides them. If the value was never created, there is nothing to remove.
- Open the Registry Editor by typing
regeditinto the Windows search bar and pressing Enter. Administrator permission is required, so click Yes when User Account Control asks. - Navigate to the following location in the left pane:
HKEY_LOCAL_MACHINE\SOFTWARE\Policies\Microsoft\Windows\Windows Search
- Look in the right pane for a value named
PreventUsingAdvancedIndexingOptions. If it exists, right-click it and select Delete. Confirm when asked. The value disappears from the list. - If the value doesn't exist, no action is needed for this step. The advanced options are already shown. If the key itself doesn't exist, that also means the policy is not set.
- Close Registry Editor. Sign out and back in, or restart, then open Indexing Options to check that the Advanced button works.
To Disable Advanced Options
To hide the advanced options, create the value that turns the restriction on. You need to do this once.
- Open the Registry Editor by typing
regeditinto the Windows search bar and pressing Enter. Administrator permission is required, so click Yes when User Account Control asks. - Navigate to the following location in the left pane:
HKEY_LOCAL_MACHINE\SOFTWARE\Policies\Microsoft\Windows\Windows Search
- If a key in that path is missing, create it. Right-click the parent key, select New, then Key, and type the exact name of the missing key.
- Right-click in the empty space on the right side and select New, then DWORD (32-bit) Value. A new value appears with its name highlighted for editing. Choose the 32-bit type even on a 64-bit version of Windows.
- Name the new value
PreventUsingAdvancedIndexingOptionsand press Enter. - Double-click the new
PreventUsingAdvancedIndexingOptionsvalue. In the Value data field, type1and click OK. The value now shows the data you entered in the list. - Close Registry Editor. Sign out and back in, or restart, then open Indexing Options. The Advanced button should be unavailable. To undo this, delete the value as described in the previous section.
Summary
Windows 11 indexing options can show or hide advanced search settings depending on how you configure the Local Group Policy Editor or Registry Editor. This control helps prevent unwanted changes to file search configurations on your computer. If a setting does not seem to apply, check which method you used last. A policy set in Group Policy Editor writes to the same place as the registry value, so the two can overwrite each other. Sign out or restart after any change.
Was this guide helpful?

About the Author
Richard
Tech Writer, IT Professional
Richard is a writer at Geek Rewind who turns complex IT tasks into clear, step-by-step guides. He draws on years of hands-on experience in system administration and enterprise IT operations, focusing on Windows, Linux and WordPress: the problems people actually run into, and the fixes that work. His server and WordPress guides come from systems he runs himself. Richard builds and maintains the platform behind Geek Rewind, from its Ubuntu servers and Nginx configuration to its custom WordPress plugins. Many new tutorials start with readers' questions, and he's always glad to answer them in the comments.



No comments yet — be the first to share your thoughts!