Should You Enable Enhanced File Indexing in Windows 11 Advanced File Explorer Options

Enhanced file indexing in Windows 11 lets you search your whole computer instead of just your personal folders. By default, Windows uses the Classic mode. That mode indexes only your Documents, Pictures, Music and Desktop folders, plus the Start menu . Enhanced mode builds a central database that covers every folder, subfolder, document, photo and app on your drives, so searches from the taskbar or File Explorer can find files almost anywhere.
No, you should not enable enhanced file indexing unless you have a fast desktop with an SSD. Enhanced mode indexes your entire hard drive instead of just Documents, Pictures, Music, Desktop and the Start menu , making searches more thorough but causing temporary slowness, battery drain on laptops, and extra disk space usage during the initial scan.
That means files tucked deep inside a nested directory or a long-forgotten folder are far more likely to show up in your results. The trade-off is more background work for your PC. Weighing the pros and cons will help you decide whether a system-wide search fits how you work.
If you want to try it, the switch is in the Settings app. It is the same on Windows 11 Home and Pro, and you don’t need to restart.
- Open Settings and select Privacy & security.
- Select Searching Windows. You should see a section called Find my files with two options.
- Choose Enhanced instead of Classic. Windows starts building the index in the background.
- Optionally, scroll down to the excluded folders list and add any folders you don’t want indexed, such as backup drives or folders holding thousands of small files.
To undo the change, go back to the same page and select Classic. You can check indexing progress on that page too. Until the first pass finishes, your search results may be incomplete.
The Pros and Cons of Enabling Enhanced File Indexing
Read both lists below against your own setup. A fast desktop with an SSD handles it very differently from an older laptop with a small battery and a slow hard drive.
The Downsides
The downsides of enhanced file indexing in Windows 11 involve temporary high resource use, potential battery drain on laptops, and extra disk space usage. Scanning your entire hard drive can make your computer run a bit warm and sluggish while it builds the initial database.- Initial Resource Use: When you first turn on enhanced indexing, Windows has to scan your entire hard drive. This can make your computer run a bit warm and sluggish for a short time while it builds the initial database.
- Battery Drain on Laptops: Because the system does extra work in the background to catalog every file, it can use a little more battery power on laptops.
- Disk Space Usage: The index database needs space to store all those file details. While it is usually quite small compared to your total drive capacity, it does use a little extra room on your main drive.
How to Check Your Current Indexing Status in 🪟 Windows 11
Checking your current search indexing status in Windows 11 is easy to do through the main settings menu before you make any system changes. You can open the Windows settings app, select privacy and security, and view your search settings to see what your computer is currently doing.
- Click the Start button on your taskbar and select the Settings app (the gear icon).

Windows 11 Start menu with Settings gear icon highlighted. - In the Settings window, click on Privacy & security on the left-hand menu.

- On the right side of the screen, scroll down and click on Searching Windows.
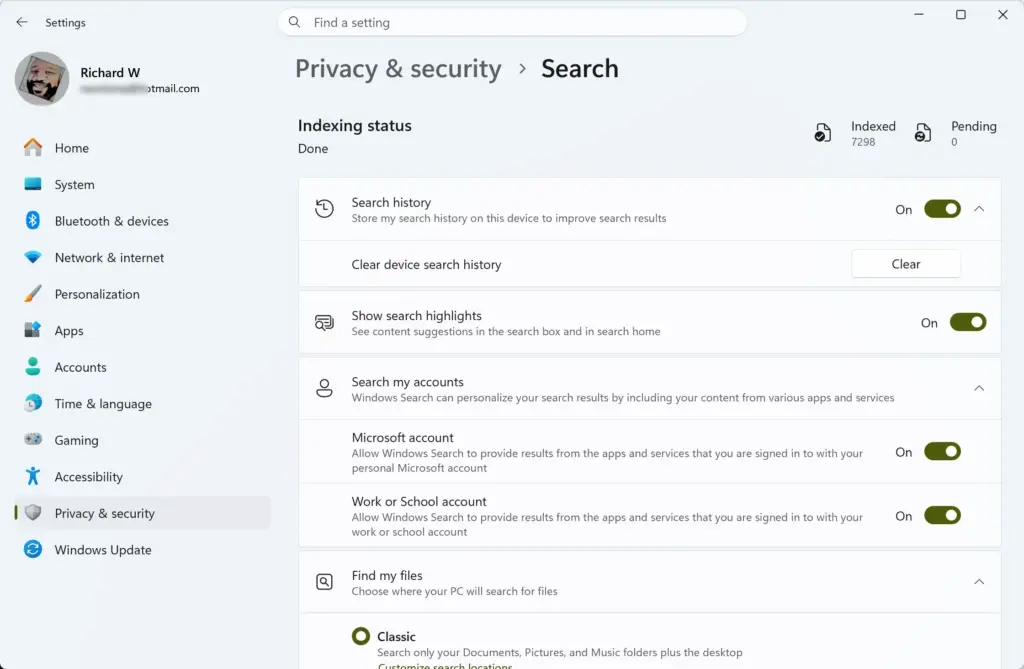
Settings › Privacy & security › Search - Look at the top of the page under the Find My Files section. You will see three choices: Classic, Enhanced, and customize options.
If your computer is set to Classic, Windows is only searching your normal user folders. If it is set to Enhanced, your entire computer is already being indexed.
Step-by-Step Guide: How to Enable Enhanced File Indexing in 🪟 Windows 11
Enabling enhanced file indexing in Windows 11 requires signing in with an administrator account and opening your privacy and security settings. You can make your computer searches much faster and more thorough by heading into the searching windows menu and turning on the enhanced option.
- Click the Start button and open the Settings app.
- Select Privacy & security from the left-hand menu.
- Click on Searching Windows in the main panel.
Settings › Privacy & security › Search - Under the Find My Files section, choose the option labeled Enhanced.
That is all you have to do to turn on the Enhanced File Indexing feature in Windows 11! Once you select the Enhanced option, Windows will automatically start building the complete file index in the background using up to 100 percent of your available processor power when the computer is idle.
Network administrators managing multiple PCs can also configure this setting via Group Policy or mobile device management tools, though the manual Settings app works best for individuals.
What Happens After You Enable Enhanced Indexing?
Enabling enhanced indexing in Windows 11 causes your computer to work a bit harder at first because it reads every file path and name to build a database. This normal background process can take a few minutes depending on your storage drive speed and total file count.
Windows has to read every single file path and name on your storage drive to build the database. Depending on how many files you have and whether you use a fast Solid State Drive (SSD) or an older Hard Disk Drive (HDD), this process can take anywhere from a few minutes to an hour.
During the initial setup time, your Windows 11 searches might actually feel a bit slow or incomplete. Give your computer up to 2 hours to finish building the search index. Once the initial index is built, the Windows 11 operating system only updates files when you create, change, or delete them. This background updating uses very few system resources, and your searches will instantly become fast and reliable.
Expert Tips: How to Customize Your Index for Maximum Performance
Many guides stop at turning enhanced indexing on. However, if you want the absolute best performance from your Windows 11 computer, you should fine-tune what Windows looks at. Here are some expert tips to make your searches even better.
Tip 1Exclude Folders You Never Search
Excluding folders you never search from Windows 11 indexing stops your computer from wasting system resources on temporary files and software backups. You can easily remove junk folders from your search results by opening the searching windows menu and adding specific folders to your exclusion list.
To exclude these folders:
- Open the Settings app and go to Privacy & security Searching Windows
Settings › Privacy & security › Search - Scroll down to the bottom of the page and click on Advanced searcher settings (this opens a classic control panel window).
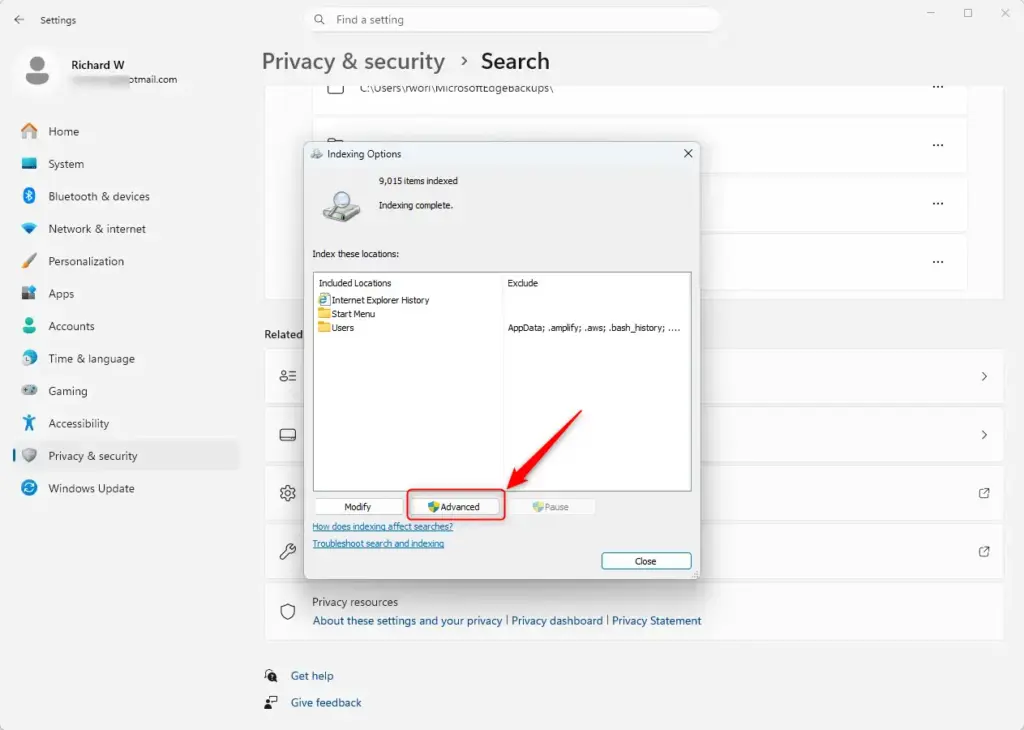
Clicking the Advanced button in Windows 11 indexing options. - In the Indexing Options window, click the Modify button.
- Uncheck any folders or drives that you do not want Windows to track.
- Click OK to save your changes.
Tip 2Add Custom Storage Drives
Adding custom storage drives to your Windows 11 search index ensures your computer catalogs files on external hard drives or secondary internal drives. You can check the indexing options window and click modify to put a checkmark next to all of your active storage drives for better search coverage.
You can make every file searchable in Windows 11 by opening the Indexing Options window, clicking Modify, and checking the boxes next to all of your active storage drives. This step ensures that the search tool scans all of your personal files across every connected drive.
Tip 3Rebuild the Index if Search Results Go Missing
Rebuilding the search index in Windows 11 fixes broken search databases when your computer fails to find files you know are there. You can give your search system a fresh start by opening advanced searcher settings and clicking the advanced button inside the indexing options window.
- Open the Settings app, go to Privacy & security Searching Windows, and click Advanced searcher settings.
Clicking the Advanced button in Windows 11 indexing options. - In the Indexing Options window, click the Advanced button. (Note: This step requires administrator privileges.)
- Under the Troubleshooting section, click the Rebuild button.
- Confirm your choice by clicking OK.
This fixes most stubborn search bugs.
Troubleshooting Common Indexing Problems in 🪟 Windows 11
Even with enhanced indexing turned on, you might occasionally run into minor issues. Here are fixes for the most common problems users face.
Problem 1: Searches Are Still Slow
Slow searches after turning on enhanced indexing in Windows 11 usually happen because the search database is stuck, paused, or waiting for power saving settings to end. You can fix this sluggish behavior by plugging your laptop into a wall outlet to let the background indexing service finish its work.
Problem 2: Search Indexing Service Keeps Stopping
A Windows Search indexing service that keeps stopping usually happens when the background service crashes or gets disabled by third-party optimization software on your computer. You can fix this problem manually by opening the windows services tool, finding windows search in the list, and restarting the service.
- Press the Windows Key + R on your keyboard to open the Run dialog box.
- Type services.msc and press Enter. (Note: This action requires administrator privileges.)
- Scroll down the list of services until you find Windows Search.
- Right-click on Windows Search and select Restart. If it is stopped, click Start.
- Right-click it again, select Properties, and change the Startup type to Automatic (Delayed Start) so it runs smoothly every time you turn on your PC.
Summary
Enhanced file indexing in Windows 11 lets your computer catalog every file and folder on your storage drive to replace slow manual searches with instant results. While it uses extra system resources during setup and might slow down older mechanical hard drives, it is a fantastic tool for modern computers running on fast solid-state drives.
The Benefits
The benefits of enhanced file indexing in Windows 11 include instant search results as you type and total computer coverage so you never miss a file. Turning on this feature helps you find documents and photos in seconds, which improves your everyday productivity without waiting for a slow progress bar.- Instant Search Results: You no longer have to wait for a green progress bar to creep across your screen. Files show up right away as you type.
- Total Coverage: Windows searches your entire computer, so you never miss a file just because it lives outside your normal user folders.
- Better Productivity: Finding documents, photos, and downloads takes seconds, helping you get back to your work without delays.
The Downsides
The downsides of enhanced file indexing in Windows 11 involve temporary high resource use, potential battery drain on laptops, and extra disk space usage. Scanning your entire hard drive can make your computer run a bit warm and sluggish while it builds the initial database.- Initial Resource Use: When you first turn on enhanced indexing, Windows has to scan your entire hard drive. This can make your computer run a bit warm and sluggish for a short time while it builds the initial database.
- Battery Drain on Laptops: Because the system does extra work in the background to catalog every file, it can use a little more battery power on laptops.
- Disk Space Usage: The index database needs space to store all those file details. While it is usually quite small compared to your total drive capacity, it does use a little extra room on your main drive.
How to Check Your Current Indexing Status in 🪟 Windows 11
Checking your current search indexing status in Windows 11 is easy to do through the main settings menu before you make any system changes. You can open the Windows settings app, select privacy and security, and view your search settings to see what your computer is currently doing.
- Click the Start button on your taskbar and select the Settings app (the gear icon).
Windows 11 Start menu with Settings gear icon highlighted. - In the Settings window, click on Privacy & security on the left-hand menu.
- On the right side of the screen, scroll down and click on Searching Windows.
Settings › Privacy & security › Search - Look at the top of the page under the Find My Files section. You will see three choices: Classic, Enhanced, and customize options.
If your computer is set to Classic, Windows is only searching your normal user folders. If it is set to Enhanced, your entire computer is already being indexed.
Step-by-Step Guide: How to Enable Enhanced File Indexing in 🪟 Windows 11
Enabling enhanced file indexing in Windows 11 requires signing in with an administrator account and opening your privacy and security settings. You can make your computer searches much faster and more thorough by heading into the searching windows menu and turning on the enhanced option.
- Click the Start button and open the Settings app.
- Select Privacy & security from the left-hand menu.
- Click on Searching Windows in the main panel.
Settings › Privacy & security › Search - Under the Find My Files section, choose the option labeled Enhanced.
That is all you have to do to turn on the Enhanced File Indexing feature in Windows 11! Once you select the Enhanced option, Windows will automatically start building the complete file index in the background using up to 100 percent of your available processor power when the computer is idle.
Network administrators managing multiple PCs can also configure this setting via Group Policy or mobile device management tools, though the manual Settings app works best for individuals.
What Happens After You Enable Enhanced Indexing?
Enabling enhanced indexing in Windows 11 causes your computer to work a bit harder at first because it reads every file path and name to build a database. This normal background process can take a few minutes depending on your storage drive speed and total file count.
Windows has to read every single file path and name on your storage drive to build the database. Depending on how many files you have and whether you use a fast Solid State Drive (SSD) or an older Hard Disk Drive (HDD), this process can take anywhere from a few minutes to an hour.
During the initial setup time, your Windows 11 searches might actually feel a bit slow or incomplete. Give your computer up to 2 hours to finish building the search index. Once the initial index is built, the Windows 11 operating system only updates files when you create, change, or delete them. This background updating uses very few system resources, and your searches will instantly become fast and reliable.
Expert Tips: How to Customize Your Index for Maximum Performance
Many guides stop at turning enhanced indexing on. However, if you want the absolute best performance from your Windows 11 computer, you should fine-tune what Windows looks at. Here are some expert tips to make your searches even better.
Tip 1Exclude Folders You Never Search
Excluding folders you never search from Windows 11 indexing stops your computer from wasting system resources on temporary files and software backups. You can easily remove junk folders from your search results by opening the searching windows menu and adding specific folders to your exclusion list.
To exclude these folders:
- Open the Settings app and go to Privacy & security Searching Windows
Settings › Privacy & security › Search - Scroll down to the bottom of the page and click on Advanced searcher settings (this opens a classic control panel window).
Clicking the Advanced button in Windows 11 indexing options. - In the Indexing Options window, click the Modify button.
- Uncheck any folders or drives that you do not want Windows to track.
- Click OK to save your changes.
Tip 2Add Custom Storage Drives
Adding custom storage drives to your Windows 11 search index ensures your computer catalogs files on external hard drives or secondary internal drives. You can check the indexing options window and click modify to put a checkmark next to all of your active storage drives for better search coverage.
You can make every file searchable in Windows 11 by opening the Indexing Options window, clicking Modify, and checking the boxes next to all of your active storage drives. This step ensures that the search tool scans all of your personal files across every connected drive.
Tip 3Rebuild the Index if Search Results Go Missing
Rebuilding the search index in Windows 11 fixes broken search databases when your computer fails to find files you know are there. You can give your search system a fresh start by opening advanced searcher settings and clicking the advanced button inside the indexing options window.
- Open the Settings app, go to Privacy & security Searching Windows, and click Advanced searcher settings.
Clicking the Advanced button in Windows 11 indexing options. - In the Indexing Options window, click the Advanced button. (Note: This step requires administrator privileges.)
- Under the Troubleshooting section, click the Rebuild button.
- Confirm your choice by clicking OK.
This fixes most stubborn search bugs.
Troubleshooting Common Indexing Problems in 🪟 Windows 11
Even with enhanced indexing turned on, you might occasionally run into minor issues. Here are fixes for the most common problems users face.
Problem 1: Searches Are Still Slow
Slow searches after turning on enhanced indexing in Windows 11 usually happen because the search database is stuck, paused, or waiting for power saving settings to end. You can fix this sluggish behavior by plugging your laptop into a wall outlet to let the background indexing service finish its work.
Problem 2: Search Indexing Service Keeps Stopping
A Windows Search indexing service that keeps stopping usually happens when the background service crashes or gets disabled by third-party optimization software on your computer. You can fix this problem manually by opening the windows services tool, finding windows search in the list, and restarting the service.
- Press the Windows Key + R on your keyboard to open the Run dialog box.
- Type services.msc and press Enter. (Note: This action requires administrator privileges.)
- Scroll down the list of services until you find Windows Search.
- Right-click on Windows Search and select Restart. If it is stopped, click Start.
- Right-click it again, select Properties, and change the Startup type to Automatic (Delayed Start) so it runs smoothly every time you turn on your PC.
Summary
Enhanced file indexing in Windows 11 lets your computer catalog every file and folder on your storage drive to replace slow manual searches with instant results. While it uses extra system resources during setup and might slow down older mechanical hard drives, it is a fantastic tool for modern computers running on fast solid-state drives.
Was this guide helpful?

About the Author
Richard
Tech Writer, IT Professional
Richard is a writer at Geek Rewind who turns complex IT tasks into clear, step-by-step guides. He draws on years of hands-on experience in system administration and enterprise IT operations, focusing on Windows, Linux and WordPress: the problems people actually run into, and the fixes that work. His server and WordPress guides come from systems he runs himself. Richard builds and maintains the platform behind Geek Rewind, from its Ubuntu servers and Nginx configuration to its custom WordPress plugins. Many new tutorials start with readers' questions, and he's always glad to answer them in the comments.


No comments yet — be the first to share your thoughts!