How to Rebuild the Windows Search Index in Windows 11


Rebuilding the Windows search index in Windows 11 fixes broken, slow, or missing search results by clearing out damaged data and mapping your files again from scratch.
The Search Index is a hidden database that Windows 11 builds in the background to help you find apps, settings, and documents instantly. When this database breaks, typing in the Start menu stops working or freezes completely.
Starting the rebuild process restarts the SearchIndexer.exe background service (the program that catalogs your files), wiping out the old data and forcing your PC to map all your files again so search works fast and accurately. You do not need to restart Windows for this.
You rebuild the Windows Search Index by going to Settings Privacy & security Searching Windows Advanced indexing options, then clicking Advanced and Rebuild. This process clears the old index and creates a fresh one to fix search issues.
What happens when done?
Once the process finishes, Windows has a fresh catalog of your files, restoring speed and accuracy to your searches.
How to rebuild the Windows Search Index
You can rebuild the Windows Search Index to fix missing files and slow search results on your Windows 11 PC. This process deletes your old search database and builds a fresh one from scratch, which fixes missing files, stuck searches, and slow results. Open your Start menu , go to Settings , and open the Privacy & security section to find the indexing tools.
The steps work the same on Windows 11 Home and Pro.
Search settings live inside the main Settings menu. Press Windows key + I or click Start and choose Settings. The Settings window should open with a list of categories on the left.

Before you start: rebuilding the index from Advanced options requires administrator permission. Sign in with an administrator account, or be ready to enter an admin password when the User Account Control (UAC) prompt appears. On a standard account, the Rebuild step will fail or ask for admin credentials. The same applies later when you restart the Windows Search service.
Proceed with the following steps once the Settings window appears:
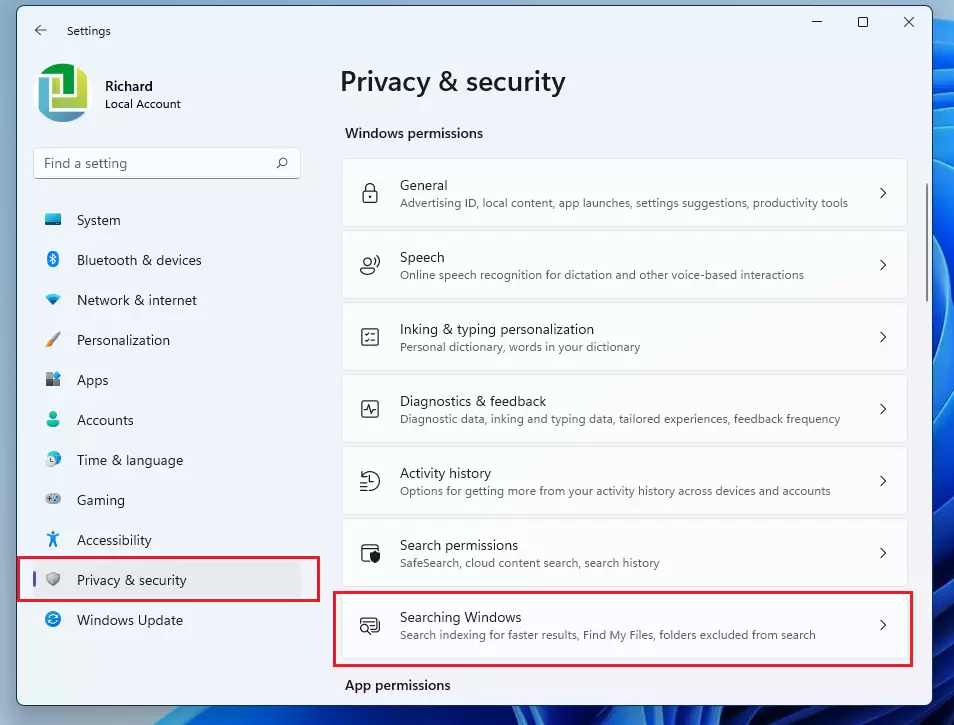
- Click on Privacy & security in the left menu. The Privacy & security options appear on the right.
- Select the Searching Windows tile on the right side. The path so far is Settings Privacy & security Searching Windows This page also shows the current indexing status, so you can see whether Windows is still indexing and how many items it has indexed.
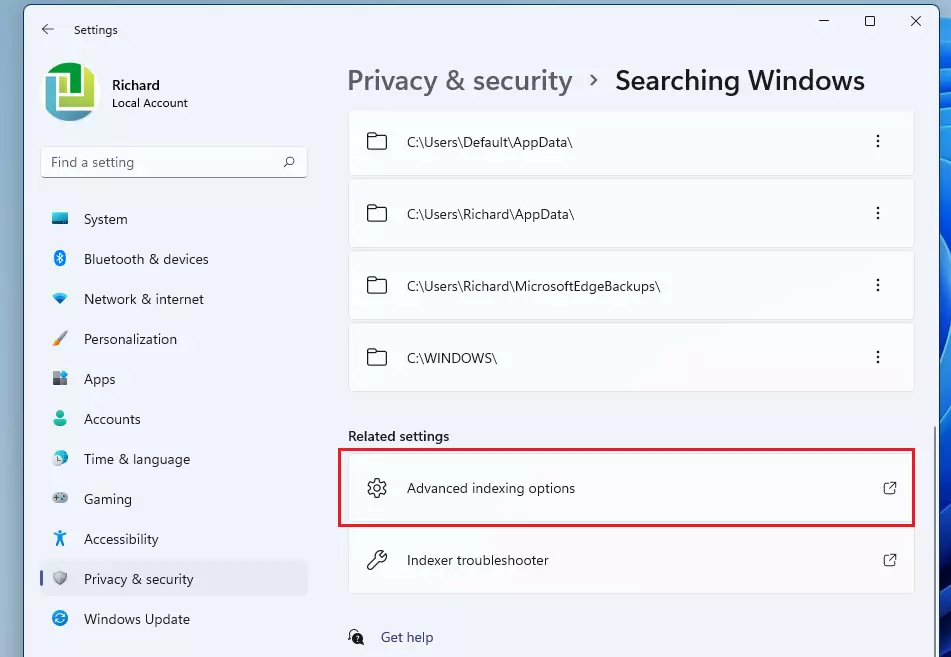
- Scroll down to the bottom and click Advanced indexing options under the "Related settings" section. The Indexing Options window opens and lists the locations being indexed.
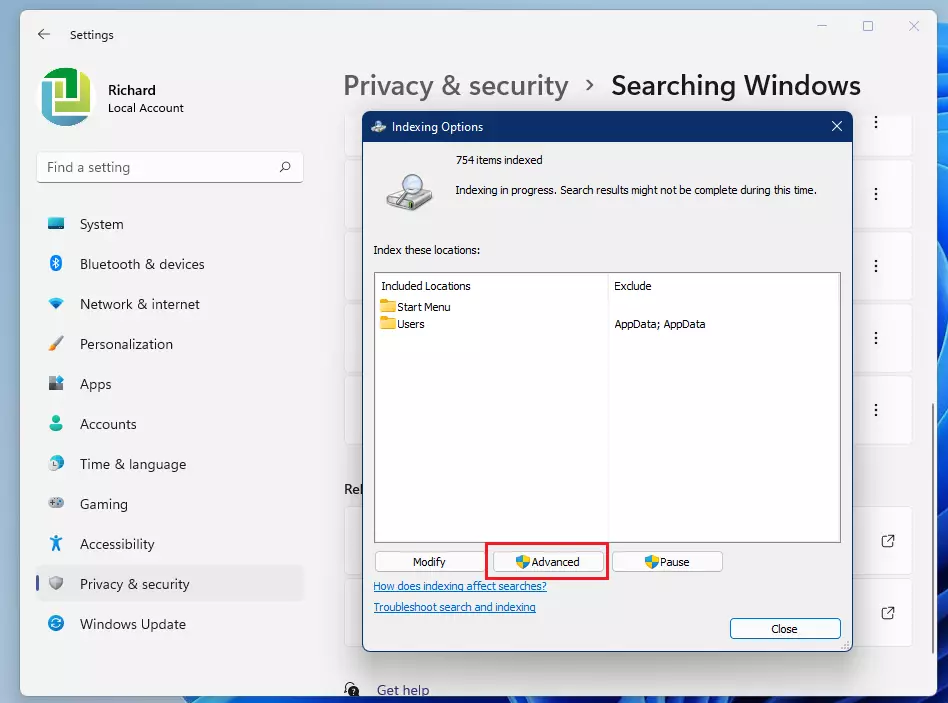
- In the new window that pops up, click the Advanced button. If a UAC prompt appears, accept it or enter an admin password. If you decline it, the Advanced Options window will not open. The Advanced Options window then opens.
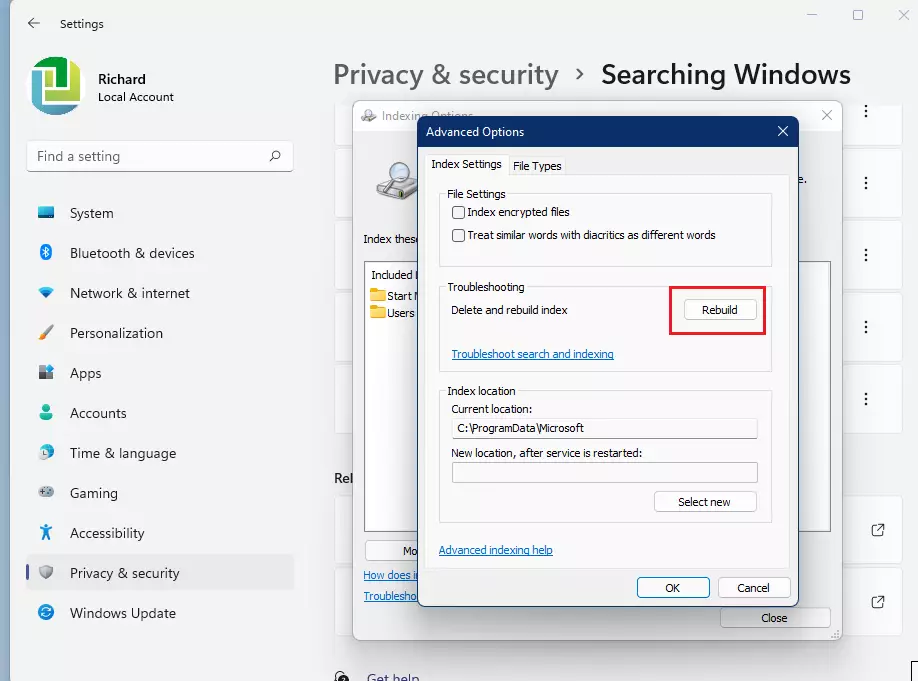
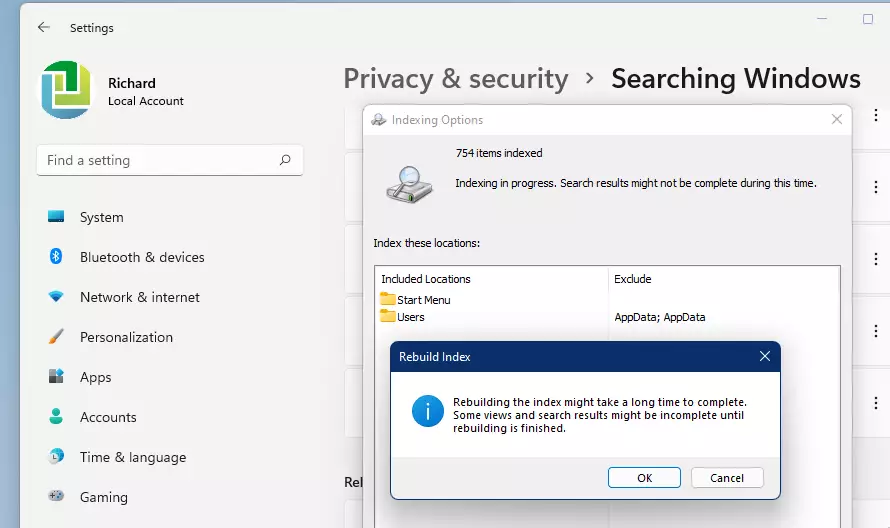
- Click the Rebuild button to start the process. It sits in the Troubleshooting section of the Advanced Options window.
- A confirmation box will appear. It warns that rebuilding can take a long time and that search results may be incomplete until it finishes. Click OK to begin.
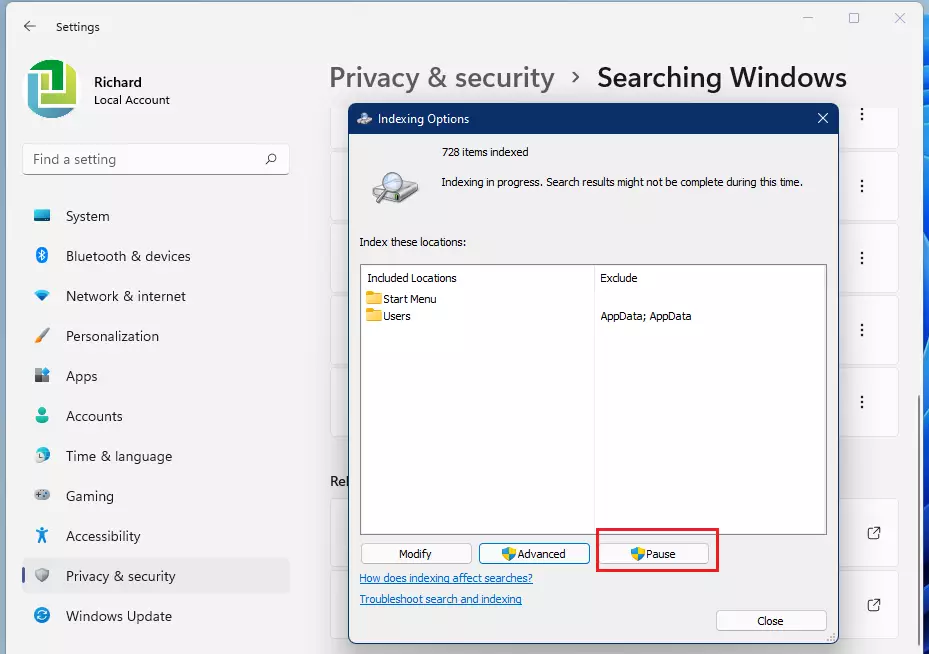
File scanning begins immediately after confirmation. Duration varies based on total file volume. Clicking Pause halts the operation temporarily if necessary.
Expect search to be slow or incomplete while the rebuild runs. Files that have not been re-indexed yet will not show up in results, so a file that seems missing may just be waiting its turn. On a large drive, or on a PC with many small files, the rebuild can take several hours. It also uses a lot of CPU and disk, so the PC may feel sluggish, especially on a hard drive rather than an SSD. Leave the PC plugged in and powered on, and run the rebuild when you do not need the machine for heavy work. You can close the settings windows. Indexing continues in the background.
To check progress, go back to Settings Privacy & security Searching Windows and read the indexing status there. You can also look at the status line in the Indexing Options window. When it reports that indexing is complete, search results should be back to normal.
Troubleshooting the Windows Search Service
You can troubleshoot the Windows Search Service by restarting the background program that handles all file searches on your computer. When search stops working entirely, restarting this specific service fixes stuck processes and gets your search bar working again. Press the Windows key plus R, type services.msc, and press Enter to open the list of Windows services. Restarting a service needs administrator permission, so accept the UAC prompt or sign in as an admin if asked. You do not need to restart Windows afterward.
- Press Windows key + R, type services.msc, and press Enter. The Services window opens with an alphabetical list.
- Locate Windows Search in the list. Its status column shows Running if the service is active.
- Right-click it and select Restart. If it is stopped, select Start. If the options are greyed out, you are probably not running with admin rights. Close the window and reopen it as an administrator account.
If restarting the service does not help, run the Search and Indexing troubleshooter from Settings System Troubleshoot Other troubleshooters; it opens in the Get Help app. If search is still broken after the troubleshooter, go back and rebuild the index using the steps above.
Index Performance Tuning and Management
Controlling search database size maintains optimal performance by excluding unnecessary directories from queries. Folders full of build files, caches, backups, or virtual machine images are good candidates, because they add a lot of index data and rarely hold anything you search for. There are two places to do this.
Option 1: Exclude folders from enhanced search
- Open Settings Privacy & security Searching Windows
- Scroll to Exclude folders from enhanced search. This list applies when search mode is set to Enhanced.
- Click Add an excluded folder. A folder picker opens.
- Browse to the folder you want to leave out, select it, and click Select Folder. The folder now appears in the excluded list.
To undo this, remove the folder from the same list. Windows will index it again, so allow some time for the status to settle.
Option 2: Change indexed locations in Indexing Options
- On the Searching Windows page, scroll down and click Advanced indexing options.
- In the Indexing Options window, click Modify. The Indexed Locations window opens.
- Expand the drives and folders in the tree. Clear the check box next to any folder you want excluded, or tick a folder to include it.
- Click OK. The Indexing Options window now lists only the locations you kept.
Changing indexed locations may prompt for administrator permission. To undo it, open the same window and tick the folder again. Changes take effect without a restart, though Windows needs time to add or drop the affected files.
Summary
Rebuilding the Windows 11 search index fixes missing files by creating a fresh map of everything saved on your hard drive. You can also turn on Enhanced mode to search your whole computer instead of just your documents and desktop folders. This keeps your search results accurate and stops you from waiting on slow file searches.
To switch modes:
- Open Settings Privacy & security Searching Windows
- Under Find my files, choose Classic or Enhanced. Classic indexes only your libraries and desktop. Enhanced indexes the whole PC.
- Watch the indexing status on the same page. After you switch to Enhanced, Windows starts indexing the rest of the PC, and the status shows progress until it finishes.
To go back, select Classic again. Neither change requires a restart.
Enhanced mode scans the entire computer rather than just selected libraries. Switching to Enhanced mode makes search results more complete, at the cost of more system resources and a longer indexing time than the default Classic mode. If your PC slows down after you switch, exclude folders you do not search, as described in the performance tuning section, or return to Classic mode.
Have a question about this guide?
Answered by AI from this guide. Good questions may be added to this page — please don't include personal details.
Did this guide fix your problem?

About the Author
Richard
Tech Writer, IT Professional
Richard is a writer at Geek Rewind who turns complex IT tasks into clear, step-by-step guides. He draws on years of hands-on experience in system administration and enterprise IT operations, focusing on Windows, Linux and WordPress: the problems people actually run into, and the fixes that work. His server and WordPress guides come from systems he runs himself. Richard builds and maintains the platform behind Geek Rewind, from its Ubuntu servers and Nginx configuration to its custom WordPress plugins. Many new tutorials start with readers' questions, and he's always glad to answer them in the comments.
No comments yet — be the first to share your thoughts!