How to Enable or Disable Let Apps Take Screenshots and Record Screen in Windows 11

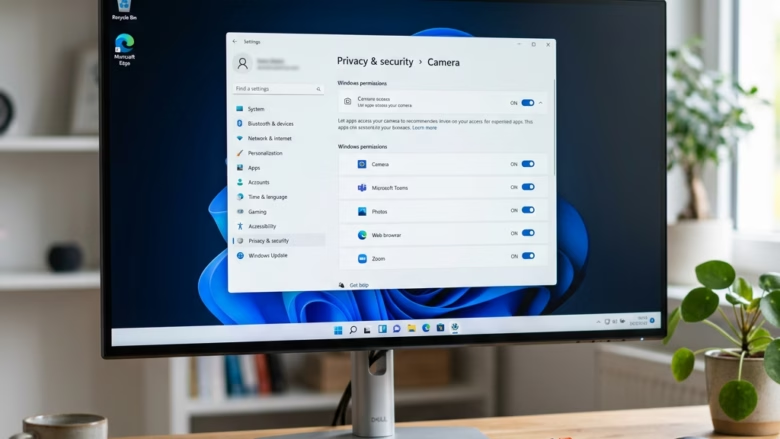
Screen capture permissions in Windows 11 control which programs can take screenshots or record video of your display. This privacy setting keeps a per-app list, so you can block or allow each program individually instead of turning screen recording off for everything at once.
Turning the feature off stops those apps from capturing your screen, which helps protect personal files and private chats. The controls are in the privacy section of the Windows 11 Settings app. Administrators can also set them with Terminal, Group Policy or the registry.
The Screenshots and screen recording page appears only on newer builds of Windows 11. If you don’t see it, run Windows Update , install the latest cumulative update and check again.
Open Settings with Win+I, click Privacy & security, then Screenshots and screen recording. Toggle the access switch On or Off at the top of the page, or use the per-app list below to allow or block individual programs.
Comparison of Methods
| Method | Best For | Difficulty |
|---|---|---|
| Settings App | Individual Users | Easy |
| Registry | Advanced Users | Hard |
| Group Policy | IT Administrators | Medium |
Turn On or Off Let Apps Take Screenshots and Record Screen for All Users in Settings
Requires Administrator Privileges
Use this method to switch the main access setting on or off from Settings. Sign in with an administrator account first.
- Open Settings by pressing Win+I.
- Click Privacy & security on the left, then click Screenshots and screen recording on the right. The page opens with the access toggle at the top and the list of apps below it.
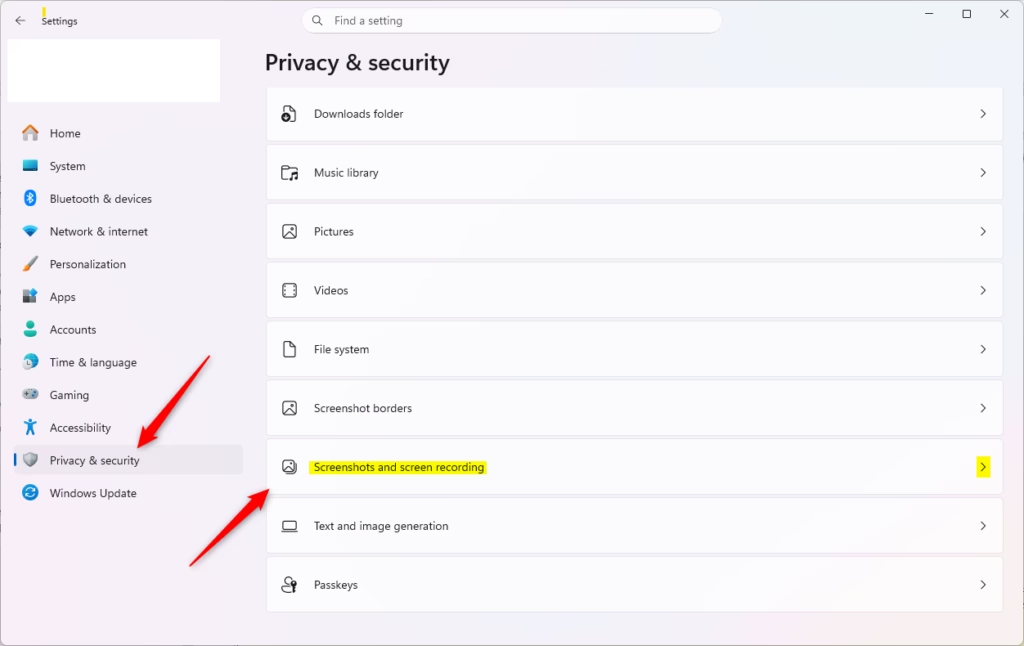
Open Screenshots and screen recording Settings
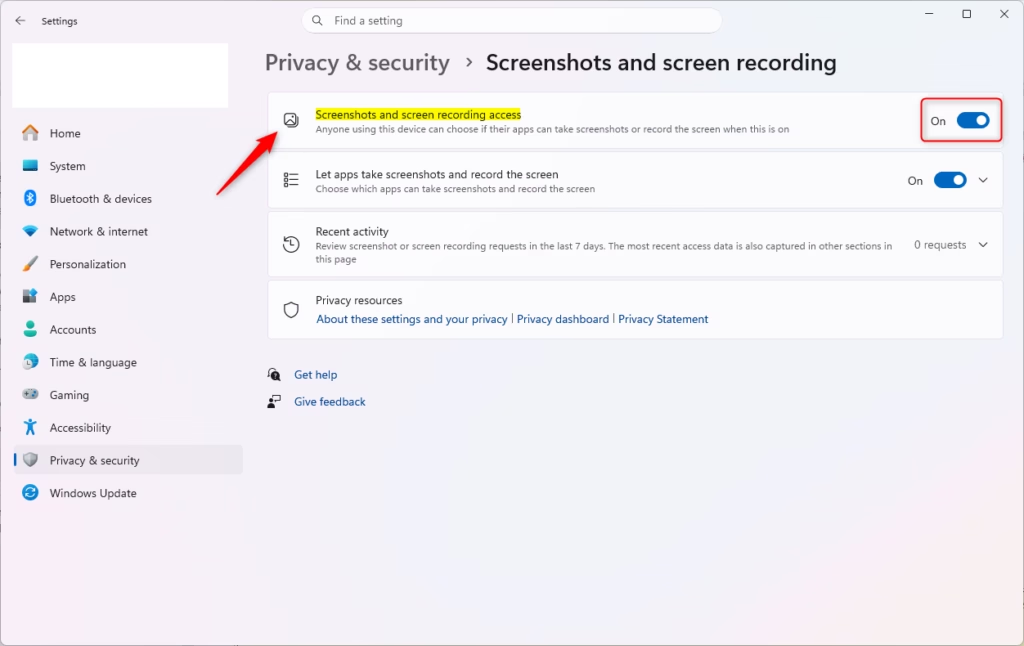
- Turn the access toggle On or Off. The switch changes right away, and there is no Save or Apply button.
To undo the change, return to this page and flip the toggle back. If the toggle is greyed out, or the page says some settings are managed by your organization, a policy (Group Policy or the registry) is controlling it. Change the policy instead, as shown in the later sections.
Turn On or Off Let Apps Take Screenshots and Record Screen for All Users using Command
Requires Administrator Privileges
Terminal is the quickest option if you manage several PCs or want to script the change.
- Right-click the Start button and choose Terminal (Admin), then click Yes at the User Account Control prompt. You can also search for Windows Terminal, right-click it and choose Run as administrator.
- To enable screen capture, run this command:
SystemSettingsAdminFlows.exe SetCamSystemGlobal graphicsCaptureProgrammatic 1 - To disable screen capture, run this command:
SystemSettingsAdminFlows.exe SetCamSystemGlobal graphicsCaptureProgrammatic 0
Open Privacy & security Screenshots and screen recording in Settings to check the result. If the page was already open, close it and open it again. To undo the change, run the other command.
Turn On or Off Let Apps Take Screenshots and Record Screen for Current User in Settings
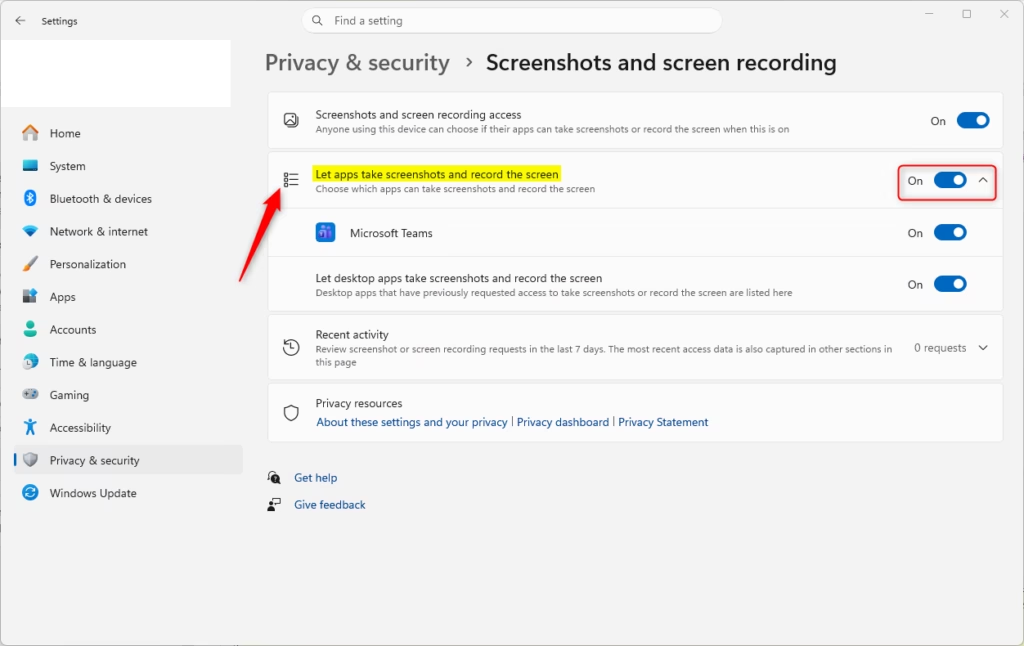
This toggle covers apps from the Microsoft Store (packaged apps). It does not cover classic desktop programs, which have their own toggle in the next section.
- Open Settings by pressing Win+I.
- Go to Privacy & security Screenshots and screen recording.
- Switch the Let apps take screenshots and record the screen toggle On or Off. It takes effect immediately.
Turn it back on to restore normal behavior.
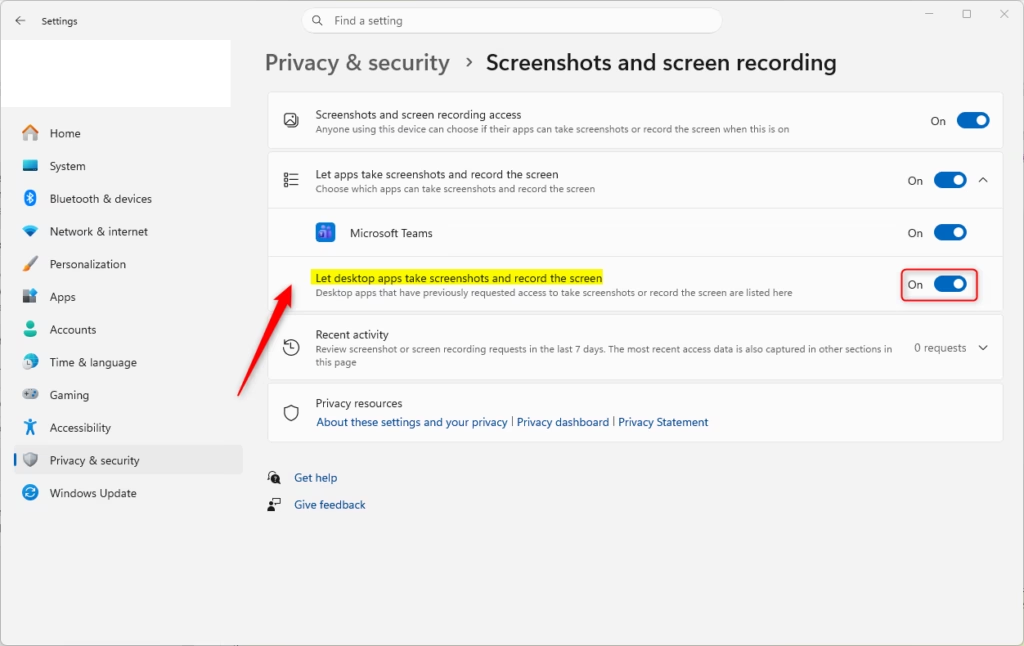
Turn On or Off Let Desktop Apps Take Screenshots and Record Screen for Current User in Settings
Classic desktop programs, such as traditional Win32 apps, are controlled separately from Store apps. Use this toggle when you want to manage them as a group.
- Open Settings by pressing Win+I.
- Go to Privacy & security Screenshots and screen recording.
- Switch the Let desktop apps take screenshots and record the screen toggle On or Off.
If a screen recorder or remote support tool stops working after you turn this off, turn it back on. To block one specific program, use the per-app list in the next section.
Turn On or Off Specific Apps
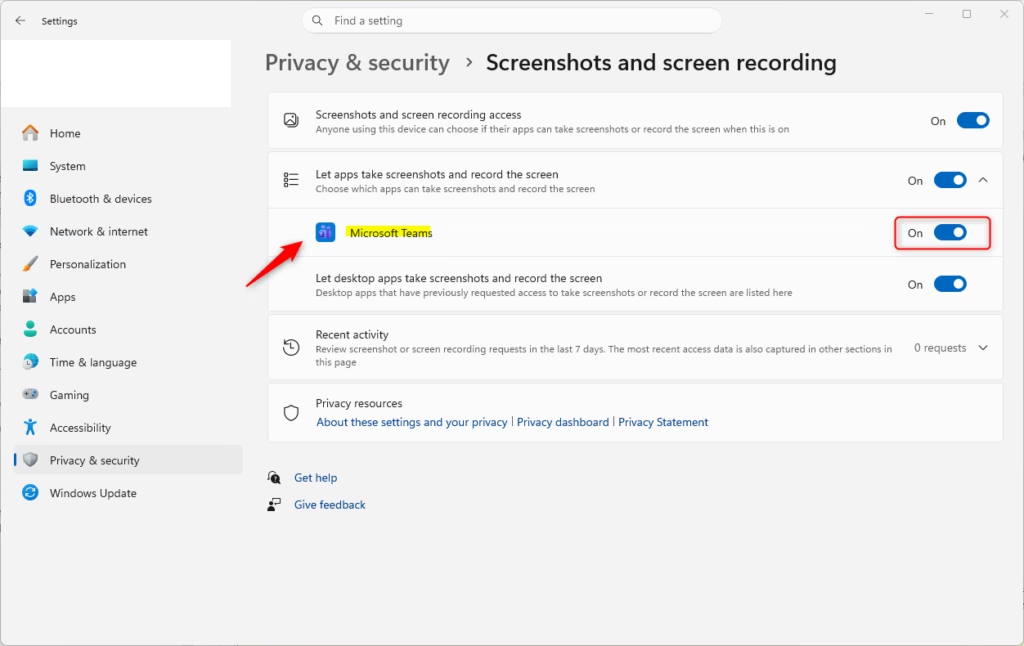
The per-app list is the best choice when you trust most programs but want to block one or two.
- Open Settings by pressing Win+I.
- Go to Privacy & security Screenshots and screen recording. Scroll down to the app list.
- Find the app in the list and switch its toggle On or Off. Each toggle controls only that app.
An app is not listed until it has tried to capture the screen. If a program is missing, run it once and check again. A master toggle above the list that is switched off may also override the per-app settings.
Enable or Disable via Local Group Policy Editor
Requires Administrator Privileges
Group Policy is useful when you want the setting enforced, not just changed. The Local Group Policy Editor is included in Windows 11 Pro, Enterprise and Education. It is not included in Home, so Home users should use the registry method below.
- Press Win+R, type gpedit.msc and press Enter. Click Yes if User Account Control asks for permission.
- In the left pane, go to Computer Configuration Administrative Templates Windows Components App Privacy. The policies appear in the right pane.
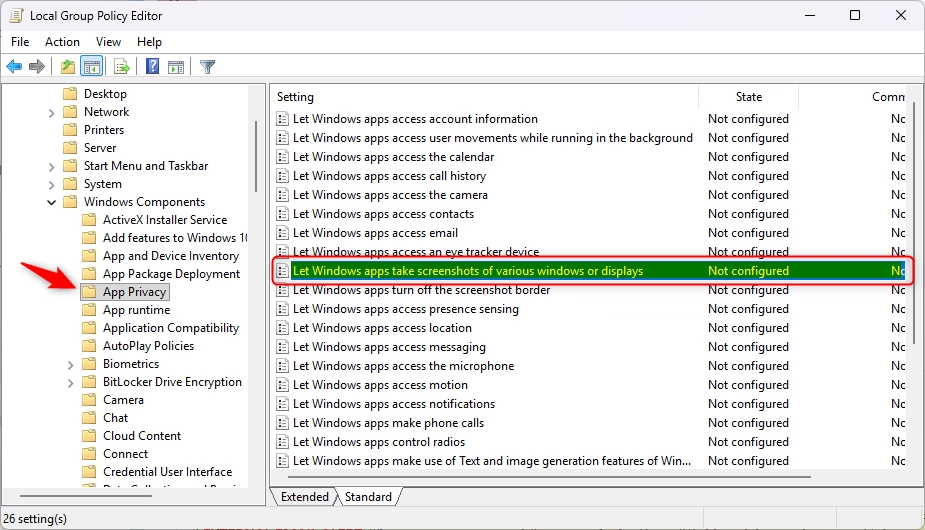
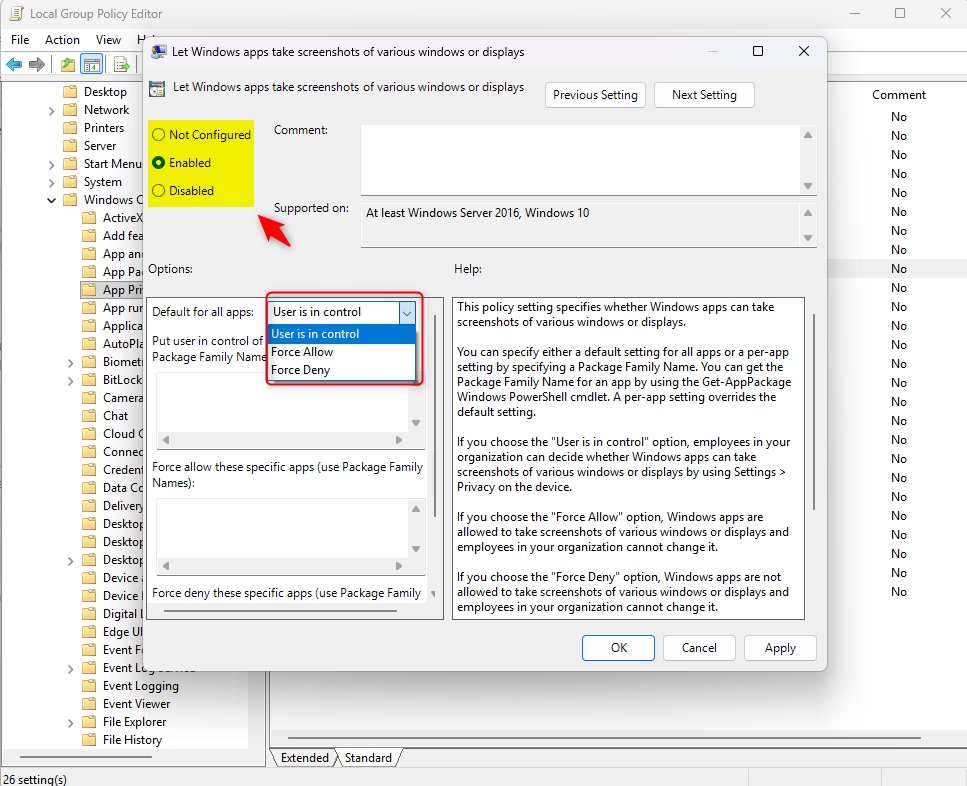
- Double-click Let Windows apps take screenshots of various windows or displays. Select Enabled and choose the option to allow or deny, or leave it as Not Configured to hand control back to the user. Click OK.
The change usually applies the next time policy refreshes. Signing out and back in, or restarting, makes sure it is applied. Once a policy is set, the matching toggles in Settings may show as managed by your organization and become greyed out. To undo the change, set the policy back to Not Configured.
Enable or Disable via Registry
Requires Administrator Privileges
It sets the same policy that Group Policy does. Back up the registry or create a restore point before you edit it.
- Press Win+R, type regedit and press Enter. Click Yes at the User Account Control prompt.
- Navigate to
HKEY_LOCAL_MACHINE\SOFTWARE\Policies\Microsoft\Windows\AppPrivacy. If the key does not exist, create it. - Find the LetAppsAccessGraphicsCaptureProgrammatic DWORD value. If it is missing, right-click in the right pane, choose New DWORD (32-bit) Value and give it that exact name.
- Double-click the value and set it to 1 to enable screen capture, or 2 to disable it. Click OK.
Restart the PC, or at least sign out and back in, so every app picks up the change. To undo it, delete the value or set it back to the setting you want.
Summary
Managing screen capture permissions in Windows 11 helps protect your privacy. Administrative rights remain necessary before modifying system-level settings or the registry.
Reference: App permissions - Microsoft Support
Was this guide helpful?

About the Author
Richard
Tech Writer, IT Professional
Richard is a writer at Geek Rewind who turns complex IT tasks into clear, step-by-step guides. He draws on years of hands-on experience in system administration and enterprise IT operations, focusing on Windows, Linux and WordPress: the problems people actually run into, and the fixes that work. His server and WordPress guides come from systems he runs himself. Richard builds and maintains the platform behind Geek Rewind, from its Ubuntu servers and Nginx configuration to its custom WordPress plugins. Many new tutorials start with readers' questions, and he's always glad to answer them in the comments.



No comments yet — be the first to share your thoughts!