How to Change Your Display Refresh Rate in Windows 11

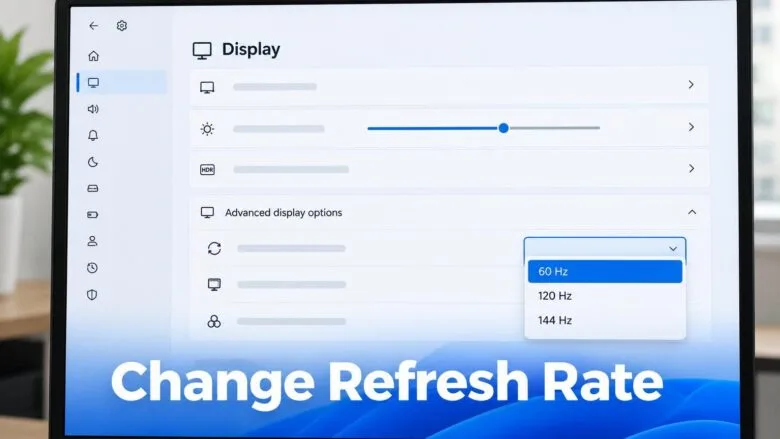
- 22 steps
- Needs administrator rights
Your display refresh rate is how many times per second your screen redraws the image, measured in hertz (Hz). Windows 11 lets you change this setting in just a few clicks from the Display settings.
A higher refresh rate, such as 120 Hz or 144 Hz, makes scrolling and mouse movement look smoother. A lower rate, such as 60 Hz, uses less power and is fine for everyday work. You don’t need administrator rights, a restart, or a specific Windows 11 edition to make this change.
Open Settings, go to System Display Advanced display, and pick a new refresh rate from the list. Windows will ask you to confirm the change within 15 seconds, so you can test it before it sticks.
Open Settings, select System Display, scroll down and select Advanced display, then pick a rate from the Choose a refresh rate list and select Keep changes. The refresh rate determines how many times per second your screen redraws, measured in hertz—higher rates like 120 Hz make scrolling smoother, while lower rates like 60 Hz use less power.
Before You Change the Refresh Rate
Windows only lists the rates your monitor, cable and graphics driver can all handle at your current resolution. You cannot pick a rate the hardware does not support, so there is no risk of forcing an unsafe setting from this menu.
Check these before you start:
- Your monitor’s maximum rate. Look at the monitor’s specification sheet or box. Many monitors ship set to 60 Hz even when they support more.
- Your cable and port. An older HDMI cable or port can limit the highest rate available at a high resolution. DisplayPort or a newer HDMI cable often fixes this.
- Which display you are changing. If you use more than one monitor, each has its own refresh rate setting.
How to Change the Refresh Rate in 🪟 Windows 11
This is the standard method and works for most laptops and desktop monitors. You will pick a new rate and then confirm it.
Open the Advanced Display Page
- Press Win+I to open Settings. You will see the Settings window with a list of categories on the left.

Windows 11 Start menu with Settings gear icon highlighted. - Select System in the left pane, then select Display. You will see your monitor layout and settings such as Brightness, Scale and Display resolution.
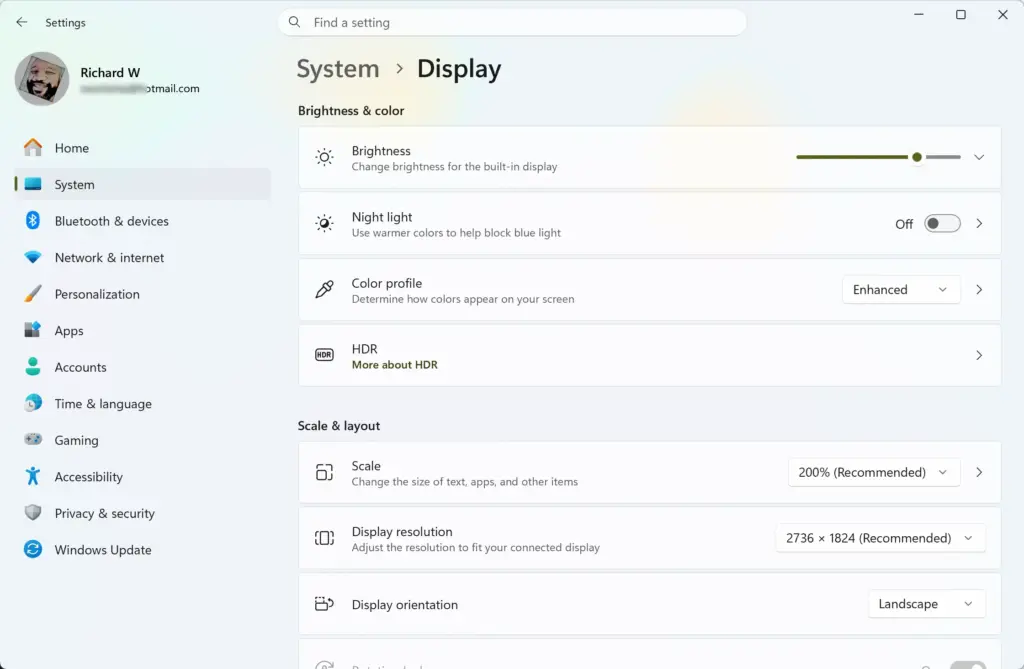
Settings › System › Display - Scroll down to the Related settings area and select Advanced display. You will see a page headed Advanced display with a Display information box.
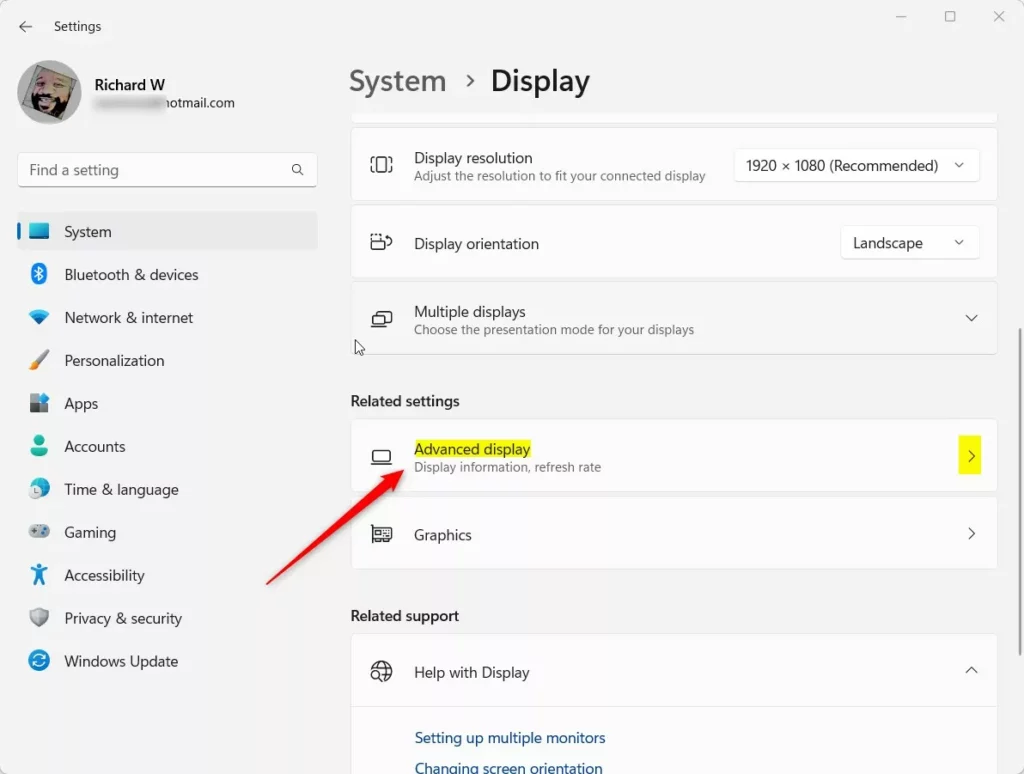
Windows Advanced display tile in Settings
You can also right-click an empty area of the desktop and select Display settings to land on the same Display page in one step.
Choose a Display (Multiple Monitors Only)
If you have more than one monitor, tell Windows which one you are changing. A rate set for one monitor does not carry over to the others.
- Select the display list at the top of the Advanced display page. It is the dropdown for choosing a display to view or change its settings.
- Select the monitor you want to change. The Display information box now shows that monitor’s name and its current mode, including the rate in Hz.
If you are not sure which monitor is which, go back to System Display and select Identify. Windows shows a number on each screen.
Pick the New Rate
- Find the Choose a refresh rate setting and select its dropdown. You will see a list of rates, for example 60 Hz and 144 Hz. The exact list depends on your hardware.
- Select the rate you want. The screen may flicker or go black for a moment. Then a prompt appears asking whether you want to keep the change.
- Select Keep changes if the picture looks right. The new rate is now active and is saved.
If the screen stays black or unreadable, do nothing. The prompt has a countdown, and Windows reverts to the previous rate by itself after a few seconds. You can also select Revert yourself if the picture looks wrong but you can still see the prompt.
Confirm the Change Worked
- Look at the Display information box on the same page. The mode shown there now lists the rate you picked.
If the rate listed there still shows the old value, close Settings, reopen the Advanced display page and check again.
How to Undo the Change
Refresh rate changes are fully reversible and carry no risk to your files. Go back to Settings System Display Advanced display, open Choose a refresh rate, select the previous rate and select Keep changes.
If you do not remember the old value, 60 Hz is the safe choice. Nearly every monitor supports it.
What Dynamic Refresh Rate Does
On some laptops, the Choose a refresh rate list includes a Dynamic option, labelled with two rates, such as “Dynamic (60 Hz or 120 Hz)”. Dynamic refresh rate lets Windows switch between a lower and a higher rate on its own. It uses the higher rate when you scroll or write with a pen, and drops to the lower rate when the screen is idle to save battery.
The option only appears if your display supports a variable refresh rate and your graphics driver supports the feature. If you do not see it, your hardware or driver does not offer it. Choose a fixed rate instead if you prefer a constant value.
Why Your Refresh Rate Is Missing, Greyed Out or Stuck at 60 Hz
This is the most common problem. Work through the causes below in order—start with the quickest to check, then move to the more involved ones.
Only One Refresh Rate Appears
If Choose a refresh rate lists only 60 Hz, one of the links between your PC and the monitor is limiting it. Try these checks:
- Confirm the monitor itself supports a higher rate. Check its specification sheet.
- Switch to a DisplayPort cable, or a newer HDMI cable, and plug it into the matching port on both the PC and the monitor. Some monitors support their top rate on only one of their ports.
- Check the monitor’s own on-screen menu (the buttons on the monitor). Some models have a setting that limits the rate or must be switched on for high refresh rates.
- Plug the cable directly into the PC’s graphics card rather than into a dock, adapter or splitter. These can cap the rate.
You Are Plugged Into the Wrong Port on a Desktop
On a desktop with a separate graphics card, plug the monitor into the graphics card’s ports, not into the motherboard ports on the back of the case. The motherboard ports connect to your processor’s built-in graphics chip, which typically supports fewer refresh rates than a dedicated graphics card.
The Graphics Driver Is Out of Date or Generic
If Windows is using a basic display driver (a generic piece of software), higher rates may not be offered. Updating the driver often restores them. This step requires administrator privileges.
- Right-click the Start button and select Device Manager. You will see a list of hardware categories.
- Expand Display adapters. You will see your graphics hardware, such as an Intel, AMD or NVIDIA entry. If the entry reads Microsoft Basic Display Adapter, Windows has no proper driver installed.
- Right-click your graphics adapter and select Update driver.
- Select Search automatically for drivers and follow the prompts.
You can also check Settings Windows Update Advanced options Optional updates and look under Driver updates. For the best results, download the latest driver straight from your graphics card maker (Intel, AMD or NVIDIA) or your laptop manufacturer.
The Resolution Is Too High for the Rate
Resolution and refresh rate compete for bandwidth on the same connection. If a high rate is missing, lower the resolution one step and check the list again. Go to Settings System Display, open the Display resolution dropdown and pick the next lower option. If the higher rate appears at the lower resolution, the cable or port is the limit. A better cable usually lets you return to your native resolution.
The Setting Is Missing in a Remote or Virtual Session
In a remote desktop session or a virtual machine, the display is often virtual and runs at a fixed rate. The refresh rate options may not appear or may not change anything. Change the rate on the physical computer instead.
The Rate Changes Back on a Laptop
Some laptops lower the refresh rate on battery to save power. This is usually controlled by the manufacturer's own utility or power settings, not by Windows. Check that utility if the rate drops when you unplug the charger. Also check whether you picked a Dynamic option, which changes the rate automatically.
Change the Refresh Rate in the NVIDIA Control Panel
If your PC has an NVIDIA graphics card with the NVIDIA Control Panel installed, you can set the rate there instead. This is useful if the Windows list is missing a rate that your card actually supports.
- Right-click an empty area of the desktop, select Show more options, then select NVIDIA Control Panel. If you do not see it, search for it in the Start menu.
- In the left pane, under Display, select Change resolution.
- If you have more than one monitor, select the one you want to change at the top of the page.
- Open the Refresh rate dropdown and select a rate.
- Select Apply, then confirm the change if you are prompted.
Other graphics software has its own layout. AMD and Intel users should check their graphics app, and I do not give steps for those here because the menu names vary by version.
Games Can Use Their Own Refresh Rate
Some games change the refresh rate while they run, especially when running in full-screen mode (filling your entire monitor). If a game feels like it runs at 60 Hz while your desktop is set higher, open the game's video or display settings and look for a refresh rate option. Set it to the same value you chose in Windows. The desktop returns to your Windows setting when you close the game.
Higher or Lower: Which Rate to Pick
Pick the highest rate your monitor supports if you want the smoothest motion for scrolling, gaming and pen input. A high rate on a laptop uses more battery, so a lower rate such as 60 Hz is a good choice when you are working away from a charger. On a desktop, there is no practical reason to run below your monitor's maximum unless you see flicker or a signal problem.
If This Didn't Work
If the rate you want still does not appear after you change the cable, port and graphics driver, check the monitor manufacturer's website for a driver or firmware update for your exact model. A major Windows update or a graphics driver reinstall can reset the refresh rate to 60 Hz later, so revisit Advanced display if your screen suddenly feels less smooth. If the screen goes black and does not recover, press Windows key + Ctrl + Shift + B to restart the graphics driver.
Frequently asked questions
How do I change my Display from 60Hz to 144hz?
Open Settings, then go to System Display Advanced display. Under Choose a refresh rate, select 144 Hz and confirm the change when Windows asks. If 144 Hz is missing from the list, your monitor's maximum rate, its cable, or your graphics driver is limiting it.
How to change refresh rate 60Hz to 120hz?
Open Settings and go to System Display Advanced display. Under Choose a refresh rate, select 120 Hz. Click Keep changes when Windows asks, or the screen reverts after 15 seconds. If 120 Hz isn't listed, check that your monitor and cable support it.
Should my refresh rate be 60 or 120?
Use 120 Hz if your monitor supports it and you want smoother scrolling and cursor movement, especially for gaming or fast-moving video. Stay at 60 Hz if you mostly work in documents and browsers, want to save power, or find the higher rate distracting. Choose the highest rate your monitor supports.
How to change screen to 120hz?
Open Settings, select System Display Advanced display, then choose 120 Hz from the Choose a refresh rate list. Click Keep changes when Windows asks, or the setting reverts after 15 seconds. If 120 Hz isn't listed, your monitor, cable, or graphics driver may not support it.
Still have a question?
Answered by AI from this guide. Good questions may be added to this page — please don't include personal details.
Did this guide fix your problem?

About the Author
Richard
Tech Writer, IT Professional
Richard is a writer at Geek Rewind who turns complex IT tasks into clear, step-by-step guides. He draws on years of hands-on experience in system administration and enterprise IT operations, focusing on Windows, Linux and WordPress: the problems people actually run into, and the fixes that work. His server and WordPress guides come from systems he runs himself. Richard builds and maintains the platform behind Geek Rewind, from its Ubuntu servers and Nginx configuration to its custom WordPress plugins. Many new tutorials start with readers' questions, and he's always glad to answer them in the comments.
No comments yet — be the first to share your thoughts!