How to Enable or Disable Variable Refresh Rate for Games in Windows 11
How to Turn VRR On or Off Using Windows Settings
You can easily turn Variable Refresh Rate (VRR) on or off in Windows 11 using the Settings app. This feature makes games look smoother by matching your monitor’s refresh rate to the game’s speed, improving your gaming visuals without complex steps.- Open Windows Settings. Click the Start button. Then click the Settings gear icon. Or press Windows key + I on your keyboard.
- In Settings, click on System on the left side.
- Click on Display on the right side.
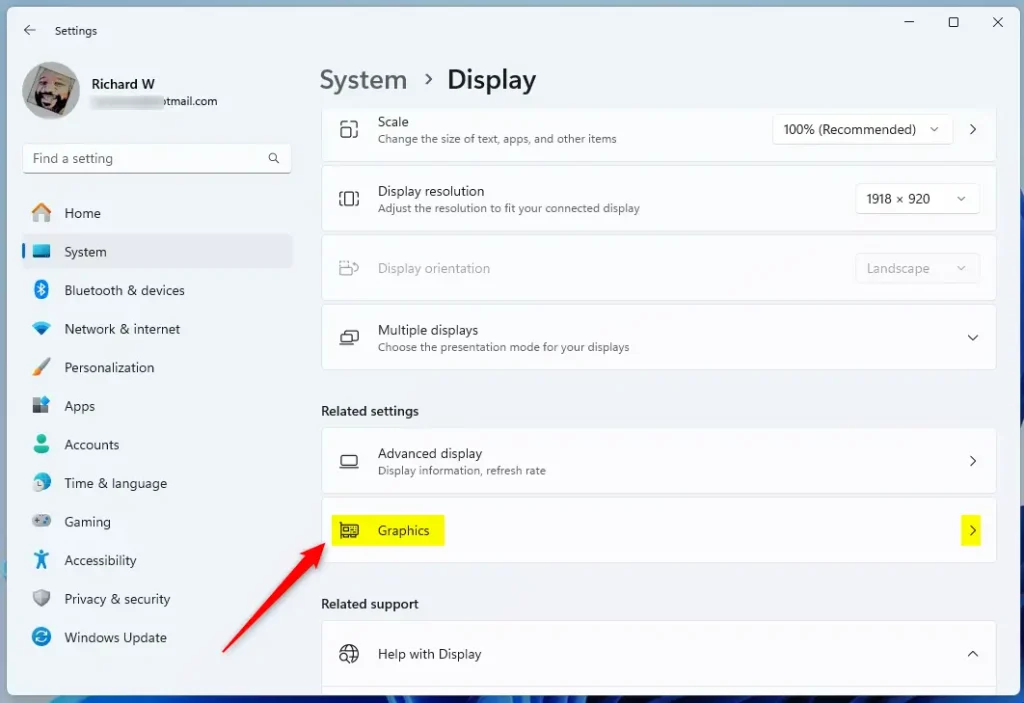
- Scroll down. Find Related settings. Then click on Graphics.
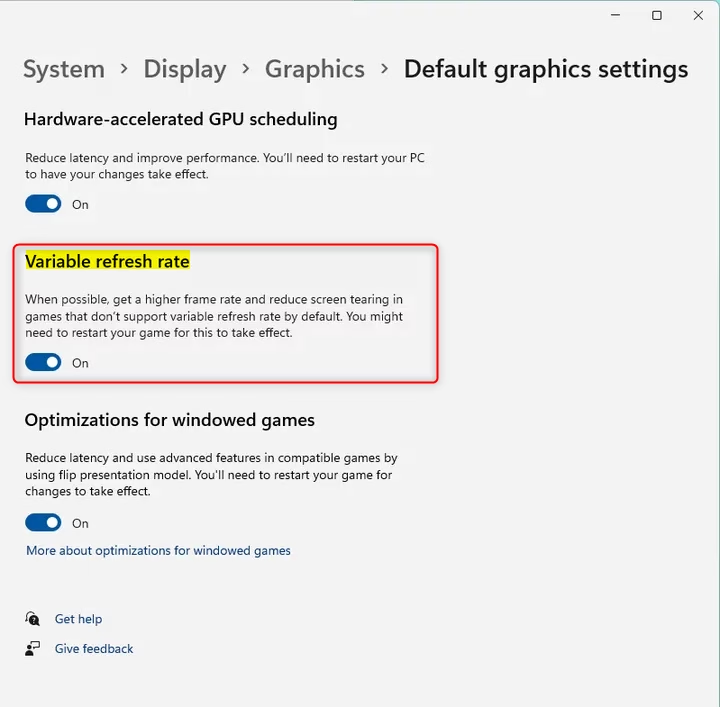
- Scroll down. Click Advanced graphics settings.
- Find the option Variable refresh rate. Switch it On to enable VRR.
- To turn it off, just switch the toggle back to Off.

How to Turn VRR On or Off Using Registry Editor (Advanced Users)
If you’re comfortable with advanced settings, you can change Variable Refresh Rate (VRR) on or off in Windows 11 using the Registry Editor. This method requires administrator rights and lets you control VRR by changing specific system files when standard settings aren’t enough.
⚠️ Admin Privileges Required
- Open the Registry Editor Registry Editor:
- Press Windows key + R to open the Run box.
- Type
regeditand press Enter.
- Navigate to this path:
HKEY_CURRENT_USER\Software\Microsoft\DirectX\UserGpuPreferences - If
UserGpuPreferencesdoes not exist, right-click on DirectX. Select New > Key. Name itUserGpuPreferences. - In the
UserGpuPreferencesfolder, right-click on the right side. Select New > String Value. - Name the new string
DirectXUserGlobalSettings. - Double-click this new string. Set its Value data:
- Enter
VRROptimzeEnable=1to turn VRR On. - Enter
VRROptimzeEnable=0to turn VRR Off.
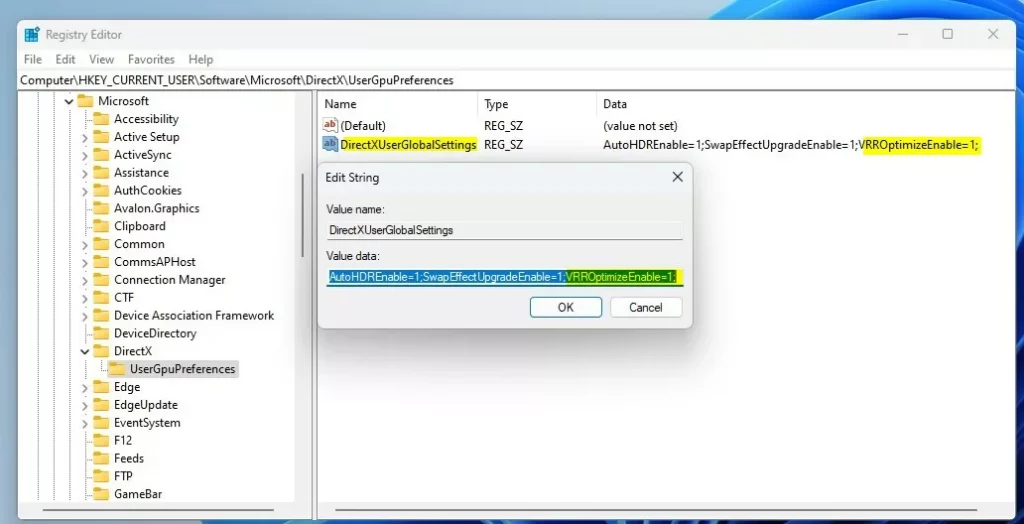
Windows UserGpuPreferences Variable Refresh Rate string value - Enter
Summary
Windows 11 VRR helps games look smoother by syncing your monitor’s refresh rate with your game’s frame rate, preventing screen tearing and stuttering for a better experience. VRR works best with compatible monitors and up-to-date graphics drivers, ensuring your games run as smoothly as possible.- VRR helps your monitor show smoother games. It matches the screen refresh rate to the game’s frame rate.
- It works best on VRR-supported monitors and with updated graphics drivers.
- You can easily turn VRR on or off in Windows 11 Settings. Go to System > Display > Graphics > Advanced graphics settings.
- Advanced users can also use Registry Editor to enable or disable VRR.
Learn More
For official details, check out the Microsoft Dev Blog.
Is VRR basically VSYNC?
Variable Refresh Rate (VRR) and VSYNC both aim to sync your game’s speed with your monitor, but they work differently.
How do I force 120Hz on 🪟 Windows 11?
You can force a 120Hz refresh rate on Windows 11 by going into your display settings and choosing a fixed high refresh rate.
This guide shows you how to turn Variable Refresh Rate (VRR) on or off in Windows 11. It’s easy to do.
Go to Settings > System > Display > Graphics > Advanced graphics settings and toggle “Variable refresh rate” on or off. This feature synchronizes your monitor’s refresh rate with your game’s frame rate for smoother visuals.
What is Variable Refresh Rate (VRR)?
Variable Refresh Rate, or VRR, is a cool feature that lets your monitor adjust its screen refresh speed to match what your game or video is doing.
If your monitor supports VRR (like AMD FreeSync or Nvidia G-SYNC), Windows 11 can use this to improve your gaming experience.
Before You Begin
- Make sure your monitor supports VRR.
- Make sure your graphics drivers are up to date.
- If your PC or monitor doesn’t support VRR, you won’t see the option.
How to Turn VRR On or Off Using Windows Settings
You can easily turn Variable Refresh Rate (VRR) on or off in Windows 11 using the Settings app. This feature makes games look smoother by matching your monitor’s refresh rate to the game’s speed, improving your gaming visuals without complex steps.- Open Windows Settings. Click the Start button. Then click the Settings gear icon. Or press Windows key + I on your keyboard.
- In Settings, click on System on the left side.
- Click on Display on the right side.
- Scroll down. Find Related settings. Then click on Graphics.
- Scroll down. Click Advanced graphics settings.
- Find the option Variable refresh rate. Switch it On to enable VRR.
- To turn it off, just switch the toggle back to Off.
How to Turn VRR On or Off Using Registry Editor (Advanced Users)
If you’re comfortable with advanced settings, you can change Variable Refresh Rate (VRR) on or off in Windows 11 using the Registry Editor. This method requires administrator rights and lets you control VRR by changing specific system files when standard settings aren’t enough.
⚠️ Admin Privileges Required
- Open the Registry Editor Registry Editor:
- Press Windows key + R to open the Run box.
- Type
regeditand press Enter.
- Navigate to this path:
HKEY_CURRENT_USER\Software\Microsoft\DirectX\UserGpuPreferences - If
UserGpuPreferencesdoes not exist, right-click on DirectX. Select New > Key. Name itUserGpuPreferences. - In the
UserGpuPreferencesfolder, right-click on the right side. Select New > String Value. - Name the new string
DirectXUserGlobalSettings. - Double-click this new string. Set its Value data:
- Enter
VRROptimzeEnable=1to turn VRR On. - Enter
VRROptimzeEnable=0to turn VRR Off.
Windows UserGpuPreferences Variable Refresh Rate string value - Enter
Registry editing requires caution; incorrect changes can harm your Windows 11 system. Back up the registry, a central database for system settings, before making any modifications to prevent potential data loss or system instability.
Summary
Windows 11 VRR helps games look smoother by syncing your monitor’s refresh rate with your game’s frame rate, preventing screen tearing and stuttering for a better experience. VRR works best with compatible monitors and up-to-date graphics drivers, ensuring your games run as smoothly as possible.- VRR helps your monitor show smoother games. It matches the screen refresh rate to the game’s frame rate.
- It works best on VRR-supported monitors and with updated graphics drivers.
- You can easily turn VRR on or off in Windows 11 Settings. Go to System > Display > Graphics > Advanced graphics settings.
- Advanced users can also use Registry Editor to enable or disable VRR.
Learn More
For official details, check out the Microsoft Dev Blog.
Is VRR basically VSYNC?
Variable Refresh Rate (VRR) and VSYNC both aim to sync your game’s speed with your monitor, but they work differently.
How do I force 120Hz on 🪟 Windows 11?
You can force a 120Hz refresh rate on Windows 11 by going into your display settings and choosing a fixed high refresh rate.
Was this guide helpful?

About the Author
Richard
Tech Writer, IT Professional
Richard, a writer for Geek Rewind, is a tech enthusiast who loves breaking down complex IT topics into simple, easy-to-understand ideas. With years of hands-on experience in system administration and enterprise IT operations, he’s developed a knack for offering practical tips and solutions. Richard aims to make technology more accessible and actionable. He's deeply committed to the Geek Rewind community, always ready to answer questions and engage in discussions.

No comments yet — be the first to share your thoughts!