How to Change Registry Editor Font in Windows 11

Registry Editor has its own font setting. It controls the text used for keys, values and data in the editor window. A larger or clearer font can reduce eye strain during long sessions. Any font already installed on your PC will work.
You need administrator rights to open Registry Editor, so expect a User Account Control prompt. This works the same on Windows 11 Home and Pro. The original guide says the change applies to all user accounts on the PC. Check this on a shared machine by opening Registry Editor under a second account.
The change only affects how Registry Editor looks. It does not change any registry key or value, and it does not touch the fonts used by the rest of Windows.
Open Registry Editor by typing regedit in Windows search, click View Font, choose your typeface, style and size from the dialog, and click OK. The change applies immediately with no restart needed.
Option 1Change Font in Registry Editor
The simplest way to change the font is from inside Registry Editor. You pick a font, a style and a size from the Font dialog. No restart is needed.
- Type
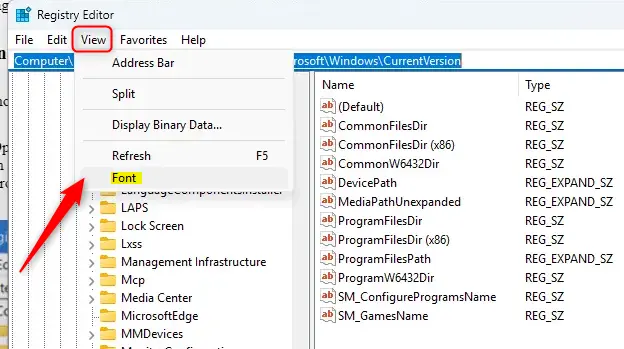
regeditin the Windows search bar and press Enter. Click Yes if User Account Control asks whether to allow the app to make changes. Registry Editor opens, with the key tree on the left and values on the right. - Click the View menu at the top of the window.
- In the dropdown, click Font. A font selection window opens.
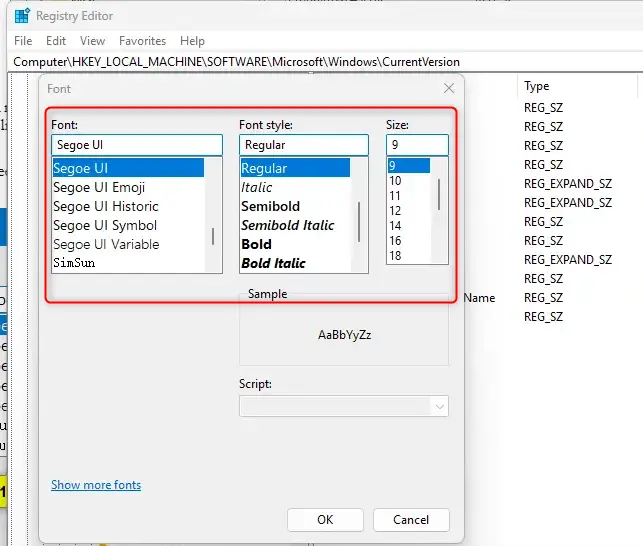
- Choose your options in the window that appears. Pick a typeface under Font, a look such as regular or bold under Font style, and a number under Size. Check the Sample box as you go. It shows a live preview of your choices.
- Click OK when you are happy with the preview. The Registry Editor text changes to the new font straight away, and the choice is saved automatically, so you will see it the next time you open the editor.
If the result is too small or hard to read, open View Font again and pick different options. You can repeat this as often as you like.
Option 2Reset Font to Default using a Command
This is quicker than hunting for the old font name, style and size by hand. You can also use it if you chose a font that is hard to read and do not want to work through the menu again.
- Close Registry Editor if it is open.
- Open Windows Terminal as an administrator. Search for "Windows Terminal" in the Start menu, right-click it and select Run as administrator. Click Yes at the User Account Control prompt. Windows PowerShell or Command Prompt opens, and either one works for this command.
- Copy the command below, paste it into the Windows Terminal window and press Enter. The command should run without an error message.
reg delete "HKEY_CURRENT_USER\Software\Microsoft\Windows\CurrentVersion\Applets\Regedit" /va /f- Close the Windows Terminal window.
- Open Registry Editor again, the same way as before.
The editor should now show the default Windows font. If it still shows your custom font, run the command again from an elevated window and reopen Registry Editor.
Summary
Changing the Registry Editor font makes the text easier to read and takes under a minute. Use View Font to pick a new font, style and size. If you want to go back to the original look, run the reset command in an elevated Windows Terminal and reopen Registry Editor.
Was this guide helpful?
50% of readers found this helpful (2 votes)

About the Author
Richard
Tech Writer, IT Professional
Richard is a writer at Geek Rewind who turns complex IT tasks into clear, step-by-step guides. He draws on years of hands-on experience in system administration and enterprise IT operations, focusing on Windows, Linux and WordPress: the problems people actually run into, and the fixes that work. His server and WordPress guides come from systems he runs himself. Richard builds and maintains the platform behind Geek Rewind, from its Ubuntu servers and Nginx configuration to its custom WordPress plugins. Many new tutorials start with readers' questions, and he's always glad to answer them in the comments.




No comments yet — be the first to share your thoughts!