How to Use Dropbox Selective Sync On Windows 11

Dropbox Selective Sync is a built-in feature of the Dropbox desktop app for Windows 11. It lets you choose which folders are stored on your hard drive. When you turn off sync for a folder, Dropbox removes it from your PC, but the files stay safe in your online account.
This helps when large folders, such as photo libraries or video collections, take up too much room on your computer. You can bring those online-only files back at any time by turning sync back on in the Dropbox app settings.
- Folders OnlySelective Sync works on whole folders. You can sync or unsync a folder, including everything inside it. You cannot pick individual files.
- Per ComputerSelective Sync settings belong to each computer. If you set it up on your work laptop, it does not carry over to your home computer. You have to set it up separately on each device.
- Online AccessA folder that isn’t synced to your computer is still available. Log in to your Dropbox account in a web browser on any device to see all of its files.
Open Dropbox Preferences from the system tray icon, go to the Sync tab, click Modify under Selective Sync, and check or uncheck folders to choose which ones sync to your computer.
Getting Started with Selective Sync on Windows
Selective Sync saves hard drive space on Windows 11 by letting you decide which cloud folders live on your PC and which stay online only. Before you start, make sure the Dropbox desktop app is installed, you are signed in, and it is running in your system tray.
The Dropbox icon appears in the system tray after installation and startup. It is usually in the bottom-right corner of the screen, next to the clock, and shows a small blue or white Dropbox logo.
If you don’t see the icon, Windows 11 may be hiding it. Click the small upward arrow (^) near the clock to show hidden icons. If Dropbox isn’t there either, open the Start menu, search for Dropbox and launch it.
Step 1Access Dropbox Preferences
The Dropbox Preferences window holds the settings that control your local storage and synced files. Here is how to open it.
- Find the Dropbox icon. Look in the system tray , near the clock, for the blue or white Dropbox icon. If it isn’t visible, click the upward arrow (^) to show hidden icons.
- Click the icon once. A small Dropbox window opens, showing recent activity and notifications.
- Click your profile picture or initials. In the original app layout this is in the bottom-left corner of the window. Newer versions of the app may place it at the top instead, so look around the edges of the window if you don’t see it. A menu appears.
- Select Preferences. The Preferences window opens.
If you can’t find Preferences, look for a gear icon in the same window. Menu layouts change slightly between Dropbox versions, but the Preferences option is always reachable from the tray window.
Step 2Navigate to Sync Settings
With Preferences open, go to the section that controls syncing.
- Click the Sync tab. This tab controls how Dropbox downloads and syncs files between your computer and the cloud. You should now see the sync options, including the Selective Sync section.
Step 3Initiate Selective Sync
The Selective Sync setting sits on the Sync tab. This is where you change which folders are stored on your PC.
- Find Selective Sync. On the Sync tab, look for a section called Selective Sync. In some versions the wording is different, for example “Choose folders to sync.”
- Click Modify. Click the Modify button next to Selective Sync (or the equivalent button in your version). A new window opens that lists all the folders in your Dropbox account.
If you can’t find the setting, make sure you are using the Dropbox desktop app and not the website. The website has no Selective Sync option. If your account uses a team folder setup, an admin may also limit what you can change.
Step 4Choose Your Folders
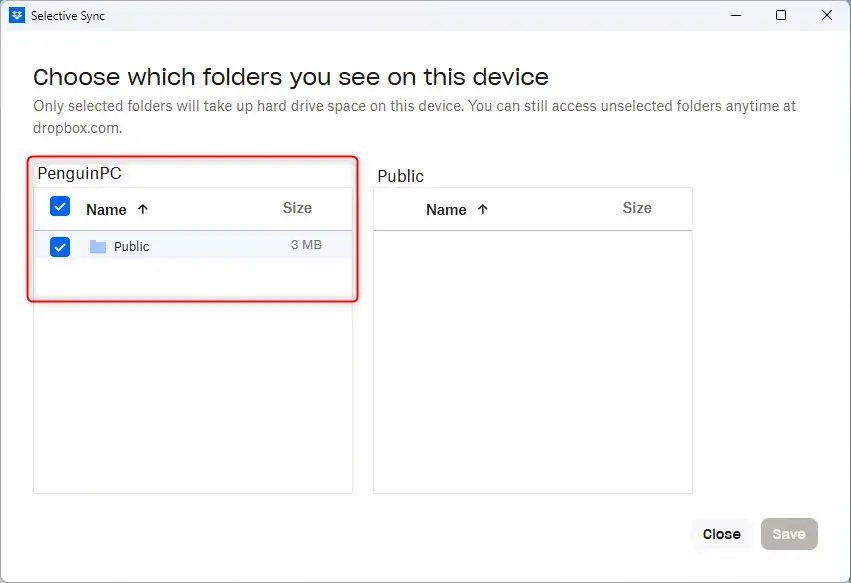
The folder list controls which directories take up space on your hard drive. A checked box means the folder is downloaded to your PC. An unchecked box means it stays online only.
- Check boxes for folders you want to sync. A checked folder is downloaded to your computer along with everything inside it. Make sure you have enough free disk space for it.
- Uncheck boxes for folders you want to remove. Unchecking a folder removes it from your PC but keeps it in your online Dropbox account. If the folder is already on your computer, Dropbox starts removing those files from your hard drive. A warning message may appear first. Read it, then confirm.
- Expand folders to choose subfolders. Click the arrow or plus sign next to a folder to see the folders inside it. This lets you be very specific. For example, you can sync your main “Work Projects” folder but unsync an old “Archived Projects 2020” subfolder inside it.
Use this window to unsync folders, not File Explorer. If you delete a synced folder directly from your Dropbox folder in File Explorer, Dropbox treats it as a deletion and removes it from your online account too. Unchecking the box here is the safe way to free up space.
Step 5Confirm Your Changes
Your selections only take effect once you save them. Saving tells Dropbox to start downloading new folders or removing the ones you unchecked.
- Click Update. After you have checked and unchecked the folders you want, click the Update button, usually at the bottom of the Selective Sync window. Dropbox may ask you to confirm the change. The window closes and syncing begins.
- Wait for Dropbox to finish. Dropbox now processes your changes. Folders you unchecked are removed from your computer. Folders you checked are downloaded. How long this takes depends on the number of files and your internet speed. You can keep using your computer in the meantime. The Dropbox tray icon shows a sync symbol while it works and a green check when it is done.
You don't need to restart Windows or the Dropbox app. To undo a change, repeat the same steps and check the folder again. Dropbox downloads it again from your online account.
References:
Summary
Selective Sync on Windows 11 saves hard drive space by keeping specific folders online instead of on your physical computer. You can always see your complete file list on the Dropbox website, while only the folders you need most are downloaded to your PC. Remember that the setting applies to one computer at a time, so repeat the steps on any other device where you want to save space.
Have a question about this guide?
Answered by AI from this guide. Good questions may be added to this page — please don't include personal details.
Did this guide fix your problem?

About the Author
Richard
Tech Writer, IT Professional
Richard is a writer at Geek Rewind who turns complex IT tasks into clear, step-by-step guides. He draws on years of hands-on experience in system administration and enterprise IT operations, focusing on Windows, Linux and WordPress: the problems people actually run into, and the fixes that work. His server and WordPress guides come from systems he runs himself. Richard builds and maintains the platform behind Geek Rewind, from its Ubuntu servers and Nginx configuration to its custom WordPress plugins. Many new tutorials start with readers' questions, and he's always glad to answer them in the comments.
No comments yet — be the first to share your thoughts!