How to Turn Photo and Video Uploads on or off in Dropbox App on Windows 11

Camera uploads in Dropbox for Windows 11 control whether your pictures and videos automatically save to cloud storage when you plug in a phone, camera or memory card. The feature copies new media files to Dropbox so you have a backup without moving files by hand.
You can turn this automatic backup on or off at any time in the Dropbox desktop app settings. Turning it off stops unwanted files from filling up your Dropbox storage. Turning it on makes sure new photos are saved as soon as you connect a device. The steps below cover the switch, the media type, and the Windows AutoPlay setting that goes with it.
Open Dropbox in your taskbar , click your profile picture, select Preferences, go to the Backups tab, and toggle the “Enable camera uploads” switch on or off. You can also choose whether to upload photos only or photos and videos from the dropdown menu.
Step 1Open Dropbox Settings
Everything for camera uploads is managed in the Dropbox Preferences window. You reach it from the Dropbox icon in the taskbar .
- Click the Dropbox icon in your taskbar . A small Dropbox menu should appear.
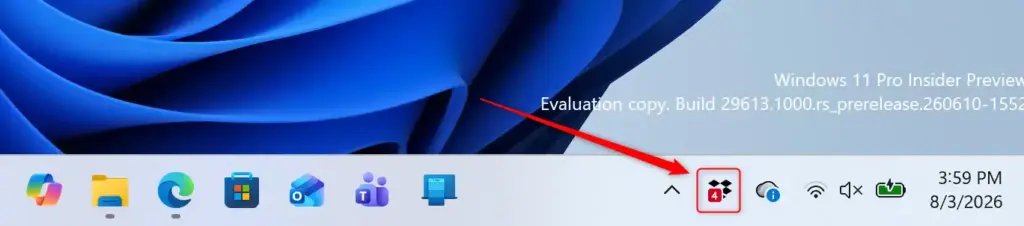
Dropbox icon highlighted in the Windows 11 taskbar. - In that menu, click your profile picture or initials in the bottom-left corner. A list of options should open.
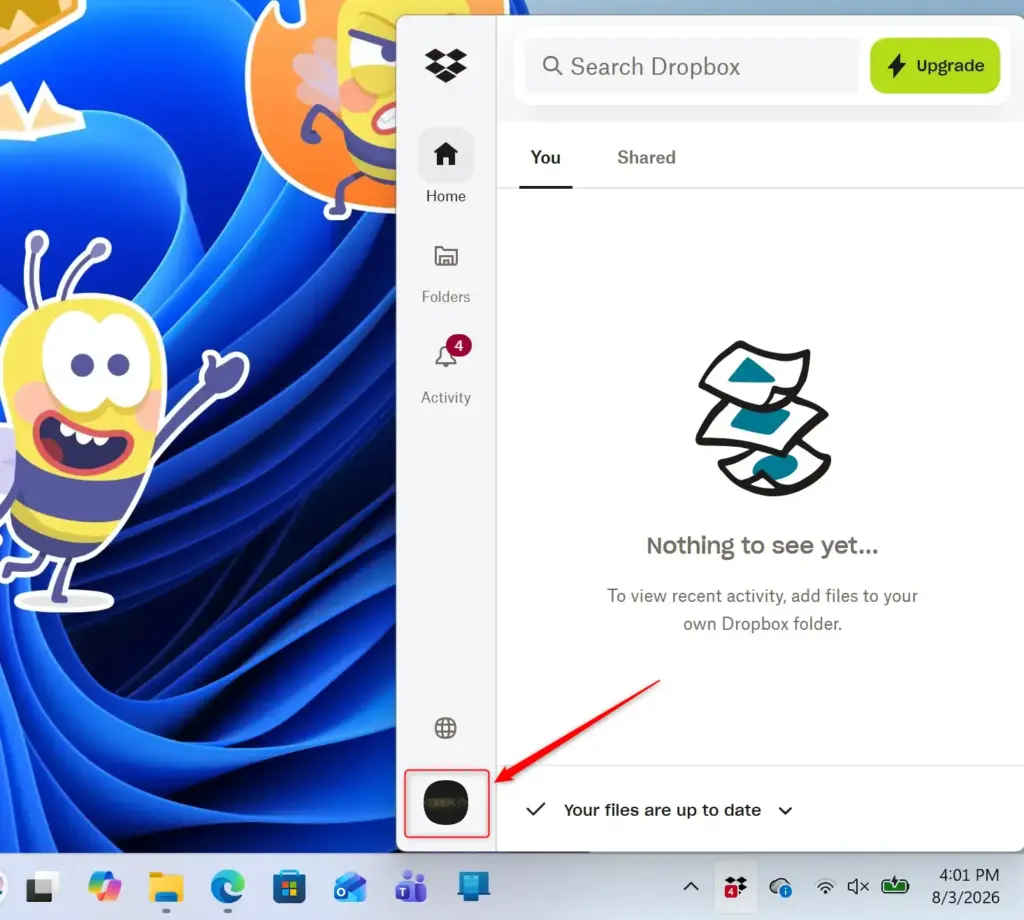
Dropbox taskbar icon menu showing profile and settings options. - From the list, choose Preferences. The Preferences window should open.
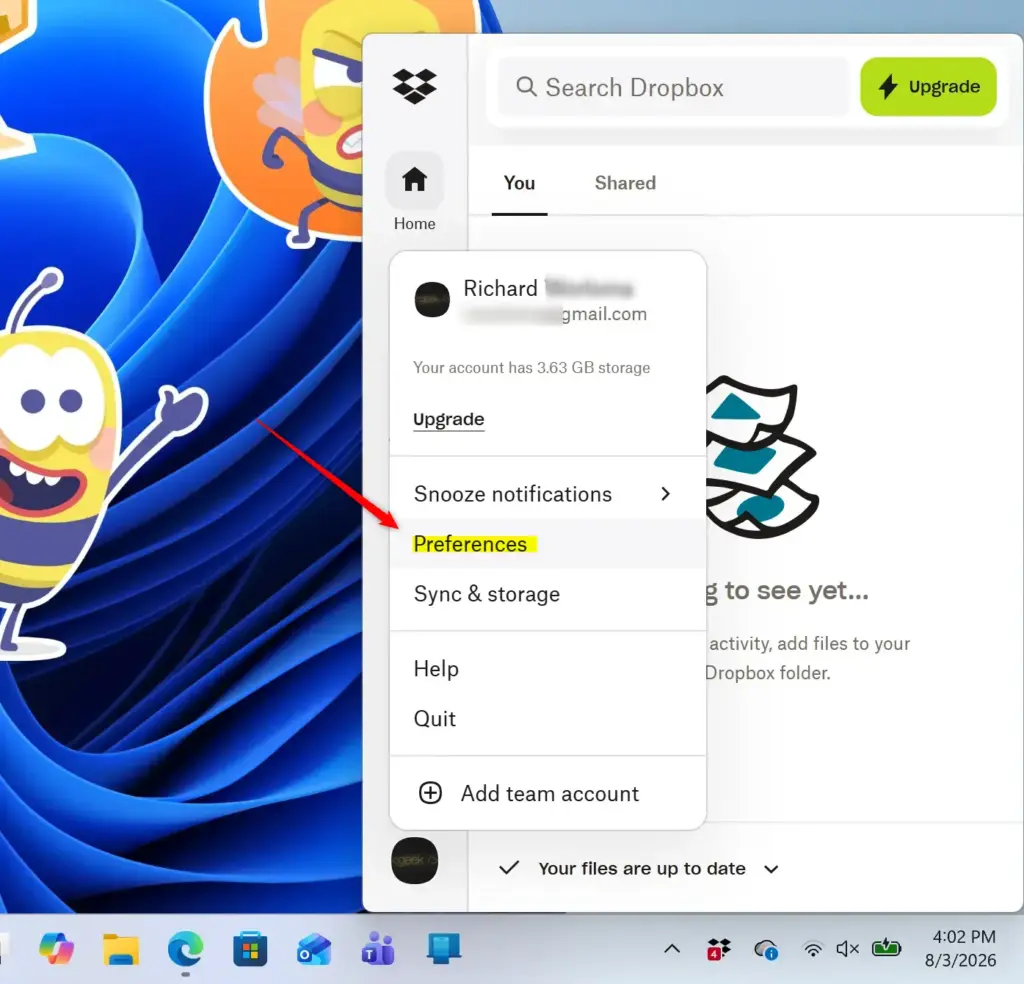
Dropbox preferences menu open, showing general settings.
The Dropbox icon may be hidden in the system tray . Click the small upward-pointing arrow (^) near the clock to show hidden icons. If the icon is still missing, Dropbox is probably not running. Open Dropbox from the Start menu , wait a few seconds, and check the taskbar again.
Sign in first, then repeat the steps.
Step 2Go to the Backups Section
The Preferences window is split into tabs. Camera upload options are in the one that covers backups.
- Click the Backups tab. This is where you control automatic photo and video uploads.
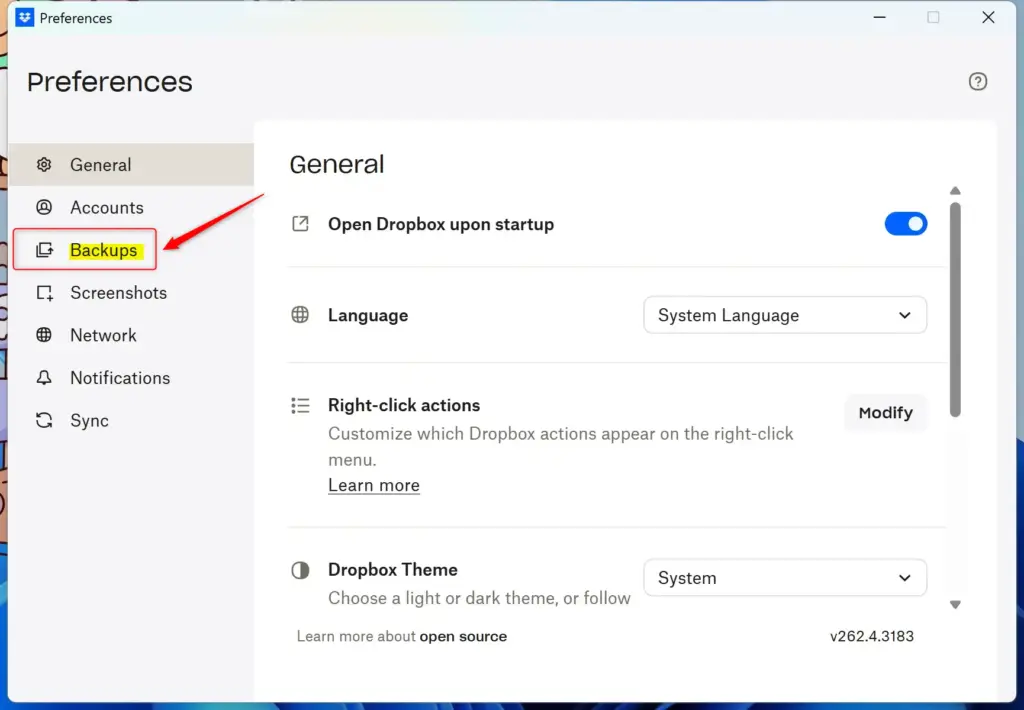
The tab layout and wording can change slightly between Dropbox app versions. If you do not see a tab named Backups, look through the other tabs for a camera uploads or import option. Keeping the Dropbox app updated helps make sure you see the current layout.
Step 3Control Camera Uploads
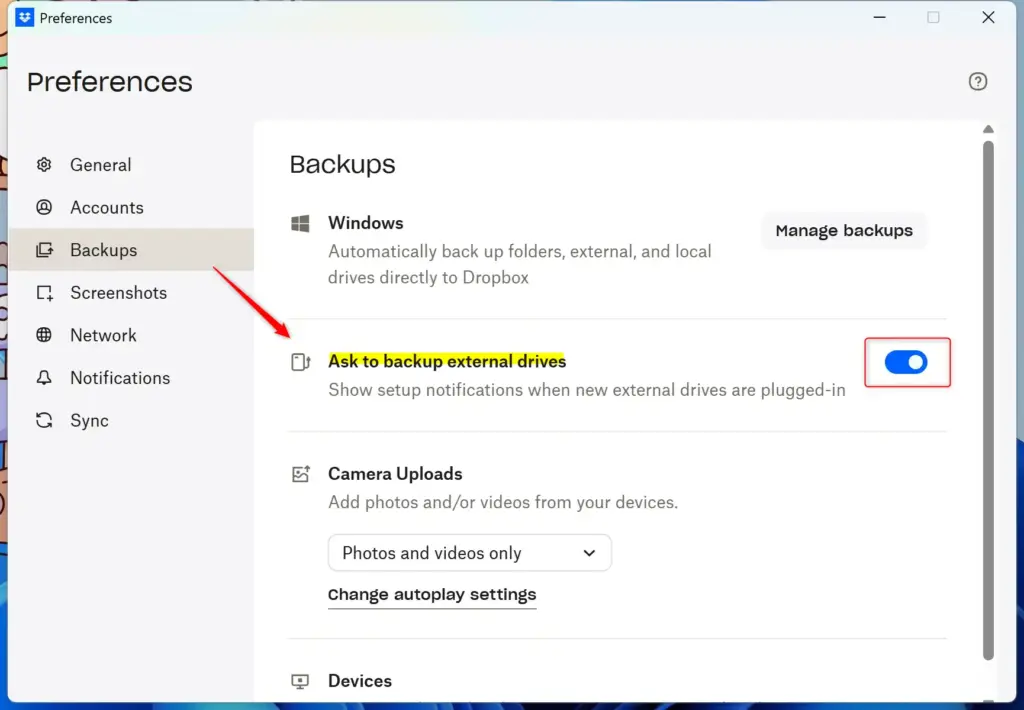
The camera uploads switch in the Backups section decides whether Dropbox saves new media automatically. Moving it on starts the backup. Moving it off stops uploads completely.
- In the Backups tab, look for an option like "Enable camera uploads" or a similar switch.
- To turn uploads ON, make sure the switch is in the "on" position. Dropbox will now save new photos and videos from connected devices.
- To turn uploads OFF, move the switch to the "off" position. New files from your devices will no longer be copied to Dropbox.
Uploaded photos and videos count against your Dropbox storage, so check your available space if you are turning the feature on for a large library. To undo the change, return to the same tab and flip the switch back.
Step 4Choose What to Upload (If Turned On)
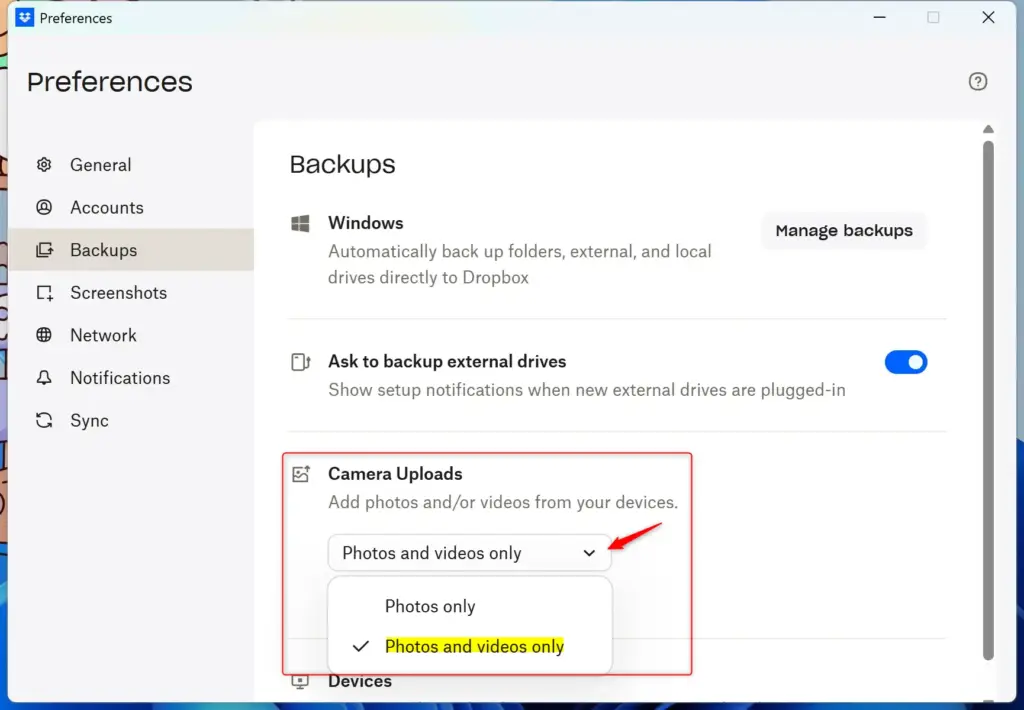
Once camera uploads are on, you can choose whether Dropbox saves only pictures or both pictures and videos. Videos are usually much larger than photos, so this choice has a big effect on how fast your storage fills.
- Check that the "Enable camera uploads" option is on. A dropdown menu should appear nearby. If you do not see it, the switch is probably off.
- Click the dropdown menu. You will likely see options such as:
- Photos only
- Photos and videos
- Choose the option that works best for you. For instance, if you only want to back up your pictures, select "Photos only."
You can come back and change this at any time. The new choice applies to files uploaded from then on.
Step 5Adjust Windows AutoPlay Settings
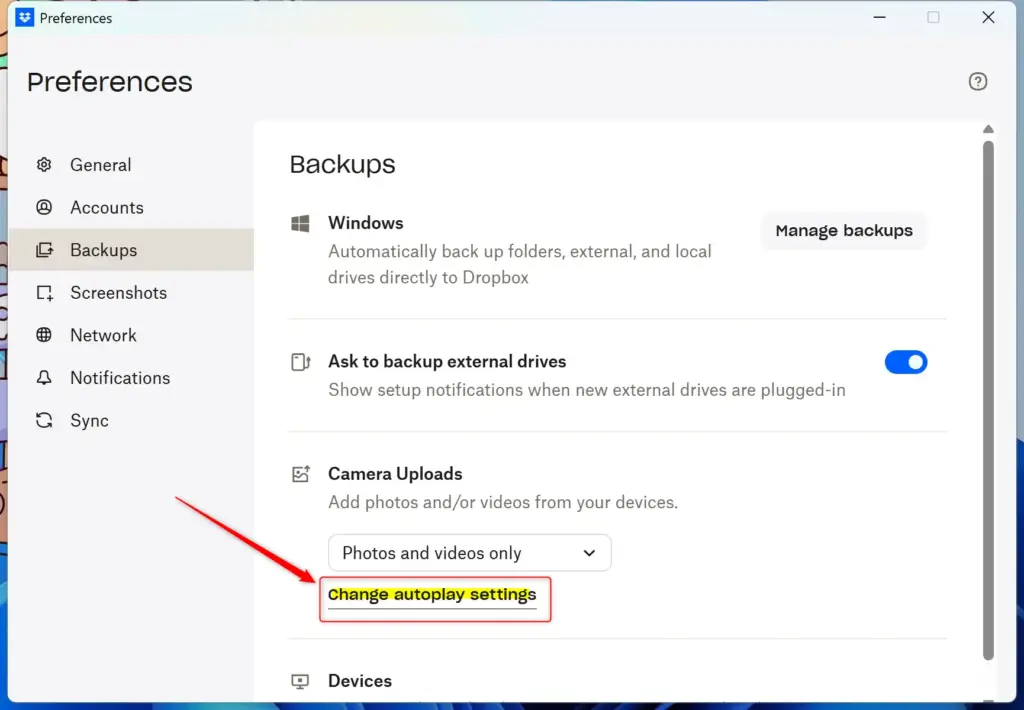
When you plug in a phone, camera or memory card, Windows AutoPlay decides what happens next. For Dropbox to start uploading on its own, AutoPlay needs to be set to use Dropbox. The Dropbox Backups settings link to the AutoPlay page in Windows settings.
- In the Backups section of Dropbox Preferences, look for a setting labeled something like "Import photos and videos" or "Change AutoPlay Settings" and click it.
- A Windows settings window should open. You will see options for different devices, such as "Removable drive" (this could be your phone or camera) and "Memory card."
- If AutoPlay options appear greyed out or missing, make sure the option to use AutoPlay for all media and devices is switched on. In Windows 11 this page is under Settings Bluetooth & devices > AutoPlay.
- Click the dropdown menu next to "Removable drive."
- To turn on Dropbox uploads, choose the option that says "Import photos and videos (Dropbox)" or something similar.
- To turn off Dropbox uploads through AutoPlay, select a different option, such as "Take no action" or "Ask me every time."
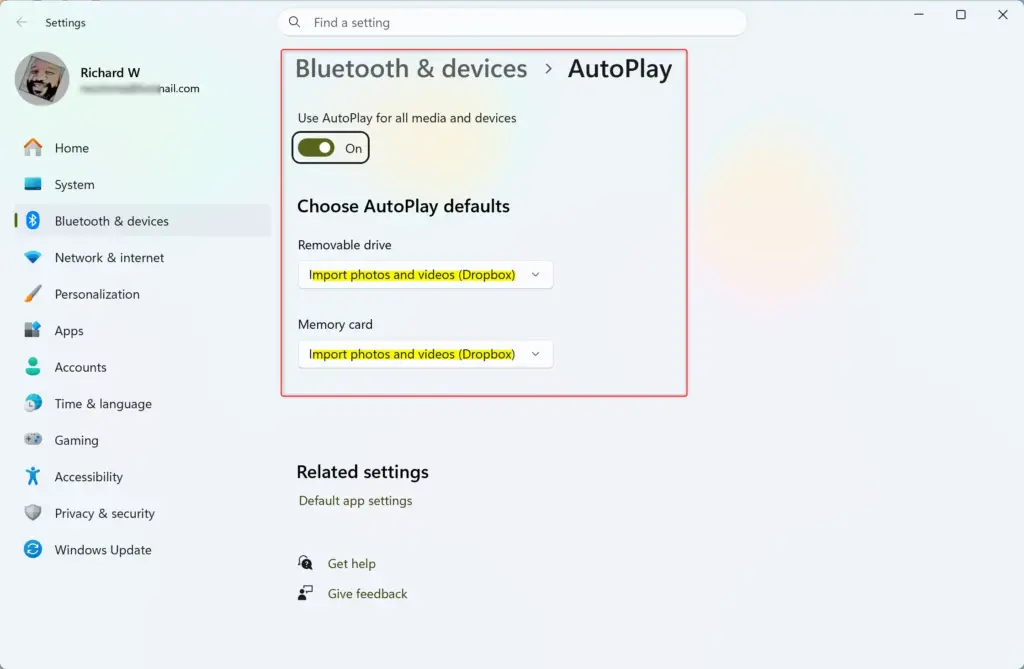
- Repeat the same choice for "Memory card" if you use SD cards from your camera.
AutoPlay settings are changed in Windows, not in Dropbox. Switching them does not turn the camera uploads switch on or off. Check both places if uploads are not behaving the way you expect. A restart is not normally needed, but unplug and reconnect your device so the new setting takes effect.
References:
https://help.dropbox.com/create-upload/camera-uploads-overview
Summary
You can control Dropbox camera uploads on Windows 11 by opening Dropbox preferences and going to the Backups tab. Use the camera uploads switch to turn the feature on or off, pick Photos only or Photos and videos, and set Windows AutoPlay so connected devices are handled the way you want.
Was this guide helpful?

About the Author
Richard
Tech Writer, IT Professional
Richard is a writer at Geek Rewind who turns complex IT tasks into clear, step-by-step guides. He draws on years of hands-on experience in system administration and enterprise IT operations, focusing on Windows, Linux and WordPress: the problems people actually run into, and the fixes that work. His server and WordPress guides come from systems he runs himself. Richard builds and maintains the platform behind Geek Rewind, from its Ubuntu servers and Nginx configuration to its custom WordPress plugins. Many new tutorials start with readers' questions, and he's always glad to answer them in the comments.


No comments yet — be the first to share your thoughts!