How to Set Up Dropbox Automatic Backups on Windows 11

- 30 steps
- Needs administrator rights
Access Dropbox Settings
To change your Dropbox automatic backups, you first need to open the main menu from your taskbar. Look in the bottom-right corner of your screen near the clock for the Dropbox icon, click it to open the menu, and then click your profile picture or initials in the bottom-left corner to reach your account preferences.- Find the Dropbox icon in your computer’s system tray . This is usually in the bottom-right corner of your screen, near the clock. If you don’t see it, click the small upward arrow to show hidden icons.
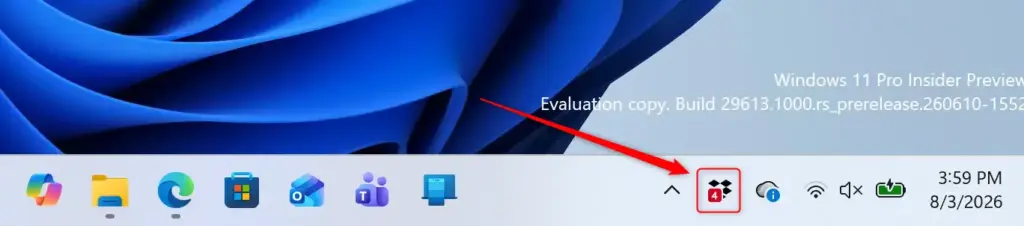
Dropbox icon highlighted in the Windows 11 taskbar. - Click the Dropbox icon. A menu will appear.
- In the bottom-left corner of the menu, click your profile picture or initials.
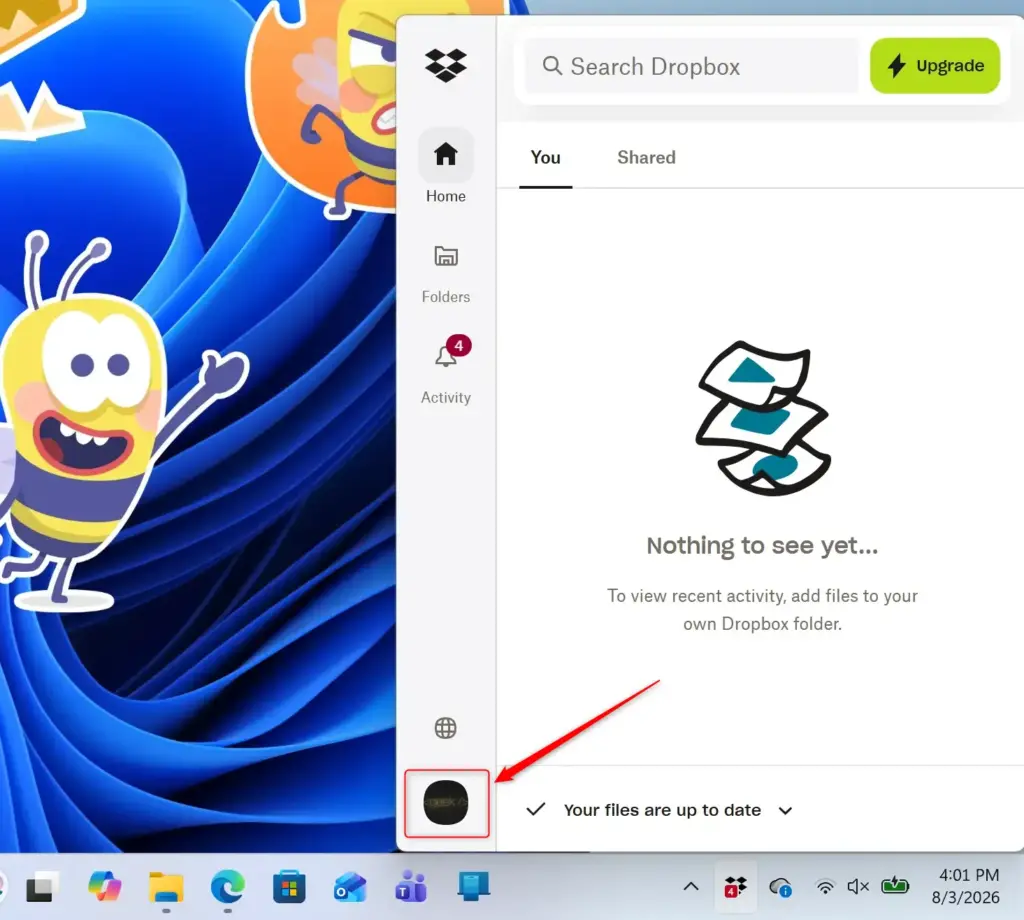
Dropbox taskbar icon menu showing profile and settings options.
Go to Backup Preferences
- From the menu that pops up, select Preferences.
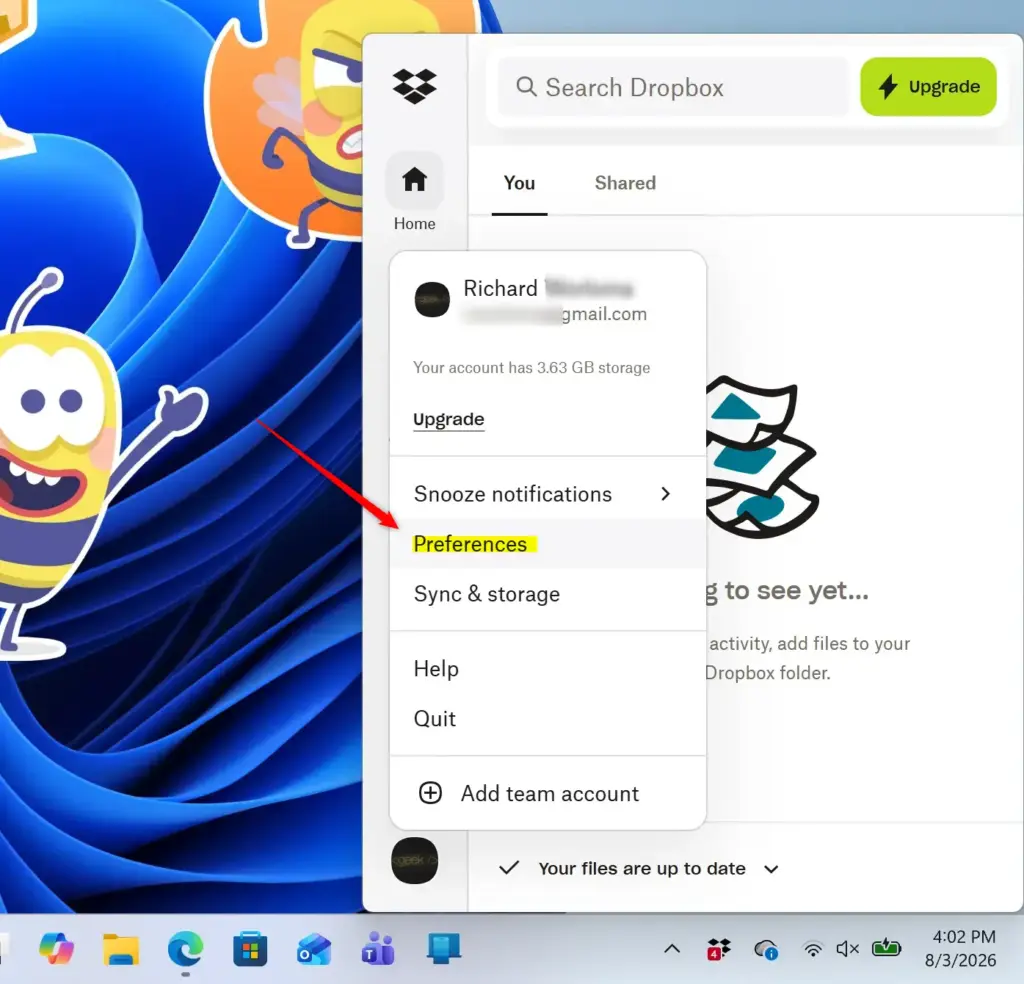
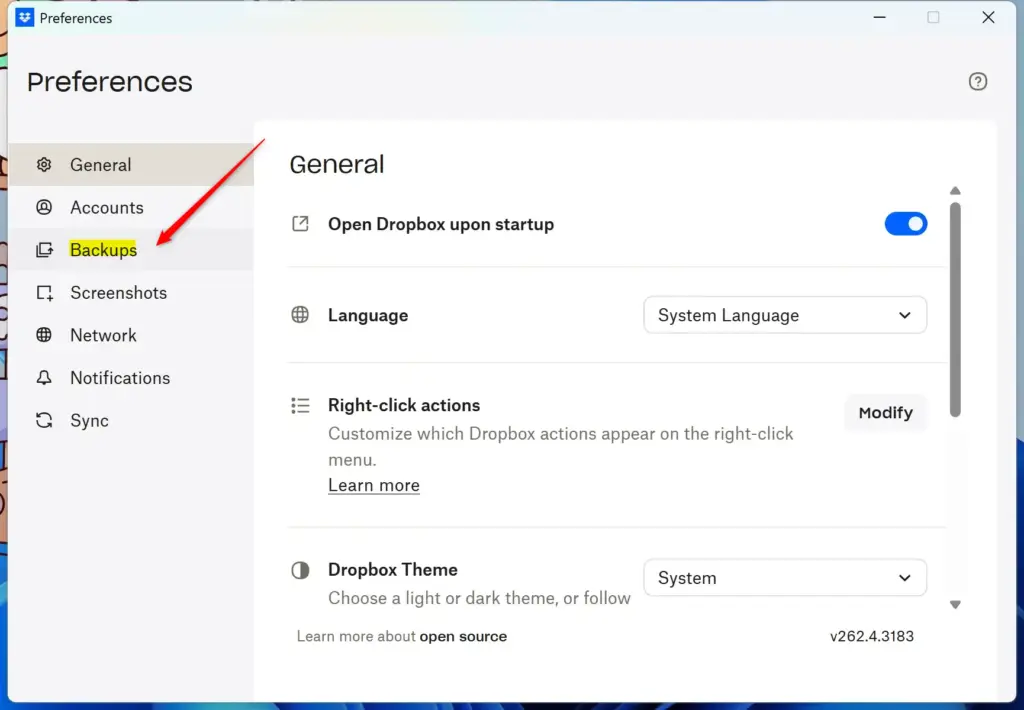
Dropbox preferences menu open, showing general settings. - The main Dropbox settings window will open. Look for the Backups tab at the top and click it.
Manage Your Backups
You can change which folders Dropbox automatic backups protects by opening the backup management screen. Go to the Backups tab in your account preferences and click the Manage backups button or the Modify folder selection option to choose the exact folders on your computer you want to keep safe.- On the Backups tab, click the Manage backups button. This is where you choose what files to protect.
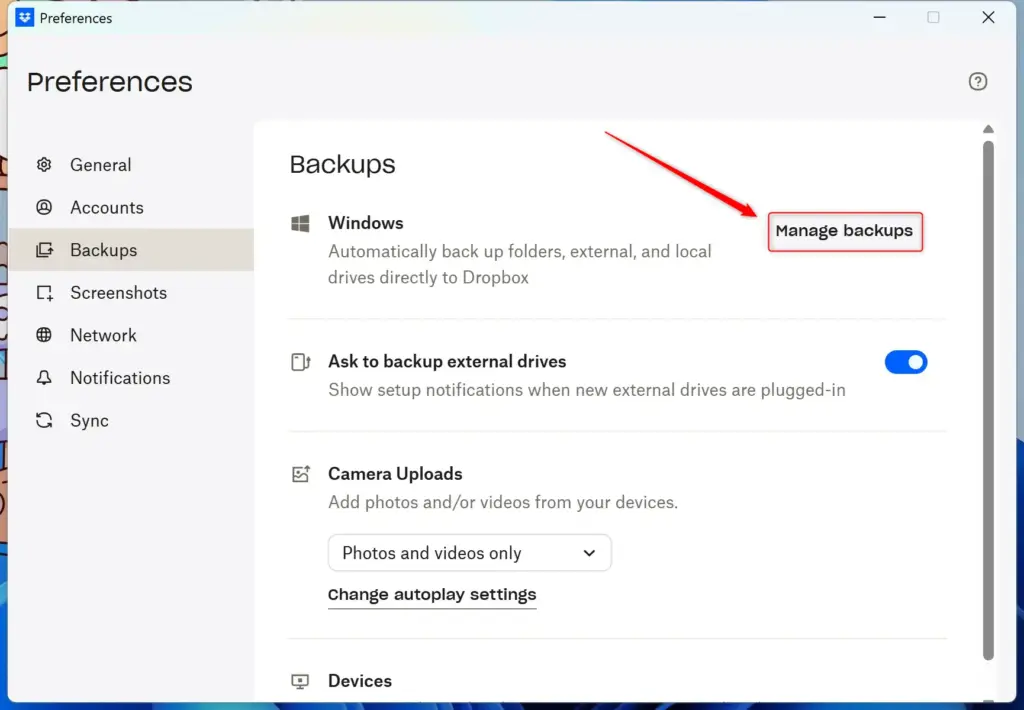
- If you are using a newer version of Dropbox Backup, you might see a button called Modify folder selection. Clicking this lets you add any folder from your computer that isn’t already set up for backup.
Choose Files to Back Up
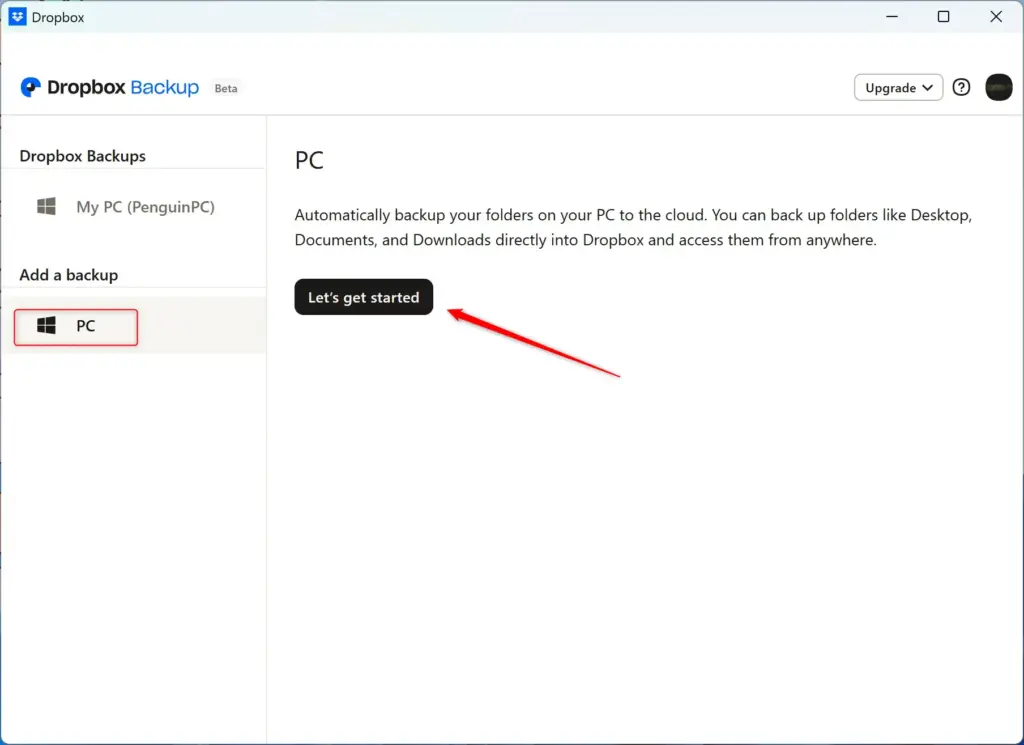
Setting up Dropbox automatic backups requires you to pick which specific folders on your computer you want to save to the cloud. You can select your main Windows 11 computer or an external drive, view the list of common folders like your Desktop, Documents, and Pictures, and check the boxes next to the ones you want to protect.- Under the “Add a backup” section, click to select the computer or external drive you want to back up. For most people, this will be their main Windows 11 computer.
- You will see a list of folders from your computer. Dropbox usually suggests common folders like Desktop, Documents, and Pictures.
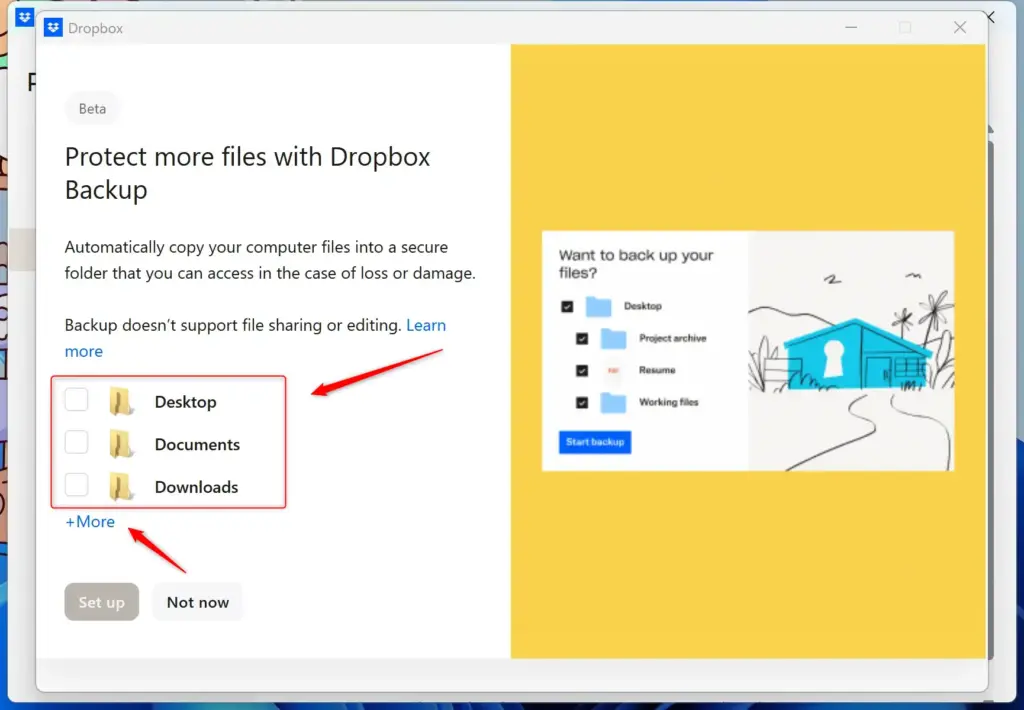
- Check the boxes next to the folders you want Dropbox to back up automatically. Remember to consider your account’s storage limits.
Start the Backup
- After selecting your folders, click the Set up button (or Back up if you are backing up an external drive).
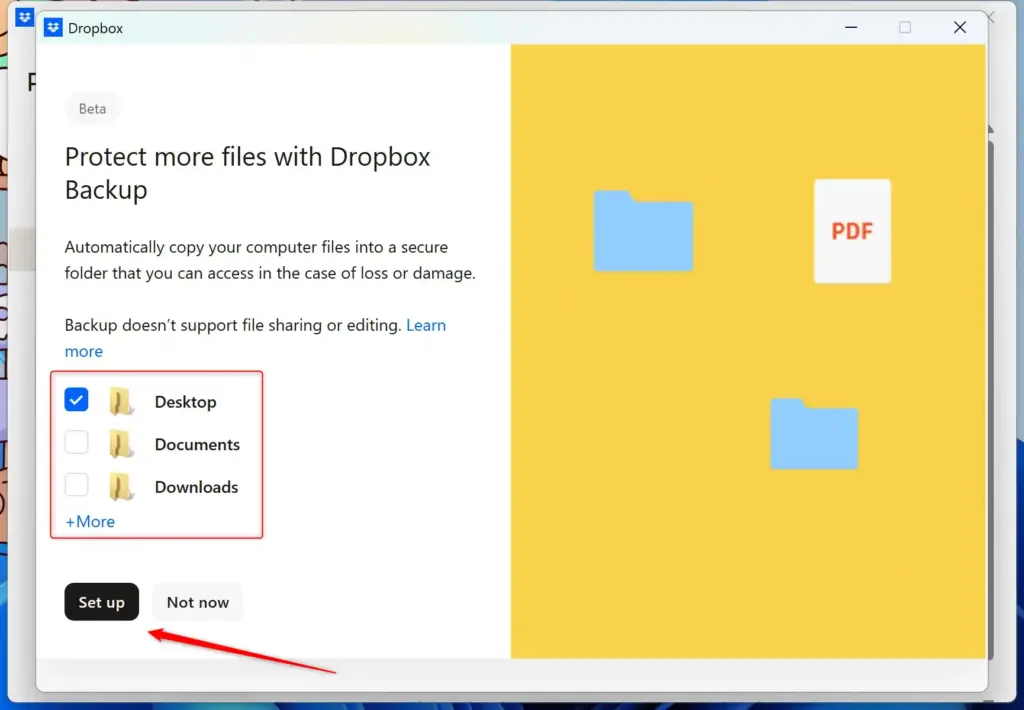
- Dropbox will begin the first backup. This might take some time, especially if you have many files.
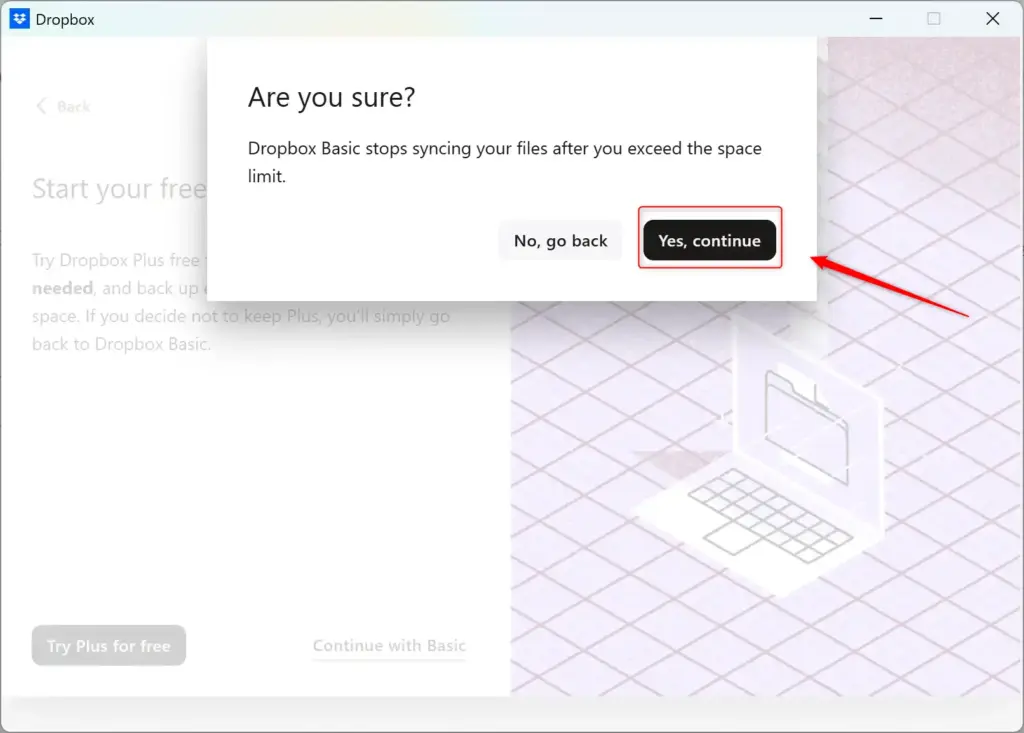
Dropbox will then upload your files to the cloud in the background, though the first backup might take a while if you have a lot of data stored on your computer.
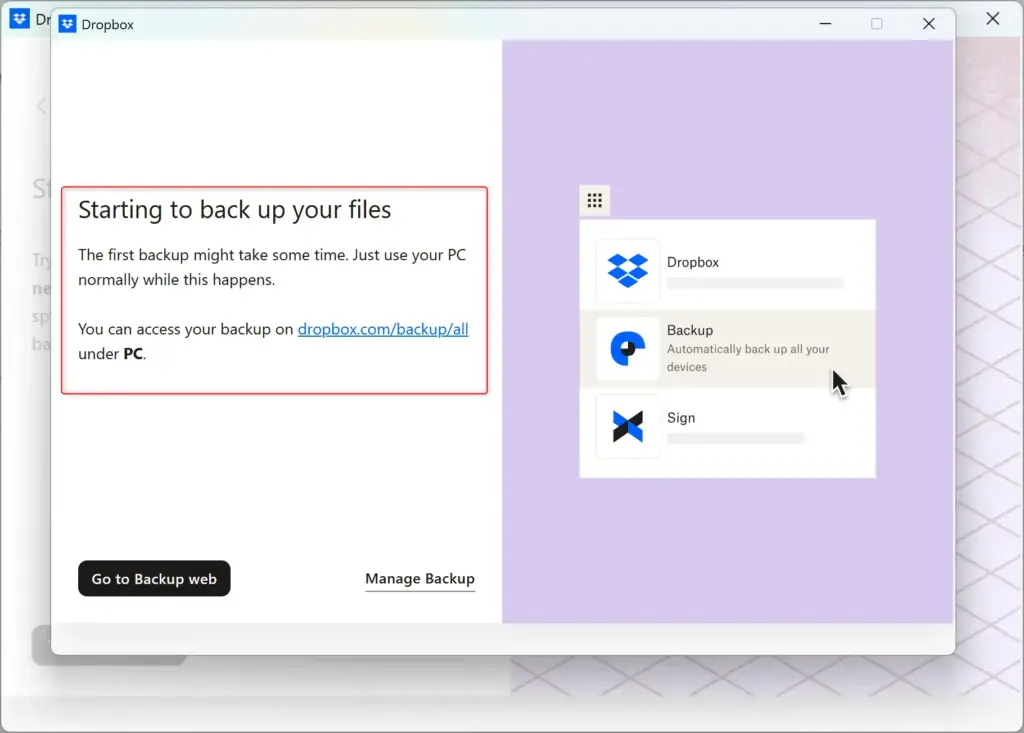
How Dropbox Backup Works
After you set up your backup, Dropbox works in the background. It watches the folders you chose for any changes, like new, deleted, or modified files. When it finds a change, it updates your backup in the cloud.
Real-time Syncing
Dropbox Backup syncs your files in near real-time. This means as soon as you save a file or make a change, Dropbox starts uploading the update. You don’t need to manually start the backup.
Accessing Backed-Up Files
You can find your backed-up files in your Dropbox account. Access them through the Dropbox website or the desktop app. They will be organized to match your computer’s folder structure, making it easy to find what you need.
Summary
Dropbox automatic backups protect your important files by syncing your computer folders to the cloud in the background. By opening your account preferences, going to the Backups tab, and selecting your preferred folders, you ensure your data stays safe and accessible from anywhere without needing to upload files manually.
Manage Your Backups
You can change which folders Dropbox automatic backups protects by opening the backup management screen. Go to the Backups tab in your account preferences and click the Manage backups button or the Modify folder selection option to choose the exact folders on your computer you want to keep safe.- On the Backups tab, click the Manage backups button. This is where you choose what files to protect.
- If you are using a newer version of Dropbox Backup, you might see a button called Modify folder selection. Clicking this lets you add any folder from your computer that isn’t already set up for backup.
Choose Files to Back Up
Setting up Dropbox automatic backups requires you to pick which specific folders on your computer you want to save to the cloud. You can select your main Windows 11 computer or an external drive, view the list of common folders like your Desktop, Documents, and Pictures, and check the boxes next to the ones you want to protect.- Under the “Add a backup” section, click to select the computer or external drive you want to back up. For most people, this will be their main Windows 11 computer.
- You will see a list of folders from your computer. Dropbox usually suggests common folders like Desktop, Documents, and Pictures.
- Check the boxes next to the folders you want Dropbox to back up automatically. Remember to consider your account’s storage limits.
Start the Backup
- After selecting your folders, click the Set up button (or Back up if you are backing up an external drive).
- Dropbox will begin the first backup. This might take some time, especially if you have many files.
Dropbox will then upload your files to the cloud in the background, though the first backup might take a while if you have a lot of data stored on your computer.
How Dropbox Backup Works
After you set up your backup, Dropbox works in the background. It watches the folders you chose for any changes, like new, deleted, or modified files. When it finds a change, it updates your backup in the cloud.
Real-time Syncing
Dropbox Backup syncs your files in near real-time. This means as soon as you save a file or make a change, Dropbox starts uploading the update. You don’t need to manually start the backup.
Accessing Backed-Up Files
You can find your backed-up files in your Dropbox account. Access them through the Dropbox website or the desktop app. They will be organized to match your computer’s folder structure, making it easy to find what you need.
Summary
Dropbox automatic backups protect your important files by syncing your computer folders to the cloud in the background. By opening your account preferences, going to the Backups tab, and selecting your preferred folders, you ensure your data stays safe and accessible from anywhere without needing to upload files manually.
Access Dropbox Settings
To change your Dropbox automatic backups, you first need to open the main menu from your taskbar. Look in the bottom-right corner of your screen near the clock for the Dropbox icon, click it to open the menu, and then click your profile picture or initials in the bottom-left corner to reach your account preferences.- Find the Dropbox icon in your computer’s system tray . This is usually in the bottom-right corner of your screen, near the clock. If you don’t see it, click the small upward arrow to show hidden icons.
Dropbox icon highlighted in the Windows 11 taskbar. - Click the Dropbox icon. A menu will appear.
- In the bottom-left corner of the menu, click your profile picture or initials.
Dropbox taskbar icon menu showing profile and settings options.
Go to Backup Preferences
- From the menu that pops up, select Preferences.
Dropbox preferences menu open, showing general settings. - The main Dropbox settings window will open. Look for the Backups tab at the top and click it.
Manage Your Backups
You can change which folders Dropbox automatic backups protects by opening the backup management screen. Go to the Backups tab in your account preferences and click the Manage backups button or the Modify folder selection option to choose the exact folders on your computer you want to keep safe.- On the Backups tab, click the Manage backups button. This is where you choose what files to protect.
- If you are using a newer version of Dropbox Backup, you might see a button called Modify folder selection. Clicking this lets you add any folder from your computer that isn’t already set up for backup.
Choose Files to Back Up
Setting up Dropbox automatic backups requires you to pick which specific folders on your computer you want to save to the cloud. You can select your main Windows 11 computer or an external drive, view the list of common folders like your Desktop, Documents, and Pictures, and check the boxes next to the ones you want to protect.- Under the “Add a backup” section, click to select the computer or external drive you want to back up. For most people, this will be their main Windows 11 computer.
- You will see a list of folders from your computer. Dropbox usually suggests common folders like Desktop, Documents, and Pictures.
- Check the boxes next to the folders you want Dropbox to back up automatically. Remember to consider your account’s storage limits.
Start the Backup
- After selecting your folders, click the Set up button (or Back up if you are backing up an external drive).
- Dropbox will begin the first backup. This might take some time, especially if you have many files.
Dropbox will then upload your files to the cloud in the background, though the first backup might take a while if you have a lot of data stored on your computer.
How Dropbox Backup Works
After you set up your backup, Dropbox works in the background. It watches the folders you chose for any changes, like new, deleted, or modified files. When it finds a change, it updates your backup in the cloud.
Real-time Syncing
Dropbox Backup syncs your files in near real-time. This means as soon as you save a file or make a change, Dropbox starts uploading the update. You don't need to manually start the backup.
Accessing Backed-Up Files
You can find your backed-up files in your Dropbox account. Access them through the Dropbox website or the desktop app. They will be organized to match your computer's folder structure, making it easy to find what you need.
Summary
Dropbox automatic backups protect your important files by syncing your computer folders to the cloud in the background. By opening your account preferences, going to the Backups tab, and selecting your preferred folders, you ensure your data stays safe and accessible from anywhere without needing to upload files manually.
Dropbox automatic backups on Windows 11 copy your important folders to the cloud as you work, so you do not lose them if your computer breaks, is stolen, or gets hit by ransomware. The backup covers folders such as Desktop and Documents, and Pictures where your version of the app offers it. Your files stay where they are on the PC. Dropbox keeps a protected copy online and updates it when files change.
Before you start, check three things:
- The Dropbox desktop app is installed and you are signed in to it. You can tell because the Dropbox icon appears in the notification area at the right end of the taskbar.
- Your account has enough free storage. Backed-up files count against your quota, so a Basic (free) account fills up fast if your Documents or Pictures folders are large. Check the size of those folders first.
- You are signed in to Windows with a normal user account. You do not need administrator rights for the backup setup itself.
The setup takes about 2 minutes. The first upload can take much longer, depending on how much data you have and how fast your connection is.
Click the Dropbox icon in the taskbar notification area, select Preferences, open the Backups tab, click Set up, check the folders you want to back up such as Desktop and Documents, then click Set up again. Dropbox uploads those folders to the cloud as you work.
Setting Up Dropbox Backup
Getting your files to save automatically to Dropbox is simple. Once the backup is on, Dropbox copies new and changed files in the chosen folders to the cloud as you work. Here is the process in short:
- Click the Dropbox icon in the taskbar notification area. If you do not see it, click the up arrow (Show hidden icons) first. You should see the Dropbox panel open.
- Click your profile picture or initials in the panel, then choose Preferences. The Preferences window opens.
- Open the Backups tab.
- Click Set up (or Manage backup if you have used the feature before). A window lists the folders you can back up.
- Tick the folders you want to protect, such as Desktop, Documents and Pictures. Untick any you do not need. Dropbox shows how much space the selection will use.
- Click Set up or Save changes to confirm. Dropbox starts uploading, and the taskbar icon shows a sync symbol while it works.
If you do not see the Backups tab, your account type or app version may not include it. Update the Dropbox app first, then check again.
A few practical notes:
- If the selected folders are bigger than your free space, Dropbox warns you. Choose fewer folders or upgrade your plan.
- Leave the PC on and connected to the internet until the first upload finishes. Dropbox resumes after a restart, and no Windows restart is needed to enable backups.
- To undo the change, go back to Preferences Backups, open Manage backup and untick the folder you want to stop backing up. Files already uploaded stay in your Dropbox account until you delete them there.
Choose Files to Back Up
Setting up Dropbox automatic backups requires you to pick which specific folders on your computer you want to save to the cloud. You can select your main Windows 11 computer or an external drive, view the list of common folders like your Desktop, Documents, and Pictures, and check the boxes next to the ones you want to protect.- Under the "Add a backup" section, click to select the computer or external drive you want to back up. For most people, this will be their main Windows 11 computer.
- You will see a list of folders from your computer. Dropbox usually suggests common folders like Desktop, Documents, and Pictures.
- Check the boxes next to the folders you want Dropbox to back up automatically. Remember to consider your account's storage limits.
Start the Backup
- After selecting your folders, click the Set up button (or Back up if you are backing up an external drive).
- Dropbox will begin the first backup. This might take some time, especially if you have many files.
You begin your Dropbox automatic backups by clicking the Set up button after you finish choosing your folders. Dropbox will then upload your files to the cloud in the background, though the first backup might take a while if you have a lot of data stored on your computer.
How Dropbox Backup Works
After you set up your backup, Dropbox works in the background. It watches the folders you chose for any changes, like new, deleted, or modified files. When it finds a change, it updates your backup in the cloud.
Real-time Syncing
Dropbox Backup syncs your files in near real-time. This means as soon as you save a file or make a change, Dropbox starts uploading the update. You don't need to manually start the backup.
Accessing Backed-Up Files
You can find your backed-up files in your Dropbox account. Access them through the Dropbox website or the desktop app. They will be organized to match your computer's folder structure, making it easy to find what you need.
Summary
Dropbox automatic backups protect your important files by syncing your computer folders to the cloud in the background. By opening your account preferences, going to the Backups tab, and selecting your preferred folders, you ensure your data stays safe and accessible from anywhere without needing to upload files manually.
Manage Your Backups
You can change which folders Dropbox automatic backups protects by opening the backup management screen. Go to the Backups tab in your account preferences and click the Manage backups button or the Modify folder selection option to choose the exact folders on your computer you want to keep safe.- On the Backups tab, click the Manage backups button. This is where you choose what files to protect.
- If you are using a newer version of Dropbox Backup, you might see a button called Modify folder selection. Clicking this lets you add any folder from your computer that isn't already set up for backup.
Choose Files to Back Up
Setting up Dropbox automatic backups requires you to pick which specific folders on your computer you want to save to the cloud. You can select your main Windows 11 computer or an external drive, view the list of common folders like your Desktop, Documents, and Pictures, and check the boxes next to the ones you want to protect.- Under the "Add a backup" section, click to select the computer or external drive you want to back up. For most people, this will be their main Windows 11 computer.
- You will see a list of folders from your computer. Dropbox usually suggests common folders like Desktop, Documents, and Pictures.
- Check the boxes next to the folders you want Dropbox to back up automatically. Remember to consider your account's storage limits.
Start the Backup
- After selecting your folders, click the Set up button (or Back up if you are backing up an external drive).
- Dropbox will begin the first backup. This might take some time, especially if you have many files.
You begin your Dropbox automatic backups by clicking the Set up button after you finish choosing your folders. Dropbox will then upload your files to the cloud in the background, though the first backup might take a while if you have a lot of data stored on your computer.
How Dropbox Backup Works
After you set up your backup, Dropbox works in the background. It watches the folders you chose for any changes, like new, deleted, or modified files. When it finds a change, it updates your backup in the cloud.
Real-time Syncing
Dropbox Backup syncs your files in near real-time. This means as soon as you save a file or make a change, Dropbox starts uploading the update. You don't need to manually start the backup.
Accessing Backed-Up Files
You can find your backed-up files in your Dropbox account. Access them through the Dropbox website or the desktop app. They will be organized to match your computer's folder structure, making it easy to find what you need.
Summary
Dropbox automatic backups protect your important files by syncing your computer folders to the cloud in the background. By opening your account preferences, going to the Backups tab, and selecting your preferred folders, you ensure your data stays safe and accessible from anywhere without needing to upload files manually.
Access Dropbox Settings
To change your Dropbox automatic backups, you first need to open the main menu from your taskbar. Look in the bottom-right corner of your screen near the clock for the Dropbox icon, click it to open the menu, and then click your profile picture or initials in the bottom-left corner to reach your account preferences.- Find the Dropbox icon in your computer's system tray. This is usually in the bottom-right corner of your screen, near the clock. If you don't see it, click the small upward arrow to show hidden icons.
Dropbox icon highlighted in the Windows 11 taskbar. - Click the Dropbox icon. A menu will appear.
- In the bottom-left corner of the menu, click your profile picture or initials.
Dropbox taskbar icon menu showing profile and settings options.
Go to Backup Preferences
- From the menu that pops up, select Preferences.
Dropbox preferences menu open, showing general settings. - The main Dropbox settings window will open. Look for the Backups tab at the top and click it.
Manage Your Backups
You can change which folders Dropbox automatic backups protects by opening the backup management screen. Go to the Backups tab in your account preferences and click the Manage backups button or the Modify folder selection option to choose the exact folders on your computer you want to keep safe.- On the Backups tab, click the Manage backups button. This is where you choose what files to protect.
- If you are using a newer version of Dropbox Backup, you might see a button called Modify folder selection. Clicking this lets you add any folder from your computer that isn't already set up for backup.
Choose Files to Back Up
Setting up Dropbox automatic backups requires you to pick which specific folders on your computer you want to save to the cloud. You can select your main Windows 11 computer or an external drive, view the list of common folders like your Desktop, Documents, and Pictures, and check the boxes next to the ones you want to protect.- Under the "Add a backup" section, click to select the computer or external drive you want to back up. For most people, this will be their main Windows 11 computer.
- You will see a list of folders from your computer. Dropbox usually suggests common folders like Desktop, Documents, and Pictures.
- Check the boxes next to the folders you want Dropbox to back up automatically. Remember to consider your account's storage limits.
Start the Backup
- After selecting your folders, click the Set up button (or Back up if you are backing up an external drive).
- Dropbox will begin the first backup. This might take some time, especially if you have many files.
You begin your Dropbox automatic backups by clicking the Set up button after you finish choosing your folders. Dropbox will then upload your files to the cloud in the background, though the first backup might take a while if you have a lot of data stored on your computer.
How Dropbox Backup Works
After you set up your backup, Dropbox works in the background. It watches the folders you chose for any changes, like new, deleted, or modified files. When it finds a change, it updates your backup in the cloud.
Real-time Syncing
Dropbox Backup syncs your files in near real-time. This means as soon as you save a file or make a change, Dropbox starts uploading the update. You don't need to manually start the backup.
Accessing Backed-Up Files
You can find your backed-up files in your Dropbox account. Access them through the Dropbox website or the desktop app. They will be organized to match your computer's folder structure, making it easy to find what you need.
Summary
Dropbox automatic backups protect your important files by syncing your computer folders to the cloud in the background. By opening your account preferences, going to the Backups tab, and selecting your preferred folders, you ensure your data stays safe and accessible from anywhere without needing to upload files manually.
Have a question about this guide?
Answered by AI from this guide. Good questions may be added to this page — please don't include personal details.
Did this guide fix your problem?

About the Author
Richard
Tech Writer, IT Professional
Richard is a writer at Geek Rewind who turns complex IT tasks into clear, step-by-step guides. He draws on years of hands-on experience in system administration and enterprise IT operations, focusing on Windows, Linux and WordPress: the problems people actually run into, and the fixes that work. His server and WordPress guides come from systems he runs himself. Richard builds and maintains the platform behind Geek Rewind, from its Ubuntu servers and Nginx configuration to its custom WordPress plugins. Many new tutorials start with readers' questions, and he's always glad to answer them in the comments.
[…] Google Drive’s benefits, some people might still have reasons to use another service like Dropbox or […]
[…] Microsoft Office add-in, turning notifications on or off, managing backups, turning automatic backups on or off, renaming backup device name, changing backup frequency, choosing back up folders, and […]
[…] Microsoft Office add-in, turning notifications on or off, managing backups, turning automatic backups on or off, renaming backup device name, changing backup frequency, and […]