How to Enable or Disable Dropbox Notifications on Windows 11


- 6 steps
- Needs administrator rights
Dropbox notifications are small pop-up messages in the corner of your screen. They tell you about file updates, comments, shared folder changes and finished syncs. You can turn them off in under 30 seconds to stop sudden distractions and keep your Windows 11 desktop clear. Nothing is deleted or paused. Dropbox keeps syncing your files in the background.
There are two places to control these alerts: the Dropbox Preferences window and the Windows 11 Settings app. Dropbox Preferences lets you pick which kinds of alerts you get. Windows Settings is the master switch for everything the app is allowed to show. This guide covers both, and all the changes can be reversed.
Click the Dropbox icon in your system tray, select the Settings gear icon, then choose Preferences and open the Notifications tab. Uncheck the boxes next to alerts you want to disable—comments, file edits, or shared folder activity—and changes apply immediately without restarting.
What happens when you are done?
Muting these alerts stops banners from sliding across your screen and removes the chime sounds for minor file updates. Your files still sync as normal, and you can see recent activity any time by opening the Dropbox window from the taskbar. If you only want a break for an hour or two, use the snooze option covered later instead of switching alerts off for good.
| Feature | Dropbox Preferences | Windows Settings |
|---|---|---|
| Scope | In-app alerts | System-wide display |
| Control | Specific activity types | Banners and sounds |
| Best for | Filtering content | Total silence |
How to access Dropbox Preferences on 🪟 Windows 11
To reach the Dropbox preferences on Windows 11, you open the main app menu from the taskbar. The Dropbox icon sits in the bottom-right corner of your screen, near the clock. Click it to open the mini window, then click the gear icon in the top-right corner to open your settings. In some Dropbox versions the gear is replaced by your profile picture or initials. The menu behind it still contains Preferences.
Dropbox must be running. If you see no icon at all, open Dropbox from the Start menu first. You do not need administrator rights for any of this.
- Click the Dropbox icon in your system tray at the bottom right of your screen. You may need to click the small arrow to see hidden icons. The Dropbox mini window should open above the taskbar .

- Click the Settings gear icon in the top right corner of the Dropbox window. A short menu should drop down.

- Select Preferences from the menu. The Dropbox Preferences window should open with a row of tabs across the top.
Customizing Dropbox Notifications
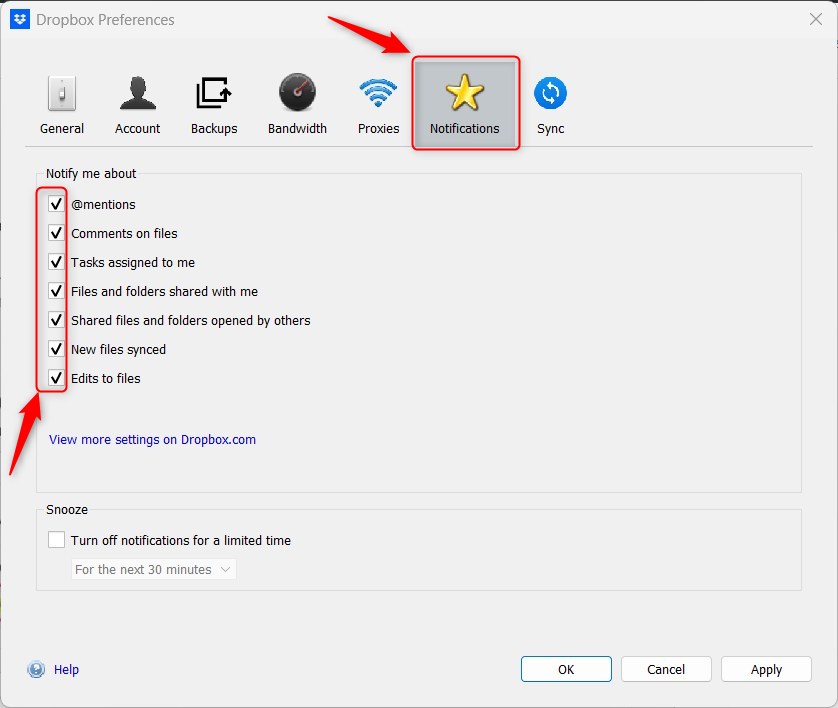
Inside the Preferences window, select the Notifications tab. This is where you switch specific alerts on or off. You can handle comments, file edits and shared folder activity one by one, so you can keep the alerts that matter and drop the noisy ones. Uncheck the boxes for anything that breaks your focus.
The change applies straight away, and you do not need to restart Dropbox or Windows. To undo it, return to the same tab and tick the box again. If the tab looks different from what is described here, your Dropbox version may be older or newer. The option names can vary slightly, but the idea is the same.
Using the Snooze feature
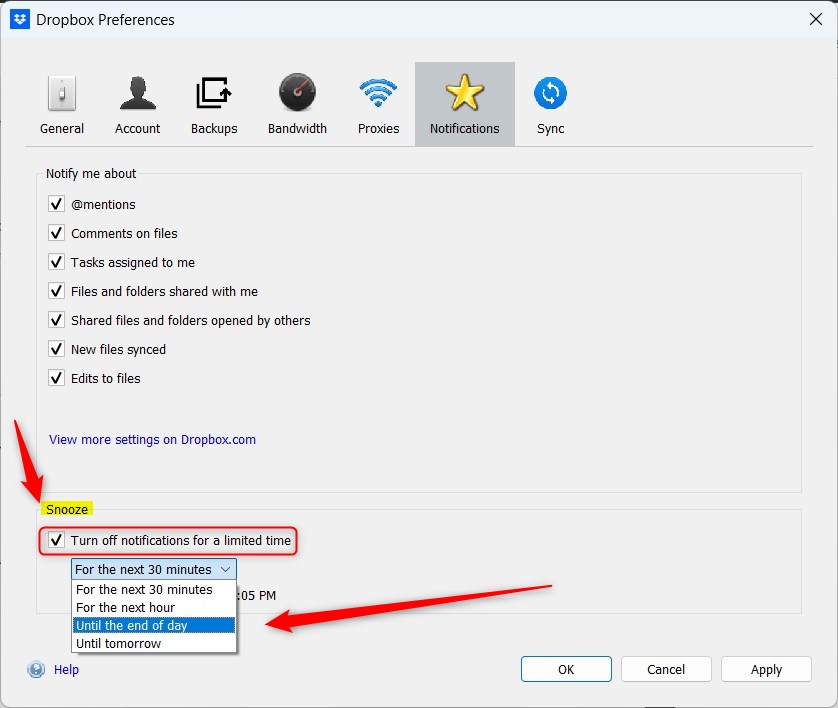
Focus time needs silence, which makes the snooze feature worth using. It mutes alerts for a set time and then turns them back on by themselves, so you do not have to remember to re-enable anything. From the Notifications tab in Preferences:
- Check the box labeled Turn off notifications for a limited time.
- Pick a duration like 30 minutes or until the end of the day. Dropbox stays quiet for that period and then resumes your normal alerts.
🪟 Windows 11 System Settings vs. Dropbox Preferences
The Windows setting acts as a master switch. If it is off, Dropbox cannot show pop-ups, whatever you chose inside the Dropbox app. This is the better route if you want Dropbox fully silent.
- Open Settings in Windows 11. You can press the Windows key plus I to get there quickly.
- Go to System Notifications A list of senders appears under the heading for notifications from apps and other senders.
- Find Dropbox in the list and toggle the switch to Off. Dropbox banners and sounds should stop at once. To bring them back, return here and set the switch to On.
Troubleshooting Notification Loops and Sync Issues
If Dropbox is missing from the list, it has usually not sent a notification yet on this PC. Windows only lists apps after they have tried to show one. Make sure Dropbox is running and try again later.
Stubborn sync loops usually stop once you clear the app cache (temporary data stored by applications). That is a sync fix, not a notification setting, so you do not need it just to silence alerts.
Summary
Combining Dropbox app controls with Windows 11 system options gives you full control over desktop alerts. Use the Notifications tab in Dropbox Preferences to choose which alerts you want, use the snooze option for short quiet periods, and use System Notifications in Windows Settings to mute Dropbox completely. Your workflow stays uninterrupted, and you can still turn on the essential file updates whenever you need them.
Have a question about this guide?
Answered by AI from this guide. Good questions may be added to this page — please don't include personal details.
Did this guide fix your problem?

About the Author
Richard
Tech Writer, IT Professional
Richard is a writer at Geek Rewind who turns complex IT tasks into clear, step-by-step guides. He draws on years of hands-on experience in system administration and enterprise IT operations, focusing on Windows, Linux and WordPress: the problems people actually run into, and the fixes that work. His server and WordPress guides come from systems he runs himself. Richard builds and maintains the platform behind Geek Rewind, from its Ubuntu servers and Nginx configuration to its custom WordPress plugins. Many new tutorials start with readers' questions, and he's always glad to answer them in the comments.
[…] on system startup, disabling Dropbox startup in the background, adding Microsoft Office add-in, turning notifications on or off, managing backups, turning automatic backups on or off, renaming backup device name, changing […]
[…] on system startup, disabling Dropbox startup in the background, adding Microsoft Office add-in, turning notifications on or off, managing backups, turning automatic backups on or off, renaming backup device name, changing […]
[…] on system startup, disabling Dropbox startup in the background, adding Microsoft Office add-in, turning notifications on or off, managing backups, turning automatic backups on or off, renaming backup device name, changing […]
[…] on system startup, disabling Dropbox startup in the background, adding Microsoft Office add-in, turning notifications on or off, and managing […]