How to Rename Your Dropbox Device on Windows 11

Dropbox identifies your Windows 11 PC by its computer name. In your account settings that name often shows up as a default string like DESKTOP-XYZ987, which tells you nothing when you have more than one machine. Giving the PC a clear name makes it easy to tell your devices apart and avoids mix-ups about which computer is syncing what.
You do not need any extra software. The rename happens in the Dropbox desktop app, as long as the PC uses the newer backup experience. If you would rather change the name of Windows itself, you can do that under Settings System About, but the steps below are the way to change what Dropbox shows. Here is the short version:
- Open the Dropbox desktop app by clicking the Dropbox icon in your Windows 11 taskbar.
- Click the gear icon and select Preferences.
- Go to the Backups tab.
- Under the ‘This PC’ section, click Manage backups.
- If you are using the older backup system, click Unlink Backup.
- Re-enable the backup by selecting My PC in the Sync and backups tab.
- Find the Rename My PC tile and click the Rename button.
- Enter your new device name and click Save.
Open the Dropbox desktop app, click the gear icon, and select Preferences. Go to the Backups tab, click Manage backups under This PC, then find the Rename My PC tile and click Rename. Enter your new device name and click Save. The name updates immediately in Dropbox without restarting Windows.
Legacy vs. New Dropbox Backup
Only the newer backup experience has the rename option. If your PC is still on the old system, you must move it to the new one first. Once that is done, you can rename your Dropbox device on Windows 11 and the new name will appear in your account settings.
If you cannot find the Rename My PC tile later in the steps, the most likely reason is that the PC is still linked to the legacy backup. Work through the unlink and re-enable steps and it should appear.
Here are the steps in order:
- Open the Dropbox desktop app by clicking the Dropbox icon in your Windows 11 taskbar. If you do not see it, click the arrow to show hidden icons first.
- Click the gear icon and select Preferences. The Preferences window opens.
- Go to the Backups tab and click Manage backups under the ‘This PC’ section.
- If you are on a legacy version, click Unlink Backup to remove the old connection. Skip this step if you are already on the new backup system.
- Re-enable the backup by selecting My PC within the Sync and backups tab.
- Locate the Rename My PC tile and click the Rename button.
- Enter your new device name and click Save.
You do not need to restart Windows. If you want to undo the change, repeat the last two steps and enter the old name.
Step-by-Step Migration and Renaming
To rename your Dropbox device on Windows 11, open the Dropbox desktop app from your taskbar, click your profile picture or initials, and open Preferences. Follow the migration prompts to switch to the new backup system, where you can finally edit your computer name. The detailed steps below show each screen along the way.
- Open the Dropbox app from your taskbar. Click the Taskbar overflow icon and select the Dropbox icon. A small Dropbox window should open above the taskbar.

Windows 11 turn on start Dropbox on system startup - Click the Settings (gear icon) and select Preferences. The Preferences window should now be open.

Windows 11 turn on start Dropbox on system startup - Go to the Backups tab. Under the 'This PC' section, click Manage backups. Visit the official Dropbox Manage Backups page for more details. You should see the backup settings for this computer.

Manage backups in Dropbox on Windows 11 - If you are on an old version, click Unlink Backup to remove the legacy connection. If you are already on the new backup system, there is nothing to unlink and you can move on to the next step.
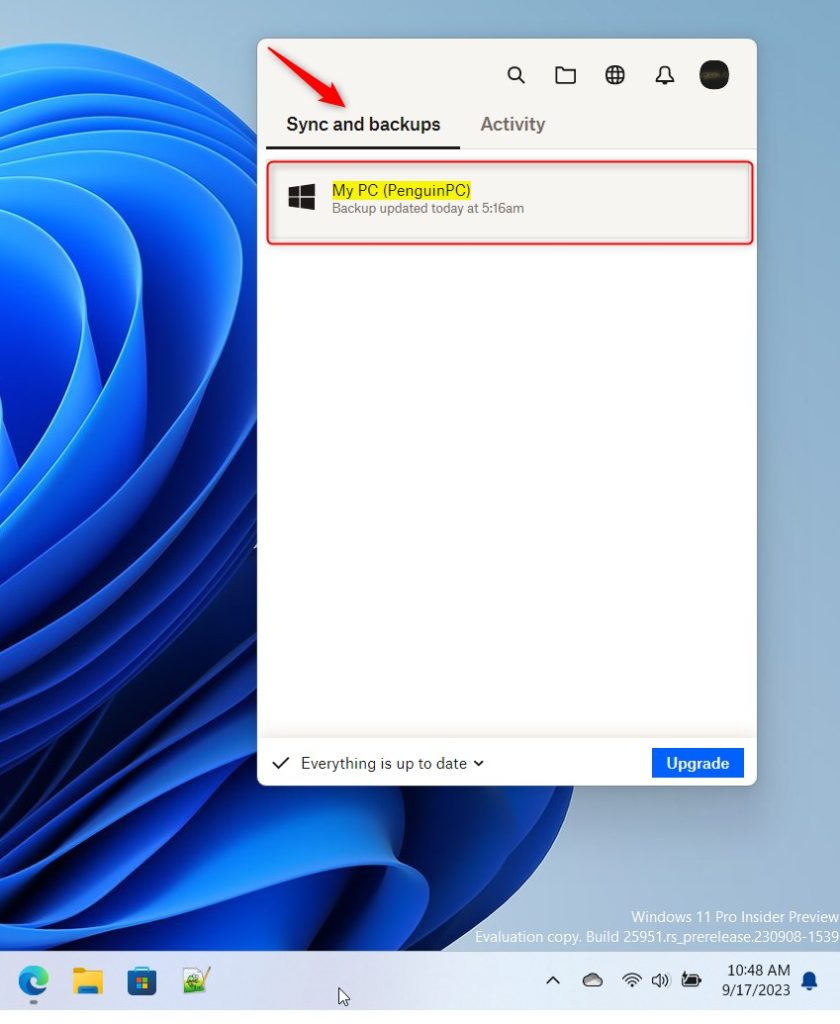
- Re-enable the backup. Select My PC (DeviceName) inside the Sync and backups tab. DeviceName here is your current computer name, such as DESKTOP-XYZ987.
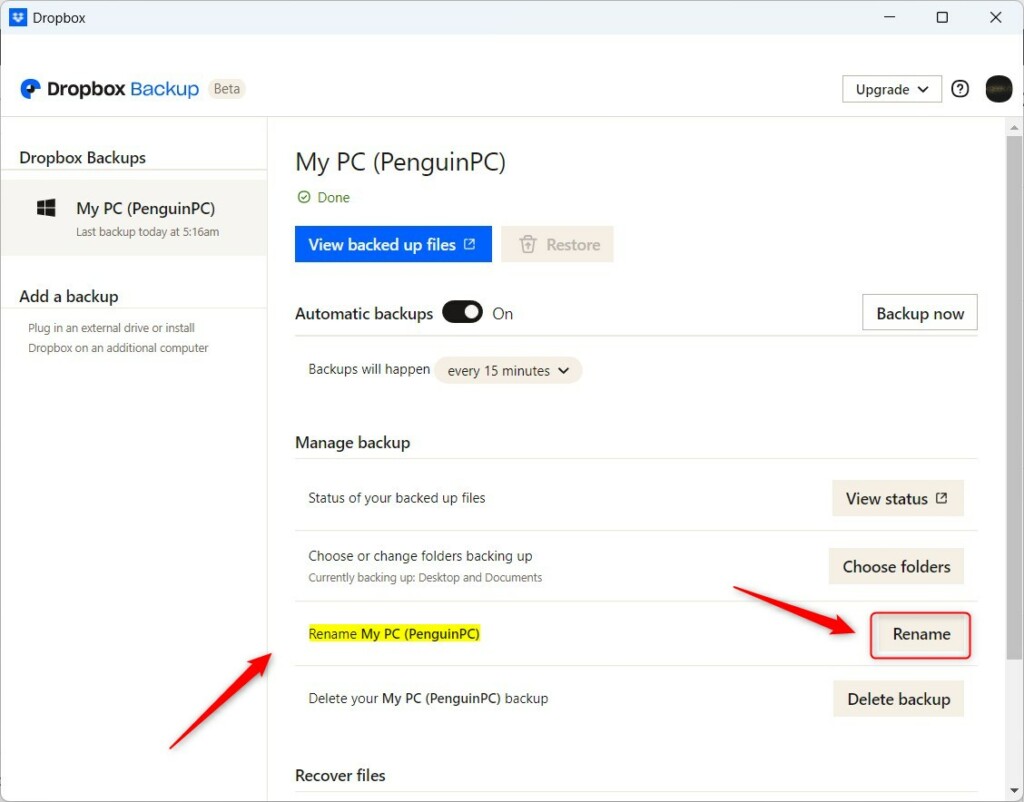
Rename device in the Dropbox app on Windows 11 - Find the Rename My PC tile and click the Rename button. A box opens where you can edit the name.
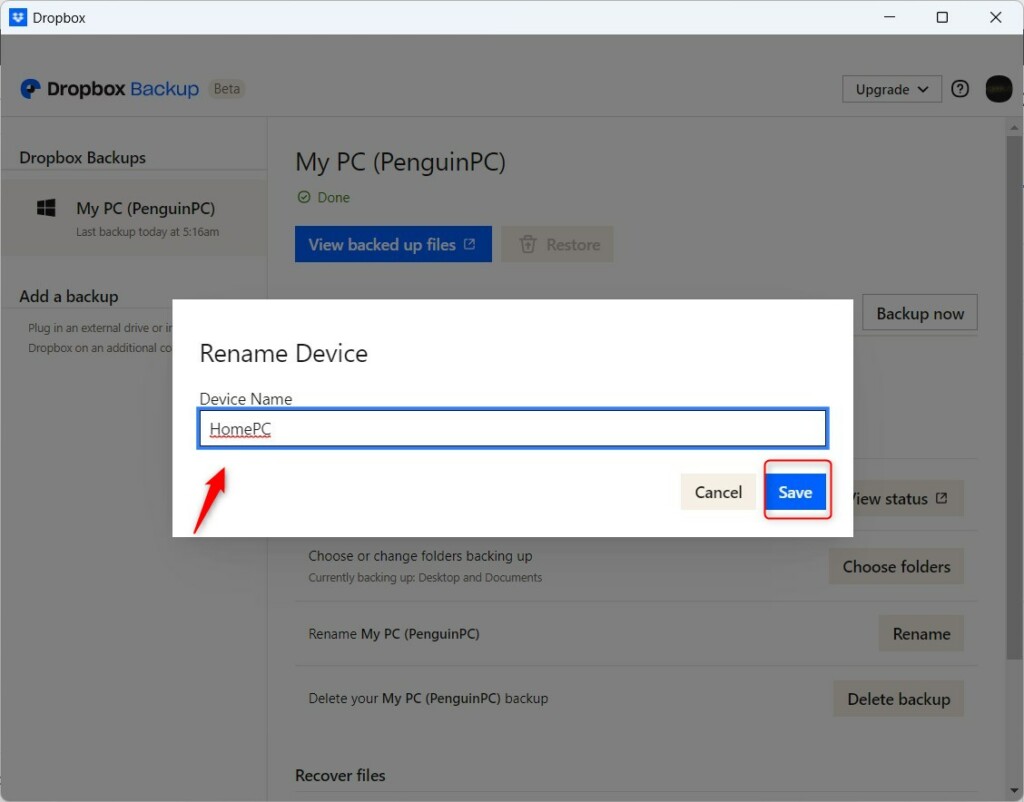
Rename device in the Dropbox app on Windows 11 - Type in your new name and click Save. Pick something short and recognizable, like Office-Laptop or Home-Desktop. The new name should now show for this PC in the app.
Rename device in the Dropbox app on Windows 11 - Check that the change took effect by looking at the device name in the Dropbox app and in your account settings on the Dropbox website. It can take a short while to update. No Windows restart is needed.
Summary
Renaming your Dropbox device on Windows 11 is worth doing if you have more than one computer. Move to the latest version of Dropbox Backup, then use the Manage backups menu to give each machine its own name. This makes it clear which PC is which, helps prevent sync conflicts, and keeps your cloud storage organized. If you ever want a different name, repeat the rename steps.
Was this guide helpful?

About the Author
Richard
Tech Writer, IT Professional
Richard is a writer at Geek Rewind who turns complex IT tasks into clear, step-by-step guides. He draws on years of hands-on experience in system administration and enterprise IT operations, focusing on Windows, Linux and WordPress: the problems people actually run into, and the fixes that work. His server and WordPress guides come from systems he runs himself. Richard builds and maintains the platform behind Geek Rewind, from its Ubuntu servers and Nginx configuration to its custom WordPress plugins. Many new tutorials start with readers' questions, and he's always glad to answer them in the comments.


[…] notifications on or off, managing backups, turning automatic backups on or off, renaming backup device name, changing backup frequency, and […]