How to Delete PC Backups in Dropbox on Windows 11


This article explains how to delete or remove PC backups from Dropbox in Windows 11.
Go to the Dropbox website, click “Computers” in the left sidebar, and select “Delete backup” for the PC you wish to remove. This action only removes the cloud copy, not your local files.
Dropbox is a cloud storage service that lets you store and share files and folders online. It offers file syncing, file versioning, and collaboration tools, which makes it easier for teams to work together on projects.
The Dropbox app for Windows has many settings you can configure, including starting Dropbox on system startup, disabling Dropbox startup in the background, adding Microsoft Office add-in, turning notifications on or off, managing backups, turning automatic backups on or off, renaming backup device name, changing backup frequency, choosing back up folders, moving backup folder location, enabling camera upload for photos and videos, and more.
When you want to stop backing up a PC, use the Delete backup feature to remove that PC from Dropbox. The files and folders stay on the PC itself. Only the cloud backups for that PC are deleted.
There are a few good reasons to do this:
- The computer is no longer in use, so there is no point in backing up its files and folders.
- Your Dropbox storage is limited. Removing backups of devices you no longer use frees up space.
- Your Dropbox account has been compromised. Deleting the backups tied to the affected device helps prevent unauthorized access to those files and folders.
Delete PC from Dropbox backups
You can delete a Dropbox backup straight from the Dropbox app in your system tray . Open the Dropbox flyout, go to the backup settings, and choose the computer you want to remove. You must be signed in to Dropbox on the PC to do this. The steps below work the same on Windows 11 Home and Pro.
Here's how to delete a Dropbox backup on a PC.
- Click the Taskbar overflow arrow in the notification area, then select the Dropbox icon. The Dropbox flyout window opens. If you can't find the icon, Dropbox may not be running. Start it from the Start menu and try again.

- In the flyout, click the Settings (gear) icon at the top, then click Preferences. The Preferences page opens.

- On the Preferences page, select the Backups tab.
- Under "This PC," click the Manage backups button.

If you have already set up Dropbox, there is a shortcut. In the flyout window, go to the Sync and backups tab and click My PC (DeviceName).

Either route opens the Dropbox settings page, where you can finish the deletion.
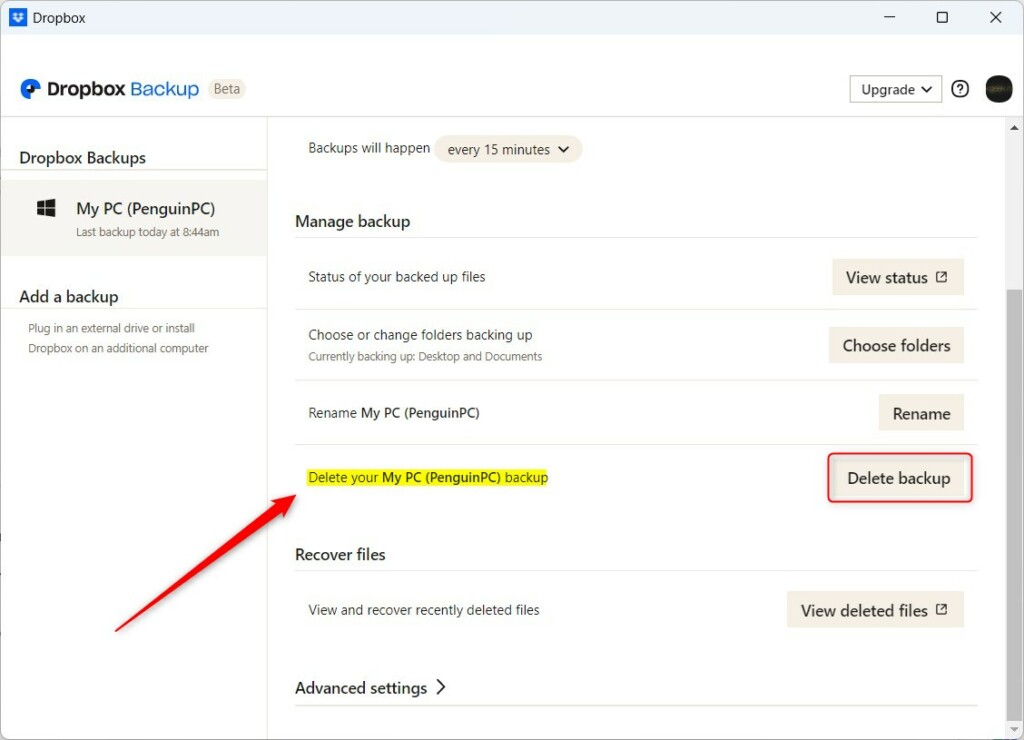
- Under Manage backups, select the "Delete your My PC (PCName) backup" tile on the Dropbox Backup page. The PC name in the tile is the name of your computer.
- Click the Delete backup button.
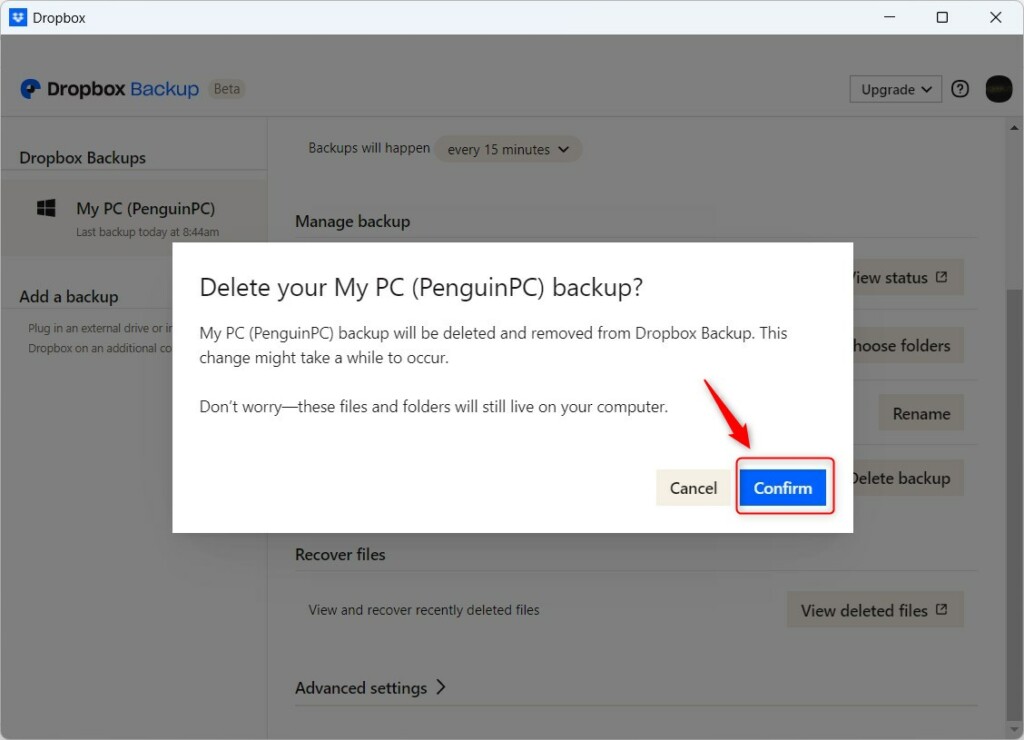
- In the pop-up window, click the Confirm button. Dropbox starts deleting your backed-up files and folders from its cloud storage.
This might take a while, depending on how much was backed up. The files and folders on your computer will remain. If you change your mind later, you can set up backup for this PC again from the same Manage backups screen. Treat the deletion as final, though, and check that you have a copy of anything you still need before you confirm.
That should do it!
Conclusion:
- Deleting PC backups from Dropbox in Windows 11 is a straightforward process that you can do from the Dropbox app settings.
- You can free up Dropbox storage by deleting backups you no longer need, and you can secure your account by removing backups from a compromised device.
- Read the confirmation prompt before you click Confirm, so you don't remove backups you still need.
- Following these steps lets you manage your Dropbox backups on Windows 11 effectively.
Was this guide helpful?

About the Author
Richard
Tech Writer, IT Professional
Richard is a writer at Geek Rewind who turns complex IT tasks into clear, step-by-step guides. He draws on years of hands-on experience in system administration and enterprise IT operations, focusing on Windows, Linux and WordPress: the problems people actually run into, and the fixes that work. His server and WordPress guides come from systems he runs himself. Richard builds and maintains the platform behind Geek Rewind, from its Ubuntu servers and Nginx configuration to its custom WordPress plugins. Many new tutorials start with readers' questions, and he's always glad to answer them in the comments.

No comments yet — be the first to share your thoughts!