How to Enable Dropbox as Save Location in Office


Adding Dropbox as a save location in Microsoft Office lets you save Word, Excel, and PowerPoint files straight to your Dropbox without browsing for the folder each time. On Windows 11 this puts Dropbox inside the Office save screens, much as OneDrive appears there by default.
You turn it on from the Dropbox desktop app, not from Office. After a restart of Office, Dropbox shows up as a place you can pick whenever you save a file. The steps below cover the setup, what to do if the option is missing, and how to make Dropbox the default.
Open the Dropbox app, click Settings Preferences General, and check “Show Dropbox as a save location in Microsoft Office.” Click Apply, restart Word, Excel, or PowerPoint, then Dropbox appears in File Save As.
Understanding AutoSave and Account Types
AutoSave in Office works best with OneDrive and SharePoint, not directly with Dropbox. If you save a file to Dropbox, the AutoSave switch in the title bar will usually be off or greyed out. That is normal and does not mean the setup failed.
Your files are still protected in two ways. Dropbox syncs the file to the cloud each time you save, and Office’s AutoRecover keeps working in the background. You can check AutoRecover under File Options Save. Press Ctrl+S now and then, as you would with any file that is not on OneDrive.
Account Type Requirements
You can connect either a personal Dropbox account or a Dropbox for Teams account to Office, and the steps are the same for both. The only requirement is that the Dropbox desktop app is installed on your PC and signed in to the account you want to use.
The same applies to Windows 11 Home and Pro. Neither edition changes the steps. The option appears in the desktop versions of Word, Excel, and PowerPoint. Office for the web does not use it.
How to add Dropbox to Office
Adding Dropbox as a save location in Office lets you save Word and Excel files straight to your cloud folder without hunting for it every time. You set it up in the Dropbox app preferences. Make sure Office is signed in with your Microsoft account too, so the two programs work together properly. This saves you a few clicks every time you work on a shared document.
You will need to restart Office at the end, and closing them first avoids losing unsaved work.
- Open the Dropbox menu from the bottom-right corner of your screen. You may need to click the Taskbar overflow icon (the small arrow) first to find the Dropbox icon. If you don't see Dropbox at all, start it from the Start menu and sign in.

Windows 11 turn on start Dropbox on system startup - Click the Settings gear icon at the top of the window and select Preferences. A Dropbox Preferences window opens with several tabs along the top.

Windows 11 turn on start Dropbox on system startup - Go to the General tab. This tab holds the startup and integration options.
- Look for the section labeled Microsoft Office add-in. If you don't see it, Dropbox may not have detected a desktop copy of Office. Update Dropbox and make sure Office is installed on this PC.
- Check the box that says Show Dropbox as a save location in Microsoft Office. The box should now show a tick.
- Click the Apply button to save your changes.
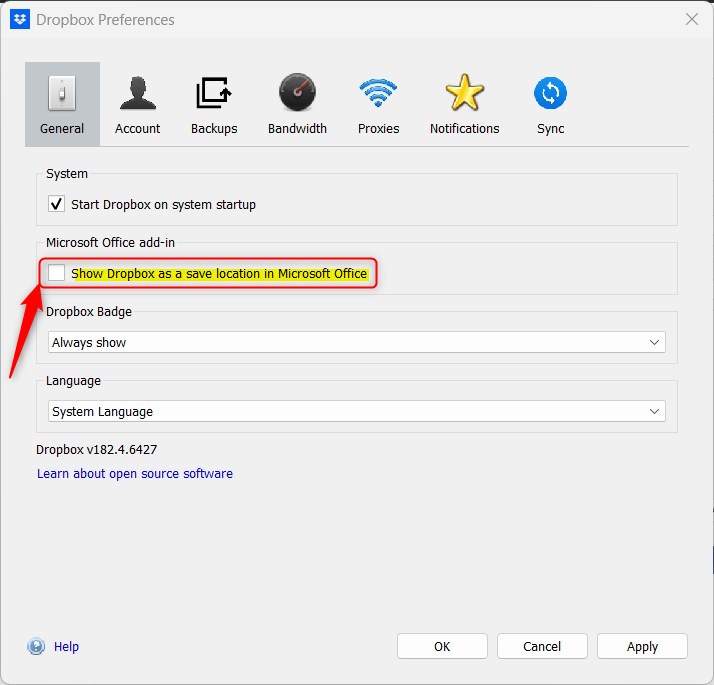
Add Dropbox add in for Office in Windows 11
You must close and restart your Microsoft Office programs for the Dropbox save location change to take effect. Restarting Office applications ensures that the updated settings, including the newly added Dropbox save location, are properly loaded by the programs.
After the restart, open Word, Excel, or PowerPoint, create a file, and choose File Save As. Dropbox should now be listed among your save locations. To undo the change, go back to the same preferences, clear the checkbox, click Apply, and restart Office again.
Right-click the Dropbox icon and select Run as administrator if the settings fail to save.
If Dropbox still doesn't appear after a restart, check that Office was fully closed. Look for leftover Office processes in Task Manager. Also check that you are using the desktop apps, not Office for the web.
Troubleshooting Default Save Paths
If Office keeps saving to OneDrive by default, you can easily change the default save location to a Dropbox folder. This is a setting inside each Office app, so you repeat it in Word, Excel, and PowerPoint if you want all three to behave the same way.
- In the Office app, click File, then Options.
- Select the Save tab in the left pane.
- Check Save to Computer by default, so Office stops offering OneDrive first.
- Under Default local file location, click Browse and select your Dropbox folder.
- Click OK. New files will now open the Save As dialog in your Dropbox folder.
Summary
Linking Dropbox to Office makes it a direct save location, though AutoSave is best with OneDrive. If you rely on AutoSave or real-time co-authoring, keep those files on OneDrive or SharePoint. Use Dropbox for files you are happy to save by hand.
Was this guide helpful?

About the Author
Richard
Tech Writer, IT Professional
Richard is a writer at Geek Rewind who turns complex IT tasks into clear, step-by-step guides. He draws on years of hands-on experience in system administration and enterprise IT operations, focusing on Windows, Linux and WordPress: the problems people actually run into, and the fixes that work. His server and WordPress guides come from systems he runs himself. Richard builds and maintains the platform behind Geek Rewind, from its Ubuntu servers and Nginx configuration to its custom WordPress plugins. Many new tutorials start with readers' questions, and he's always glad to answer them in the comments.



[…] Dropbox on system startup, disabling Dropbox startup in the background, adding Microsoft Office add-in, and […]
[…] Dropbox on system startup, disabling Dropbox startup in the background, adding Microsoft Office add-in, turning notifications on or off, managing backups, turning automatic backups on or […]
[…] including starting Dropbox on system startup, disabling Dropbox startup in the background, adding Microsoft Office add-in, turning notifications on or off, managing backups, turning automatic backups on or off, […]
[…] the app, such as starting Dropbox on system startup, disabling Dropbox startup in the background, adding Microsoft Office add-in, turning notifications on or off, managing backups, automatic backups on or off, renaming backup […]