How to Change Dropbox Folder Location in Windows 11

Moving the Dropbox folder shifts your synced files from the C: drive to a secondary SSD, a hard drive partition, or an external drive. It is the quickest way to free up space when the system drive runs low. A common rule of thumb is to keep at least 50 GB free on the primary drive of a Windows 11 PC so it runs smoothly.
The Dropbox desktop app moves the files for you once you pick the new location in its settings. You do not copy anything by hand. Before you start, check two things:
- The destination drive has enough free space for your whole Dropbox folder.
- The destination drive is formatted as NTFS, which Dropbox requires on Windows. If you choose an external drive, keep it plugged in. Dropbox cannot sync while the drive is disconnected.
Open the Dropbox icon in the system tray , click your profile picture, select Preferences, go to the Sync tab, and click the Move button next to your current folder path. Choose your new destination drive or folder in the browse window, and Dropbox transfers your files automatically.
Close Up Shop
Close every program that might be using files in your Dropbox folder before you begin. An open file can block the move and leave you with sync errors or a half-finished transfer. This applies most to the following:
- Save your work and close Word, Excel, and any other Office apps.
- Close photo and video editors that have files open from Dropbox.
- Pause or exit any background backup or file-indexing software that scans your Dropbox folder.
- Close any File Explorer windows that show your Dropbox folder.
Click the small upward-pointing arrow to see hidden icons too. Close anything you think is connected to your files, but leave the Dropbox icon alone, because you need it in the next step.
Find the Dropbox Icon
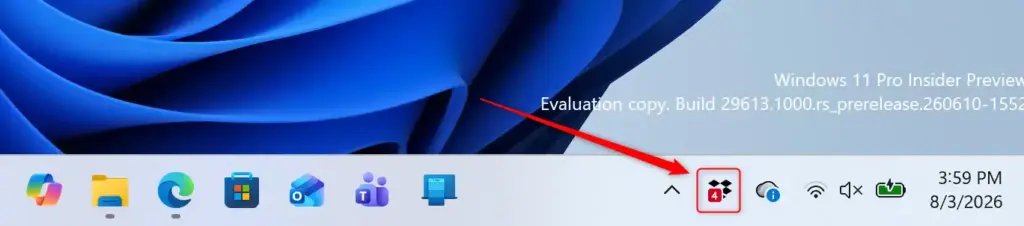
The Dropbox icon sits in the system tray at the bottom-right of the screen, near the clock. To find it:
- Look for the blue Dropbox icon next to the clock.
- If you do not see it, click the small upward-pointing arrow to show hidden icons. The Dropbox icon should appear in the pop-up.
If the icon is missing from both places, Dropbox is not running. Open it from the Start menu , wait a few seconds, and check the tray again.
Open Preferences
Next, open the Preferences window from the Dropbox menu:
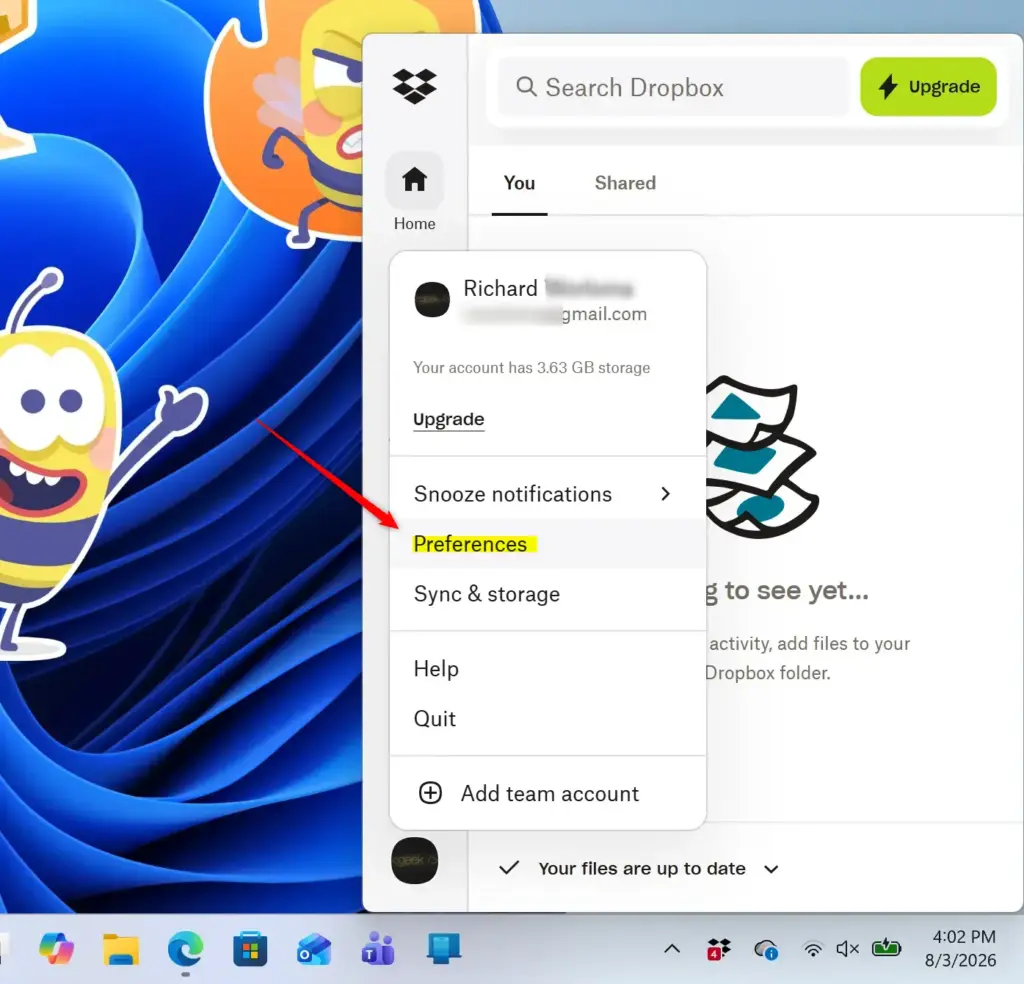
- Click the Dropbox icon. The Dropbox menu opens.
- Click your profile picture or initials. It is usually in the corner of the menu.
- Choose Preferences from the list.
A Preferences window opens, where you control how Dropbox behaves on this computer. If the menu looks slightly different from this description, look for your profile picture or initials, because the Preferences option is always reached from there.
Go to the Sync Tab
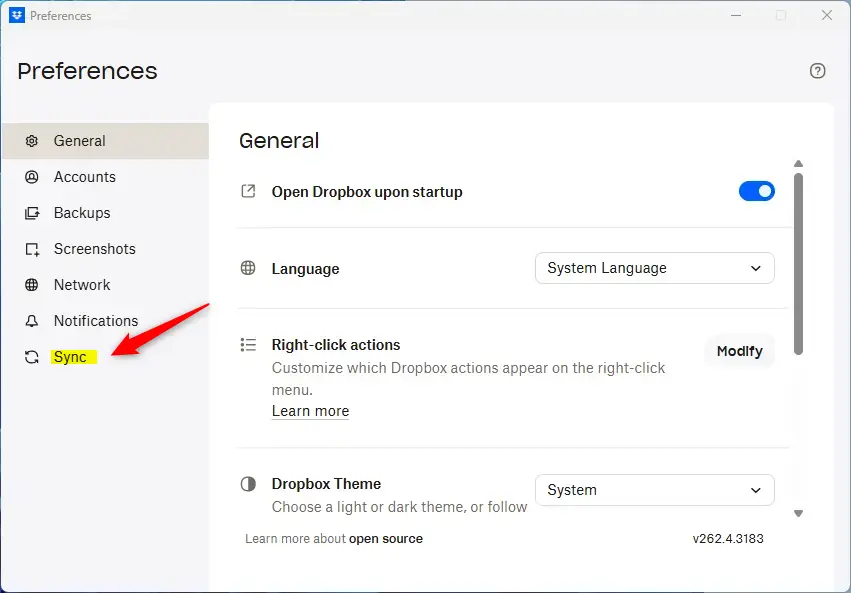
The Sync tab controls how your files update between this computer and the cloud, and it holds the folder location setting.
- In the Preferences window, click the Sync tab.
- Look at the settings listed there. You should see the current Dropbox folder location near the top or in the main list.
If you cannot find the folder location setting in the Sync tab, make sure you are using the Dropbox desktop app, not the website. Preferences with a Sync tab only exist in the desktop app.
Start the Move
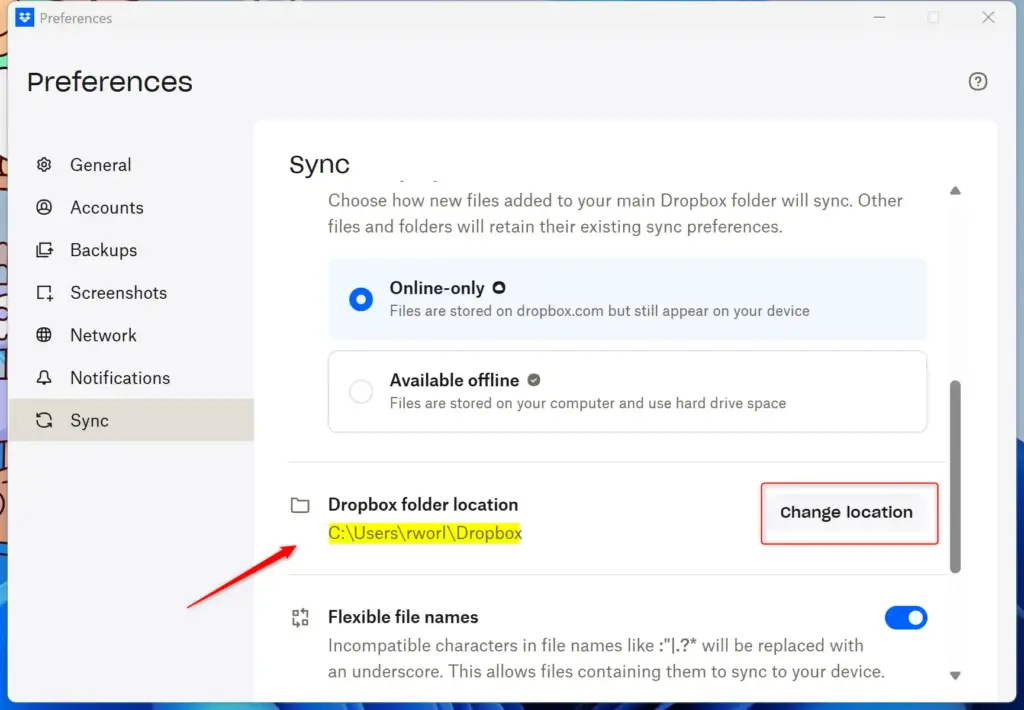
The button for changing the folder location is in the Sync tab, next to the path where your Dropbox folder currently lives.
- In the Sync tab, find the current Dropbox folder path.
- Click the button next to it. In current versions it is labeled Move…. Some versions call it Change location.
- Wait for a browse window to open. That is where you pick the new spot.
If the button is greyed out or does nothing, close and reopen the Preferences window. Make sure you are signed in to the right account. If it still does not respond, close any program that has a file open in Dropbox and try again.
Moving the wrong account's folder can cause confusion!
Choose Your New Spot
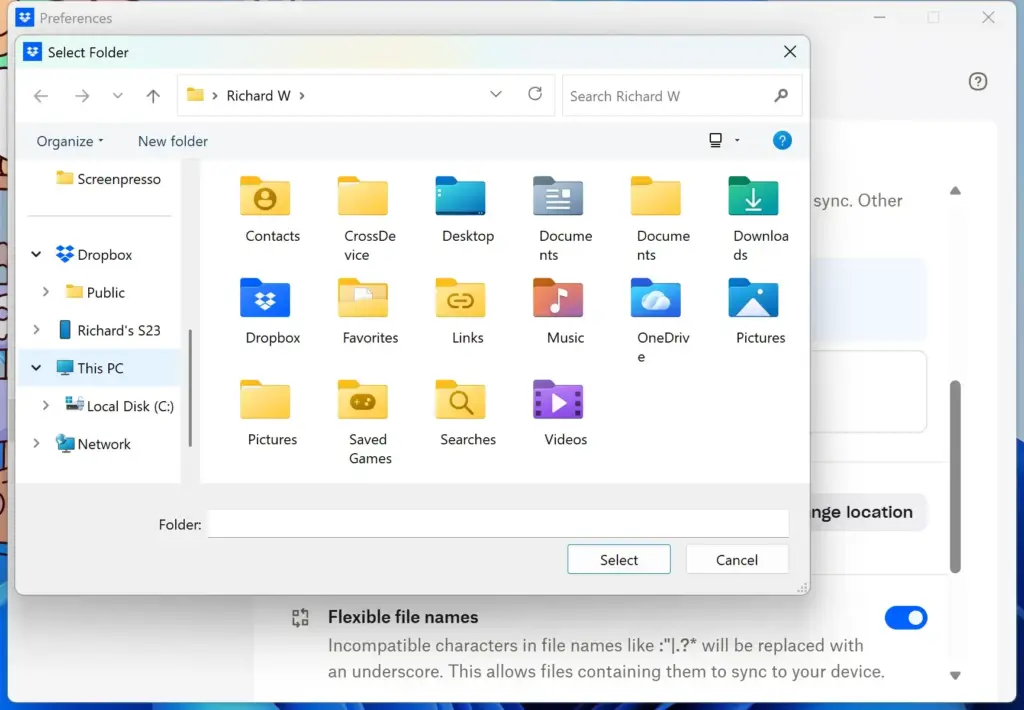
Now choose where the Dropbox folder will go:
- In the browse window, click through your drives and folders to find the destination, such as a secondary SSD, a second partition, or an external drive.
- Click the folder you want to select it. If you need a new one, create it first, for example a plain folder on the D: drive.
- Confirm your choice by clicking the button that accepts the selection, usually Select Folder or OK.
Dropbox may ask you to confirm the move. Read the prompt and accept it. Pick a simple location with a short path, and avoid putting the folder inside another synced or system-protected folder.
Let Dropbox Do the Work
After you confirm, Dropbox moves all your files and folders to the new destination on its own. A progress indicator shows the transfer. The move takes a few minutes, or much longer if you have a large number of files or a lot of data.
- You can watch the progress bar or let it run in the background.
- Do not shut down the PC, put it to sleep, or unplug an external drive until the move finishes.
- Keep the files you closed earlier shut during the transfer.
When it finishes, open File Explorer and check that the Dropbox folder is in the new location with your files inside. To undo the change later, repeat the same steps and pick the original location.
Log Out and Log Back In
Sign out of the Dropbox desktop app and sign back in once the move is complete. This makes the app reload its settings and confirms that everything syncs from the new folder path.
- Click the Dropbox icon in the system tray.
- Click your profile picture or initials.
- Choose Sign out.
- Open Dropbox again and sign in with your account details.
After you sign in, Dropbox should show your files syncing from the new location. A short check for changes is normal.
Tip: Signing out and back in gives Dropbox a fresh start with its new file location, so everything is properly connected.
Summary
To change the Dropbox folder location in Windows 11, close any programs that have your files open and open Dropbox Preferences from the system tray. In the Sync tab, click the button next to the current folder path and select a new location. Confirm the move, let the app transfer your files, then sign out and back in so Dropbox finishes updating.
Was this guide helpful?

About the Author
Richard
Tech Writer, IT Professional
Richard is a writer at Geek Rewind who turns complex IT tasks into clear, step-by-step guides. He draws on years of hands-on experience in system administration and enterprise IT operations, focusing on Windows, Linux and WordPress: the problems people actually run into, and the fixes that work. His server and WordPress guides come from systems he runs himself. Richard builds and maintains the platform behind Geek Rewind, from its Ubuntu servers and Nginx configuration to its custom WordPress plugins. Many new tutorials start with readers' questions, and he's always glad to answer them in the comments.



[…] more help with cloud services, check out these related guides: Dropbox and […]