Windows 11 Taskbar: What Is the Start Feature

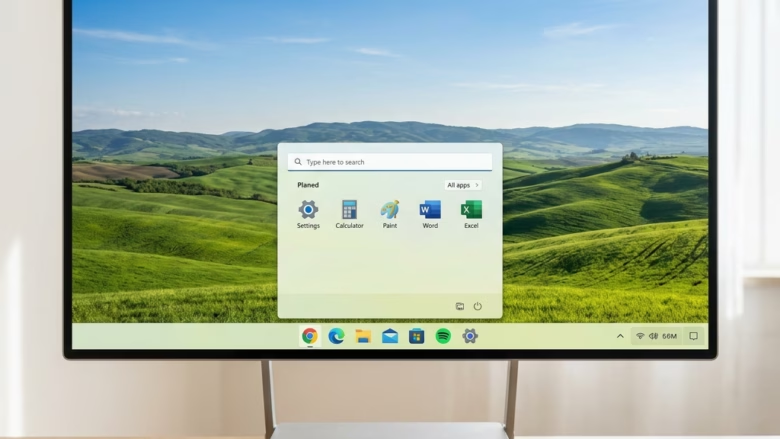
The Start menu in Windows 11 is the central panel for opening apps, settings and files from the taskbar. Press the Windows key or click the Windows logo to open it. It shows pinned shortcuts, recent documents and a search box for finding files on your PC.
Start also holds the power controls (sleep, shut down, restart) and your account menu, where you can lock the PC, sign out or switch users. Settings is pinned by default, so you can reach it in two clicks. You can change which apps appear in Start and how the taskbar behaves.
The Start menu in Windows 11 opens when you click the Windows logo on the taskbar or press the Win on your keyboard. It displays pinned app shortcuts at the top, a Recommended section with recent files below, and an All apps button for accessing your full app list.
Understanding the 🪟 Windows 11 Start Feature
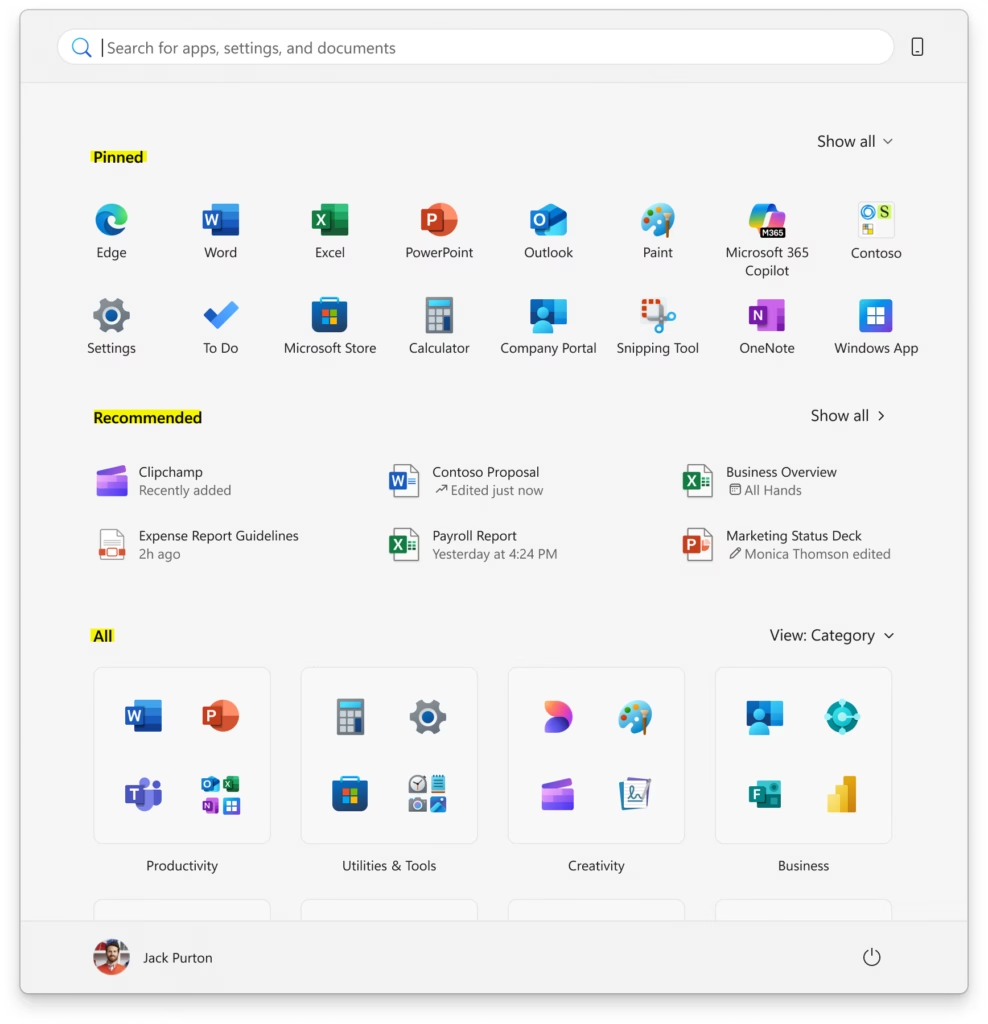
Start is the main place to open apps, change settings and get back to recent files. It has three parts: a Pinned area for the apps you choose, an All apps list of everything installed, and a Recommended area for recent files and newly installed apps.
The Recommended area changes as you work, so recent items stay close. The Pinned area only changes when you change it. Knowing what each part does makes it easier to set Start up the way you work.
This tutorial describes the standard layout with Pinned, Recommended and an All apps button. If your menu looks different, the same ideas apply, but button positions may not match.

| 1. Widgets | 2. Start | 3. Search | 4. Task view | 5. Applications | 6. System tray |
Step 1Finding and Opening the Start Menu
You open Start with one click on the Windows logo on the taskbar . By default the taskbar icons are centered, so the logo sits in the middle of the screen. If you prefer the older left-aligned look, you can move it to the left corner.
- Find the Windows logo (four squares) on the taskbar. With the default centered layout, it is the leftmost icon in the centered group, next to the Search button.
- Click the Windows logo, or press the Windows key on your keyboard. The Start menu opens above the taskbar. You should see Pinned apps at the top, a Recommended section below them, and an All apps button at the top right of the Pinned area.
- To close Start without choosing anything, press the Windows key again, press Esc, or click anywhere outside the menu.
- To move the logo to the left, right-click an empty part of the taskbar and choose Taskbar settings. Open Taskbar behaviors and set Taskbar alignment to Left. The icons shift immediately. No restart is needed, and you can switch back to Center the same way.
Step 2Looking at Pinned Apps
Pinned apps sit at the top of Start so your favorite programs are one click away. Think of it as a speed dial: browsers, document editors, games and anything else you use daily, without searching for them.
- Open Start and look at the top section, labeled Pinned. These are the apps Windows pinned by default plus any you have added. You will typically see a web browser, File Explorer, Settings and similar apps.
- Click any app icon in the Pinned section. The app opens right away and Start closes.
- If you have more pins than fit on screen, the section splits into pages. Small dots appear at the right edge. Click a dot or scroll with the mouse wheel to see the next page.
Step 3Managing Your Pinned Apps
Pinning is done from the app's right-click menu, and unpinning only removes the shortcut. The app itself stays installed.
- To pin an app, click All apps, or type the app's name into Start to search for it. Find it in the results.
- Right-click the app's name or icon. A context menu appears.
- Select Pin to Start. The app is added to the end of your Pinned section. If you cannot see it, check the next page of pins.
- To rearrange pins, click and hold an icon in the Pinned section. Drag it to the new spot and release the mouse button. The other icons move out of the way.
- To remove a pin, right-click its icon in the Pinned section and select Unpin from Start. The icon disappears from Start. To undo it, find the app in All apps and choose Pin to Start again.
Step 4Looking Through the "All Apps" List
The All apps list is an alphabetical directory of the programs installed on your PC. Use it to find apps that are not pinned, either by scrolling the A-to-Z list or by jumping to a letter.
- In Start, click the All apps button at the top right of the Pinned section. The menu switches to a full list of installed programs, sorted from A to Z. A Back button appears so you can return to the Pinned view.
- Scroll through the list with the mouse wheel or the scroll bar. To jump to a letter, click one of the letter headings in the list (for example P). Windows shows a grid of letters, and clicking one takes you to the apps starting with it.
- Click the app you want. It opens right away, just like a pinned app.
Some apps are grouped in folders, such as Windows Tools or Microsoft Office tools. Click the folder to expand it.
Step 5Using the Recommended Section
The Recommended section sits below your pinned apps. It lists files you recently worked on and apps you recently installed or opened, so you can pick up where you left off without digging through folders.
- Open Start and look below the Pinned area at the Recommended section. It shows shortcuts to recent files and apps. If the section is empty, you have not opened many files yet, or the feature is turned off.
- Click an item in Recommended. A file opens in its usual program, and an app starts normally.
- To remove a single item, right-click it and select Remove from list. Only that shortcut is cleared. The file itself is not deleted.
- To control what appears here, open Settings and go to Personalization, then Start. Turn off the toggles for recently added apps, most used apps, or recently opened items as you prefer. Turning off the recently opened items toggle also stops those files appearing in Jump Lists and File Explorer. Turn the toggle back on to restore them.
- On the same Start page, the Layout setting lets you show more pins or more recommendations. Use it if you want a bigger Pinned area and a smaller Recommended area, or the reverse.
Step 6Accessing User Account Options
Your account controls are in the bottom-left corner of Start. From there you can lock the PC, sign out, switch to another account or open your account settings. The power controls are in the opposite corner.
- Look at the bottom-left corner of the Start panel. Your account picture or initial, along with your name, is shown there.
- Click your account icon. A small menu appears. It usually offers Change account settings, Lock and Sign out. If other accounts exist on the PC, their names are listed too, and clicking one switches to that account without signing you out.
- To change your account picture, choose Change account settings. The Settings app opens on your account page, where you can pick a new picture.
- To shut down or restart, click the Power button in the bottom-right corner of Start. Choose Sleep, Shut down or Restart. If updates are waiting, you may see Update and restart or Update and shut down instead.
Reference:
Summary
Start is the central launch point in Windows 11. It combines pinned shortcuts, a full app list, recent file recommendations and account and power controls on one screen. Pin the apps you use daily, use All apps for the rest, and adjust the Recommended section in Settings so Start shows what you actually need.
Frequently asked questions
What is the Start button on the taskbar?
The Start button is the Windows logo on the left side of your taskbar. Click it or press the Windows key to open the Start menu, where you can launch apps, access Settings, search your PC, and reach power controls like shutdown and restart.
How do I get the classic Start menu back on 🪟 Windows 11?
Windows 11 doesn't offer the classic Start menu style, but you can customize the current one. Right-click the taskbar, select Taskbar settings, then adjust which apps appear pinned and how recommendations display. Third-party tools exist, but Windows itself won't restore the old layout.
What is the difference between the taskbar and the Start button?
The taskbar is the bar at the bottom of your screen holding the Start button, app icons, and system tray. The Start button is a single element on the taskbar—the Windows logo icon you click to open the Start menu for launching apps and accessing settings.
What is start in Task Manager 🪟 Windows 11?
In Task Manager's Startup tab, "Start" refers to whether a program runs automatically when Windows boots. You can disable startup apps here to speed up your PC's startup time. Right-click an app and select Disable to prevent it from launching at startup.
Still have a question?
Answered by AI from this guide. Good questions may be added to this page — please don't include personal details.
Did this guide fix your problem?

About the Author
Richard
Tech Writer, IT Professional
Richard is a writer at Geek Rewind who turns complex IT tasks into clear, step-by-step guides. He draws on years of hands-on experience in system administration and enterprise IT operations, focusing on Windows, Linux and WordPress: the problems people actually run into, and the fixes that work. His server and WordPress guides come from systems he runs himself. Richard builds and maintains the platform behind Geek Rewind, from its Ubuntu servers and Nginx configuration to its custom WordPress plugins. Many new tutorials start with readers' questions, and he's always glad to answer them in the comments.
No comments yet — be the first to share your thoughts!