How to Change Taskbar Position to Top or Side in Windows 11

Windows 11 lets you move the taskbar from the bottom of your screen to the top, left, or right side.
The taskbar is that strip at the bottom of your screen where you find the Start button, app icons, and the system tray. Until now, it was permanently fixed at the bottom in Windows.
This change, introduced in a recent Windows 11 update, gives you more control over your desktop layout. You can reposition the taskbar to better suit how you work or simply to get a different look.
For instance, some users prefer placing the taskbar at the top to gain more vertical screen space for applications. This flexibility allows you to tailor your Windows experience.
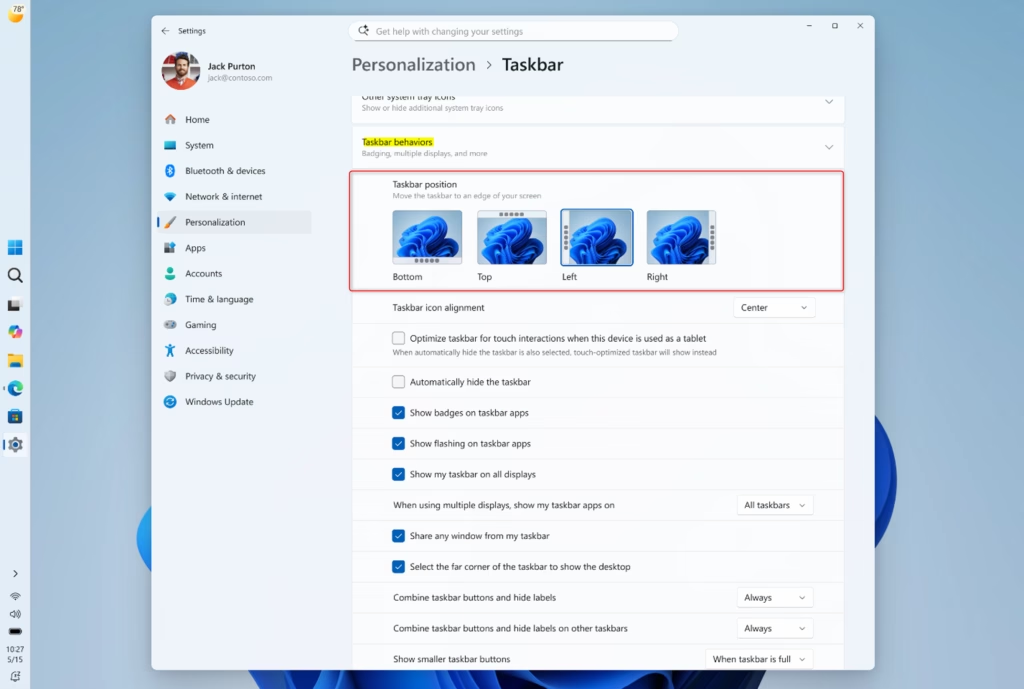
Right-click the taskbar and select Taskbar settings. Navigate to Taskbar behaviors and use the Taskbar position dropdown menu to select Top, Left, or Right. Your taskbar will move immediately.
Finding the New Taskbar Settings
To change your Windows 11 taskbar position, you’ll need to open its settings. The quickest way is to right-click on any empty spot on your taskbar. From the menu that pops up, select ‘Taskbar settings’ to go directly to the right place in Windows Settings.
- Right-click on an empty spot on your taskbar. This is where you usually go to change settings or open Task Manager.
- A menu will pop up. Click on Taskbar settings. This will open the Personalization section in your Windows Settings app, focusing on the taskbar.
- Once you are in Taskbar settings, look for a section called Taskbar behaviors. This is where all the new options are.
These new taskbar position options might not appear for everyone right away. Microsoft rolls out features gradually. You can get early access by joining the Windows Insider Program, or you can simply wait for a future Windows Update. Keeping your operating system current is important.
Choosing Your Taskbar’s New Home
You can change your Windows 11 taskbar position to the top, left, or right side of your screen. Inside the ‘Taskbar behaviors’ settings, look for the ‘Taskbar position’ dropdown menu. This lets you pick where you want your taskbar to live, instead of just the default bottom.
- In the Taskbar behaviors section, find the option called Taskbar alignment or Taskbar position. (The exact words might change a little as it rolls out).
- Click the dropdown menu. You will see options like:
- Bottom (Default): This is the normal spot for the Windows taskbar.
- Top: Your taskbar will now be at the top of your screen.
- Left: The taskbar will be a vertical bar on the left side of your screen.
- Right: The taskbar will be a vertical bar on the right side of your screen.
- Pick the position you like. Your taskbar should move right away. You don’t need to restart your computer!
Placing the taskbar on the side of a wide monitor can free up horizontal screen space. Wide displays naturally offer more horizontal real estate than vertical. This setup lets you see more of your work without scrolling, which really boosts productivity on monitors 24 inches or larger.
Aligning Your Icons (When Vertical)
When you move your Windows 11 taskbar to the left or right side, you can control how your icons are arranged. Within the ‘Taskbar behaviors’ settings, find ‘Taskbar icon alignment’. This option lets you choose to align your icons to the ‘Top’ or ‘Center’ of the taskbar when it’s vertical.
- Still in the Taskbar behaviors settings, look for an option about Taskbar icon alignment.
- When your taskbar is on the left or right, you will likely see options to align icons to the Top or Center of the vertical taskbar.
- When your taskbar is at the top or bottom, you will have options for Left or Center alignment.
Users can change the Windows 11 taskbar position to suit their work style. For a vertical taskbar, aligning icons to the top offers a natural feel, mirroring the typical bottom-left placement of the Start button.
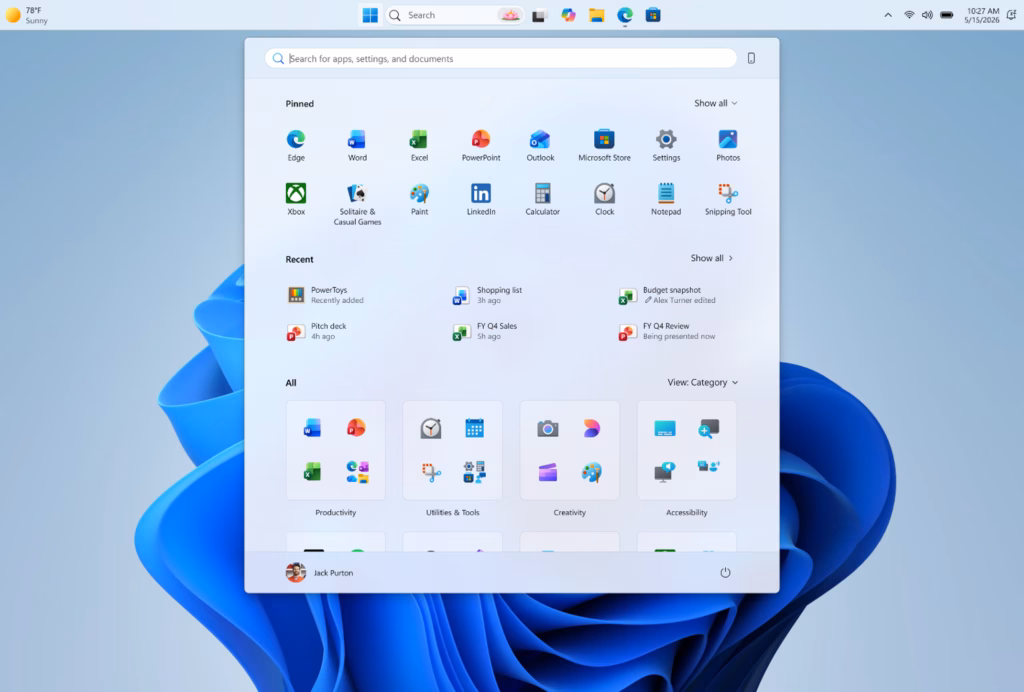
Taskbar position affects Windows 11 features. When the taskbar is at the top of the screen, the Start menu opens from that top edge. This behavior ensures the user interface remains intuitive, even with a changed taskbar location.
Seeing Every Window at a Glance
Taskbar settings allow you to change how buttons are displayed on your taskbar. Within Taskbar settings, under ‘Taskbar behaviors’, you will find the ‘Combine taskbar buttons and hide labels’ setting. Setting ‘Combine taskbar buttons and hide labels’ to ‘Never’ shows each open window as a separate button.
- Go back to Settings > Personalization > Taskbar.
- Look for the setting called Taskbar behaviors.
- Find the option that says “Combine taskbar buttons and hide labels”. Make sure this is not checked (or set to “Never” if that’s what it says).
Windows 11’s vertical taskbar (left or right side) shows each open window for an app as a separate button with its name. This change, implemented in Windows 11 build 22000.653, simplifies finding and switching between different documents or projects.
Changing the taskbar position improves workflow for users who code, write, or manage many files within a single program. The taskbar, when moved to the top or side of the screen, provides a clear, always-visible list of open tasks, reducing clutter. This visual organization helps users track their active applications more effectively.
What’s Still Being Worked On?
While you can move the Windows 11 taskbar position, some features might not work perfectly when it’s not at the bottom. The auto-hide feature, which makes the taskbar disappear, and its behavior in Tablet Mode, might still have issues.
- Auto-hide and Tablet Mode: The feature that hides the taskbar automatically, and how the taskbar works on tablets, might not work perfectly yet when the taskbar is moved from the bottom.
- Touch Gestures: If you use specific touch actions, they might still be in progress for these new taskbar positions.
- Search Box: In some cases, the full search box might just show a search icon when the taskbar is in a different position. This is expected to get better.
- Per-Monitor Settings & Drag and Drop: Things like having different taskbar positions on different screens, or dragging and dropping files onto taskbar icons, are things Microsoft is still thinking about.
Microsoft ensures expected taskbar functionality and prevents accidental movement. While Microsoft adds more taskbar position choices, the company also aims to maintain the taskbar as a stable and reliable part of the Windows 11 experience.
Reference:
Summary
You can easily change your Windows 11 taskbar position to the top, bottom, left, or right using the Taskbar settings for better customization and efficiency.
How do I get my taskbar back to the top?
To move your taskbar to the top in Windows 11, right-click an empty space on the taskbar, select ‘Taskbar settings,’ and then under ‘Taskbar behaviors,’ choose ‘Top’ from the ‘Taskbar alignment’ dropdown menu. This will reposition it instantly.
How do I switch the position of my taskbar?
Switching your taskbar position in Windows 11 is quite simple. Right-click on an empty taskbar area, choose ‘Taskbar settings.’ Navigate to ‘Taskbar behaviors’ and use the ‘Taskbar alignment’ dropdown to select your desired position: left, right, top, or bottom.
How to move taskbar to top in 🪟 Windows 11?
To move your taskbar to the top in Windows 11, right-click an empty taskbar area and select ‘Taskbar settings.’ In the ‘Taskbar behaviors’ section, click the ‘Taskbar alignment’ dropdown and choose ‘Top.’ Your taskbar will immediately relocate to the top of the screen.
How to make taskbar 🪟 Windows 11 on top?
To place your Windows 11 taskbar on top, right-click an empty spot on the taskbar and select ‘Taskbar settings.’ Under ‘Taskbar behaviors,’ find the ‘Taskbar alignment’ option and select ‘Top’ from the available choices. This instantly moves the taskbar.
Was this guide helpful?
0% of readers found this helpful (2 votes)

About the Author
Richard
Tech Writer, IT Professional
Richard, a writer for Geek Rewind, is a tech enthusiast who loves breaking down complex IT topics into simple, easy-to-understand ideas. With years of hands-on experience in system administration and enterprise IT operations, he’s developed a knack for offering practical tips and solutions. Richard aims to make technology more accessible and actionable. He's deeply committed to the Geek Rewind community, always ready to answer questions and engage in discussions.

You don’t mention that you need to be a Windows Insider to use this.