How to Enable or Disable Ability to Unblock Files Downloaded from Internet in Windows 11

The ability to unblock files downloaded from the internet controls whether you can remove the security block Windows puts on a downloaded file. Windows 11 uses Attachment Manager, a built-in component that checks where a file came from. It adds a hidden security tag (zone information) to items you download from the internet or receive as attachments.
Open Local Group Policy Editor, navigate to User Configuration Administrative Templates Windows Components Attachment Manager, find Hide mechanisms to remove zone information, and select Not Configured to enable unblocking or Enabled to disable it. Click OK and restart if the change doesn’t appear immediately.
When Windows blocks a file, you normally fix it by right-clicking the file, opening Properties, and checking the Unblock box. The setting in this tutorial does not stop Windows from tagging files. It hides the options that let you remove the tag, so users can no longer unblock a downloaded file themselves.
When Attachment Manager decides how to treat a file, it looks at these things:
- The type of program you are using.
- The type of file you are trying to open.
- The security settings for the website you downloaded the file from. This includes zones like Internet, Local intranet, Trusted sites, and Restricted sites.
Attachment Manager also sorts files into risk categories:
- High Risk: If a high-risk file comes from a restricted zone, Windows will block it. If it’s from the internet zone, you’ll see a warning: “Windows found that this file is potentially harmful. To help protect your computer, Windows has blocked access to this file.”
- Moderate Risk: For moderate-risk files from restricted or internet zones, you might see a warning like: “The publisher could not be verified. Are you sure you want to run this software?”
- Low Risk: Windows usually won’t warn you about low-risk files, no matter where they came from.
This setting hides the Unblock option on a file’s Properties window and the “Always ask before opening this file” option on the security warning. With those options hidden, nobody can use them to unblock downloaded files. Files that are already unblocked stay unblocked. The setting only affects what you can do from now on.
Important: Administrator rights are needed to make these changes.
Option 1Using Local Group Policy Editor
The Local Group Policy Editor lets you control this feature on Windows 11 Pro, Enterprise, or Education. It is not included in Windows 11 Home. If you run Home, use the Registry Editor method further down. You can use the editor to turn the setting on or off for all users or for specific accounts on your PC.
- Open the Local Group Policy Editor. You can apply this policy to all users, to specific users or groups, or to all users except administrators. The last two options need the per-user Local Group Policy setup, not the standard editor window that opens from the Start menu.
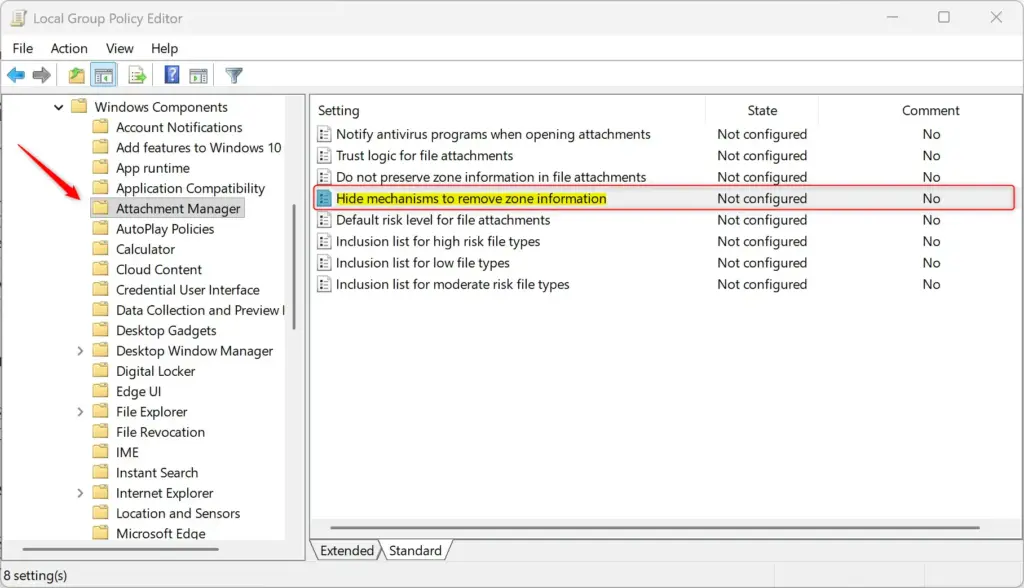
- In the left pane of the editor, go to User Configuration Administrative Templates Windows Components Attachment Manager You should see a short list of Attachment Manager policies in the right pane.
- In the right pane, find Hide mechanisms to remove zone information and double-click it. A window with the policy settings opens.
To Enable the Ability to Unblock Files
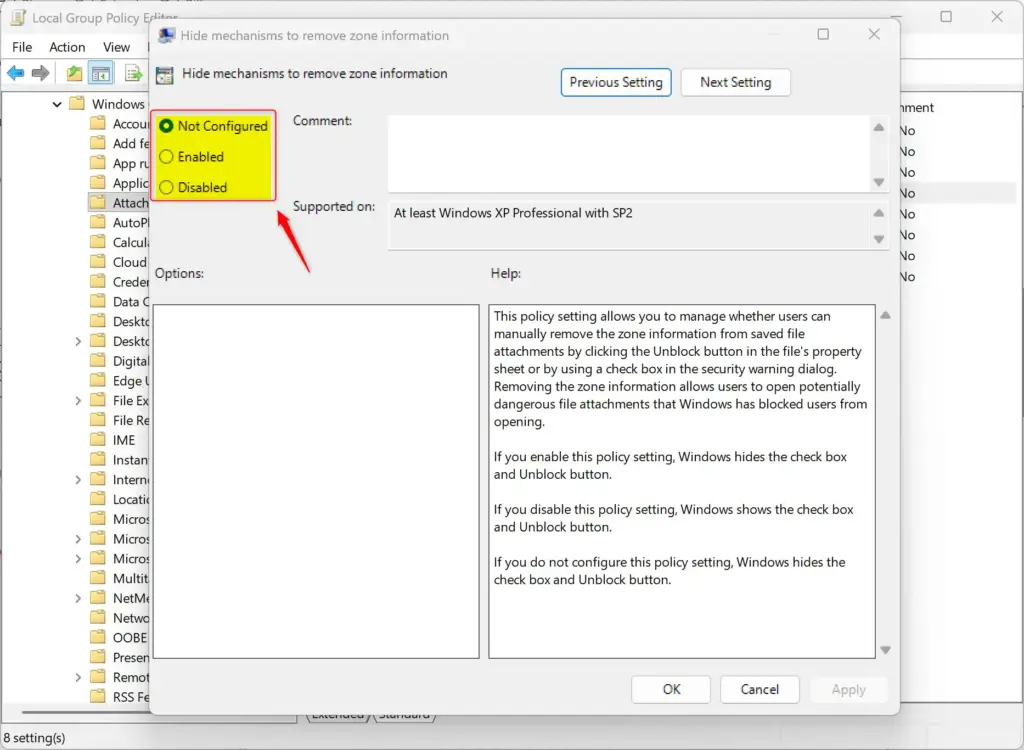
To enable the ability to unblock files, which is the default behavior, follow these steps:
- Select Not Configured. Disabled gives the same result, but Not Configured puts the policy back to its original state.
- Click OK. The window closes and the policy no longer hides the unblock options.
The change normally applies the next time you open a file's Properties window. If you still don't see the Unblock option, sign out and back in, or restart the PC.
To Disable the Ability to Unblock Files
To disable the ability to unblock files, follow these steps:
- Select Enabled.
- Click OK. The window closes and the policy now hides the unblock options.
To check it, right-click a file that was downloaded from the internet and open Properties. The Unblock checkbox should be gone. If it is still there, sign out and back in, or restart the PC. To undo the change, go back to the policy and select Not Configured.
To disable the ability to unblock downloaded files with the Registry Editor, sign in as an administrator. You will add one value that tells Windows to hide the unblock options. Users then can't remove the security warning from files they get from the internet.
A wrong change in the registry can cause problems that are hard to trace.
Option 2Using the Registry Editor
This option works for all Windows 11 editions, including Home, where the Local Group Policy Editor is not available.
To Enable the Ability to Unblock Files (Default Setting)
No changes are needed to enable the ability to unblock files, as it is the default. If you or someone else added the value in the steps below, remove it or reset it as described at the end of this section.
To Disable the Ability to Unblock Files
- Press Windows key + R on your keyboard to open the Run dialog box.
- Type
regeditand press Enter or click OK. If User Account Control asks for permission, click Yes. The Registry Editor opens. - In the left pane, go to this key: HKEY_CURRENT_USER\SOFTWARE\Microsoft\Windows\CurrentVersion\Policies\Attachments. You can also paste the path into the address bar at the top of the Registry Editor. This key controls how Windows handles files downloaded from the internet. If the Attachments key does not exist, right-click the Policies key, choose New Key, and name it Attachments.
- Right-click the Attachments key in the left pane.
- Select New DWORD (32-bit) Value. A new value appears in the right pane with its name ready to edit.
- Name the new value
HideZoneInfoOnPropertiesand press Enter. - Double-click the new
HideZoneInfoOnPropertiesvalue. The Edit DWORD (32-bit) Value window opens. - In the Value data field, type
1and click OK. The value now shows the data you entered in the right pane.
This change disables the Unblock option for files downloaded from the internet. Open a downloaded file's Properties window to confirm the checkbox is gone. If it still shows, sign out and back in.
Because the key is under HKEY_CURRENT_USER, it applies only to the account you are signed in with. Repeat the steps in each account you want to restrict.
To re-enable the Unblock option, delete the HideZoneInfoOnProperties value or set its Value data to 0.
Summary
Use the Local Group Policy Editor on Pro, Enterprise, and Education editions, or the Registry Editor on any Windows edition, to control this security setting. Both methods give the same result. Use the registry method on Home, and use Group Policy where you have it, since it is easier to review and undo.
Was this guide helpful?

About the Author
Richard
Tech Writer, IT Professional
Richard is a writer at Geek Rewind who turns complex IT tasks into clear, step-by-step guides. He draws on years of hands-on experience in system administration and enterprise IT operations, focusing on Windows, Linux and WordPress: the problems people actually run into, and the fixes that work. His server and WordPress guides come from systems he runs himself. Richard builds and maintains the platform behind Geek Rewind, from its Ubuntu servers and Nginx configuration to its custom WordPress plugins. Many new tutorials start with readers' questions, and he's always glad to answer them in the comments.

No comments yet — be the first to share your thoughts!