How to Install CAB Files in Windows 11: Step-by-Step Guide

CAB files on Windows 11 usually contain system updates or hardware drivers. Installing one takes a few minutes with the built-in command-line tools. Which method you pick depends on what the file contains, and the sections below cover each one.
Open Command Prompt as Administrator, then run the command dism /Online /Add-Package /PackagePath:”📁C:\
What Is a CAB File?
A CAB (cabinet) file is a compressed archive that holds one or more system files. Microsoft and device manufacturers use this format for update packages and drivers because it keeps downloads small. You will usually run into one when you download an update by hand, for example from the Microsoft Update Catalog, or when a manufacturer ships a driver as a single package.
Bundling many files into one archive also saves storage space and keeps related files together.
Before you install anything, check two things:
- The package must match your system. A package built for a different Windows version or processor type (x64 or ARM64) will fail to install.
- You need an administrator account. Both command-line methods fail with an access error without elevated rights.
How to Install a CAB File in 🪟 Windows 11
Use Command Prompt or PowerShell for update packages. Use File Explorer when you only need a driver from inside the file. Whichever you choose, restart the PC afterward if Windows asks you to. Some updates only finish installing after a reboot.
1Using Command Prompt
You can install CAB files in Windows 11 from Command Prompt by running a built-in deployment tool with administrator rights. This is the fastest way to apply system updates and patches. It needs no extra software, just one text command.
- Open Command Prompt as Administrator (this means running it with special permissions). If a User Account Control prompt appears, click Yes. The window title should now start with “Administrator”.
- Find the full path of your CAB file. A quick way is to select the file in File Explorer and press Ctrl+Shift+C to copy its path.
- Type the command below, but replace
FULL_PATH_TO_CAB_FILEwith the full location of your CAB file. For example, if your CAB file is in Downloads, it might look like this:C:\Users\YourName\Downloads\file.cab. If the path contains spaces, put it in quotation marks. - Press Enter and wait. Large updates can take several minutes, and a progress indicator may appear in the window.
dism /Online /Add-Package /PackagePath:"FULL_PATH_TO_CAB_FILE"
Example:
dism /Online /Add-Package /PackagePath:"C:\Users\Richard\Downloads\Windows10.0-KB5018851-x64.cab"
When the operation finishes, the console window shows a confirmation message. If it reports an error instead, the usual causes are a typing mistake in the path, a window that is not running as administrator, or a package that does not match your version of Windows. Restart the PC if the message says a restart is required.
Not every package appears in that list.
2Using Windows PowerShell
Windows PowerShell lets you install CAB files in Windows 11 with a package management command run with administrative privileges. This suits administrators who prefer modern scripting tools for applying updates and drivers. The result is the same as the Command Prompt method.
- Open PowerShell as Administrator. Click Yes on the User Account Control prompt. The window title should show “Administrator”.
- Type this command, again replacing
FULL_PATH_TO_CAB_FILEwith your file’s path:
Add-WindowsPackage -Online -PackagePath "FULL_PATH_TO_CAB_FILE"
Example:
Add-WindowsPackage -Online -PackagePath "C:\Users\Richard\Downloads\Windows10.0-KB5018851-x64.cab"
Press Enter and let it run. PowerShell may show a progress bar while it works. When it finishes, the console displays a success notification. Restart the PC if you are prompted to.
If you see an access denied error, you are almost certainly in a window that is not elevated. Close it and reopen PowerShell as administrator.
3Extract and Install CAB Files Using File Explorer
File Explorer lets you extract the contents of a CAB file by hand. This is the right approach when you need one specific hardware driver rather than the whole update package. It involves no commands, but you install the driver separately afterward.
- Open File Explorer (the folder icon on your taskbar ).
- Find your CAB file and double-click it to open. The files inside appear in a normal folder view.
- Select all the files inside (Ctrl+A), right-click, and choose Extract All. If that option is missing, copy the selected files and paste them into a new empty folder instead.
- Pick a folder where you want to save the extracted files, then click Extract.
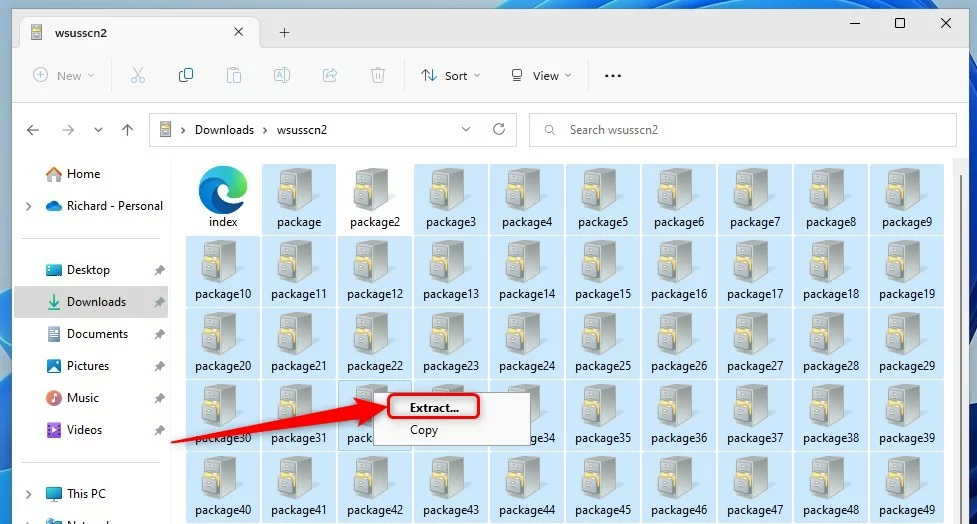
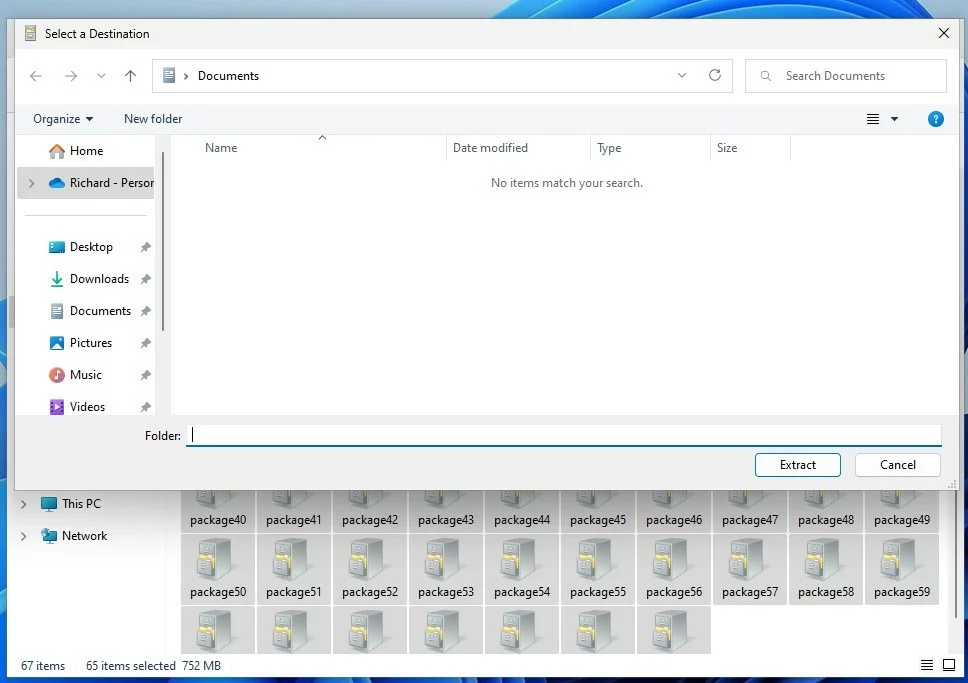
Extracting does not install anything. Once the files are in a folder, install the driver through Device Manager. Review the guide on How to install device drivers in Windows 11 for detailed instructions.
If the new driver causes problems, you can undo it. Open the device’s Properties in Device Manager, go to the Driver tab, and click Roll Back Driver. The button is greyed out when no earlier driver is stored.
Summary
Installing CAB files Windows 11 is possible using either Command Prompt, PowerShell, or by extracting the contents directly through File Explorer depending on whether you are applying a system update or just installing a specific hardware driver.- CAB files are compressed packages with updates or drivers for Windows.
- You can install them using Command Prompt or PowerShell, by typing simple commands.
- If you only want certain drivers, you can extract CAB files using File Explorer and install just what you need.
- Helpful links and pictures make the process easier to follow.
Helpful Links & Resources
- Microsoft official info about CAB files
- How to open apps as administrator in Windows 11
- How to open Command Prompt in Windows 11
- How to open PowerShell in Windows 11
Questions or feedback belong in the comment section below.
Frequently asked questions
How to install cab file 🪟 Windows 11?
Open Command Prompt as administrator and run dism /online /add-package /packagepath:, followed by the full path to the .cab file. This works for Windows update packages. Driver packages need a different method: extract the files first, then install the driver from its .inf file through Device Manager.
How to install cabinet file win11?
A cabinet file is the same as a CAB file. Open Command Prompt or PowerShell as administrator. Run dism /online /add-package /packagepath: with the full file path, then wait for the message that the operation completed successfully. Driver packages need to be extracted and installed through Device Manager instead.
How to install driver cab file?
Extract the CAB file to a folder. Right-click it and choose Extract All, or run expand from Command Prompt. Then open Device Manager, right-click the device, choose Update driver, select Browse my computer for drivers, and point to the folder. Windows installs the driver from the .inf file inside.
How to install .cab driver?
Extract the .cab file to its own folder by right-clicking it and choosing Extract All. Open Device Manager and right-click the device you want to fix. Choose Update driver, then Browse my computer for drivers, and select the extracted folder. Windows finds the .inf file and installs the driver.
How to install cab?
It depends on what the file contains. For update packages, open an administrator Command Prompt and run dism /online /add-package /packagepath: with the file path. For driver packages, extract the files and install the .inf file through Device Manager. Either way, the package must match your Windows version and processor type.
How to run cab file 🪟 Windows 11?
Double-clicking a CAB file opens it in File Explorer so you can see its contents. It does not run an installer. To install an update CAB, use dism /online /add-package in an administrator Command Prompt. To pull out its files, right-click the file and choose Extract All.
Still have a question?
Answered by AI from this guide. Good questions may be added to this page — please don't include personal details.
Did this guide fix your problem?

About the Author
Richard
Tech Writer, IT Professional
Richard is a writer at Geek Rewind who turns complex IT tasks into clear, step-by-step guides. He draws on years of hands-on experience in system administration and enterprise IT operations, focusing on Windows, Linux and WordPress: the problems people actually run into, and the fixes that work. His server and WordPress guides come from systems he runs himself. Richard builds and maintains the platform behind Geek Rewind, from its Ubuntu servers and Nginx configuration to its custom WordPress plugins. Many new tutorials start with readers' questions, and he's always glad to answer them in the comments.
No comments yet — be the first to share your thoughts!