How to Add or Remove the “Learn About This Picture” Desktop Icon in Windows 11

To remove the Learn about this picture icon from your Windows 11 desktop, open Settings Personalization Background and change the dropdown from Windows Spotlight to Picture or Solid color. To keep Spotlight and only hide the icon, set a registry value with Registry Editor or PowerShell, both covered below. The icon gives you details about the current Spotlight wallpaper with one click. Windows adds it to your desktop automatically when Spotlight is your background, and you can get rid of it whenever you like.
To remove the Learn about this picture icon, open Settings Personalization Background and change the dropdown from Windows Spotlight to Picture or Solid color. The icon disappears from the desktop immediately, and no restart is needed. To keep Spotlight and hide only the icon, use Registry Editor or PowerShell instead.
Why You Might Want to Remove It
If you are on an older build, you won’t see it. On some builds the label reads “Learn more about this picture.” It is the same icon, and the steps below remove it either way.
Clicking it opens a Bing page about the current Spotlight image. That is why some people search for it as the “about this image” Bing desktop icon. If you never use it, hiding it keeps your desktop clean.
Windows lets you control which items show on the desktop, and this icon is one of them. You can turn it on or off through Settings, the registry, or PowerShell. All four methods below work on both Home and Pro editions. Pick the one that fits whether you want to keep Spotlight.
Method 1Change Your Background (The Simplest Way)
The simplest way to remove the learn about this picture desktop icon is to move your background off Windows Spotlight. Spotlight is the feature that rotates daily images on your lock screen and desktop. When it is no longer your background, the icon goes away immediately.
These steps remove the Learn about this picture icon by switching your desktop background away from Windows Spotlight:
- Right-click an empty area of your desktop. A context menu appears.
- Choose Personalize. You can also open Settings Personalization yourself The Personalization settings page opens.
- Click Background. The background options appear.
- Open the dropdown under "Personalize your background." If it says Windows Spotlight, that is why the icon is there.
- Select Picture or Solid color. The new background is applied and the icon disappears from the desktop. Slideshow also works, because the icon only shows with Spotlight.
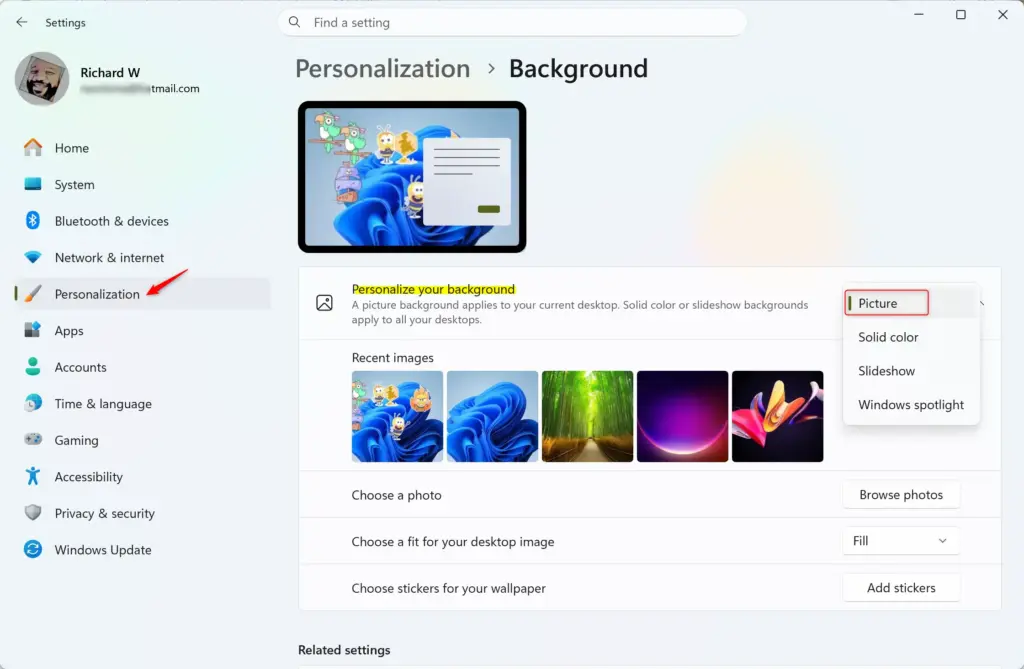
If you pick Picture, choose one of the recent images or use Browse photos to select your own. If the background options are greyed out or locked, check whether Windows is activated. Unactivated copies restrict personalization.
This change affects the desktop only. Spotlight on your lock screen is a separate setting and stays as it is. Changing the background also stops Windows from rotating your wallpaper automatically. To undo it, return to Settings Personalization Background and set the dropdown back to Windows Spotlight. The icon should come back.
Method 2Using the Registry Editor (For More Control)
If you want to keep Windows Spotlight running but hide the icon, you can do it by editing the Windows Registry. The Registry Editor is a database of low-level Windows settings. A wrong change can cause problems, so follow the key names exactly. This method hides the desktop shortcut without turning off your changing background images. It works on Home and Pro, because Registry Editor is included in both.
Back up the registry before you start. In Registry Editor, you can do this with File Export If you are not comfortable with this process, Method 1 is the safer option.
These steps hide the Learn about this picture icon while Windows Spotlight stays on:
- Press Windows key + R. The Run box opens.
- Type
regeditin the Run box and press Enter or click OK. - Click Yes if a prompt asks whether you want to allow this app to make changes. Registry Editor opens.
- Click the address bar at the top of the Registry Editor window. Paste this path and press Enter:
HKEY_CURRENT_USER\Software\Microsoft\Windows\CurrentVersion\Explorer
If the path exists, Registry Editor jumps straight to that key. - Create the first missing key if you get a "can't be found" error. Some keys don't exist yet. Right-click the Explorer key, select New Key, and name the new key
HideDesktopIcons. Skip steps 5 and 6 if the path opened without an error. - Create the second missing key. Right-click the
HideDesktopIconskey, select New Key, and name itNewStartPanel. - Look for the value on the right. With the correct path open, check the right-hand side for a value named
%1. If it is already there, skip to step 11. If not, you need to create it. - Right-click the empty space on the right side. A context menu appears.
- Select New DWORD (32-bit) Value. A new value appears in the list with its name ready to edit.
- Name the new value
%1. Type it exactly and include the curly braces. - Double-click the value. The Edit DWORD dialog opens.
- Type
0in the Value data box. This tells Windows to hide the icon. - Click OK, then close the Registry Editor.
- Sign out and back in, or restart your computer, if the icon is still showing. The change may not appear until then.
To show the icon again later, open the same value and change the value data back to 1. If you want to undo everything, restore the registry backup you exported before you started.
Method 3Using PowerShell (For Automation Fans)
You can also hide or show the icon with a command in Windows PowerShell. PowerShell is Windows' command-line tool for automation and configuration. This method suits you if you want to apply the change quickly, or on several machines, without clicking through the Registry Editor.
These steps hide the Learn about this picture icon with one PowerShell command:
- Click the Start button. The Start menu opens.
- Type
powershell. Windows PowerShell appears in the search results. - Right-click Windows PowerShell in the results. A context menu appears.
- Select Run as administrator. This gives PowerShell permission to make system changes. Click Yes if Windows asks for confirmation.
- Paste the command into the PowerShell window and press Enter:
{2cc5ca98-6485-489a-920e-b3e88a6ccce3}
- Check the result. The command sets up the registry path and the item to change, then sets the value to
0, which hides the icon. If PowerShell prints a red error, check that you opened it as administrator and pasted the whole command. - Close the PowerShell window.
The change should take effect right away. If the icon is still there, sign out and back in or restart your computer. To show the icon again later, run the same command but change the last line to:
1
Method 4Context Menu Option (If It's Available)
Some versions of Windows 11 let you remove the icon directly from the desktop. Right-click the icon and look for a delete or remove option. This depends on your update version. If your build has the option, it is the fastest way to clear the shortcut.
These steps remove the Learn about this picture icon straight from the desktop, if your build allows it:
- Find the "Learn about this picture" icon on your desktop.
- Right-click the icon. A context menu appears.
- Look for an option such as Remove or Delete. Not every build shows one.
- Click the option if you see it. The icon is hidden from the desktop.
Not everyone sees this option, so if it isn't in your menu, use Method 1, 2 or 3 instead. If the icon returns later while Spotlight is still your background, use one of those methods for a lasting fix.
Summary
To remove the "Learn about this picture" icon from your Windows 11 desktop, change your background to something other than Windows Spotlight. If you want more control, use the Registry Editor or PowerShell to hide the icon while Spotlight stays active. Each change can be reversed, so you can try one and switch back if you don't like the result.
Have a question about this guide?
Answered by AI from this guide. Good questions may be added to this page — please don't include personal details.
Did this guide fix your problem?

About the Author
Richard
Tech Writer, IT Professional
Richard is a writer at Geek Rewind who turns complex IT tasks into clear, step-by-step guides. He draws on years of hands-on experience in system administration and enterprise IT operations, focusing on Windows, Linux and WordPress: the problems people actually run into, and the fixes that work. His server and WordPress guides come from systems he runs himself. Richard builds and maintains the platform behind Geek Rewind, from its Ubuntu servers and Nginx configuration to its custom WordPress plugins. Many new tutorials start with readers' questions, and he's always glad to answer them in the comments.
If they put it on without permission it should be a link on the icon to remove it . I didn’t ask for it and having to click here read this and if it that does not work do that and this, A simple click would do to get rid of it. Everyone don’t know about the PowerShell or to find that changing the back ground, there were no instructions as how to change the back ground. Make it simple we don’t need all this crap added to OUR computers