How to Add or Remove “Explore background” Desktop Context Menu in Windows 11

You can add or remove the “Explore background” option from your Windows 11 desktop context menu by making changes in the Windows Registry.
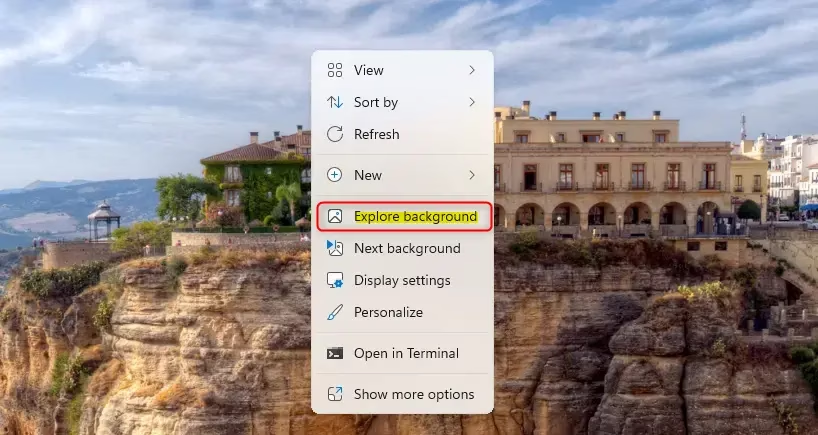
This menu option, which shows up when you’re using Windows Spotlight for your desktop background, lets you quickly open the folder containing the Spotlight images. For instance, it allows you to access the current Spotlight image file, which is typically located at %USERPROFILE%\AppData\Local\Packages\Microsoft.Windows.ContentDeliveryManager_cw5n1h2txyewy\LocalState\Assets.
By making specific changes in the registry, you can control whether this shortcut appears. You’ll usually need administrative privileges to change these registry keys safely.
Modify the Windows Registry to add or remove the “Explore background” option. Open Windows Terminal and use `reg delete` or `reg add` commands targeting specific registry keys under `🗝️HKEY_CURRENT_USERSoftwareClassesDesktopBackgroundshell.SpotlightLearnMore` or `🗝️HKEY_CLASSES_ROOTDesktopBackgroundShell.SpotlightLearnMore`.
Why This Matters
Windows 11 now includes an “Explore background” option in the desktop right-click menu that shows you information about your current wallpaper, especially for Windows Spotlight images.
What Happens When Done
After following these steps, the “Explore background” option will either appear or disappear from your right-click desktop menu, depending on which option you choose.
Option 1Current User Only
You can remove the “Explore background” option from your desktop context menu in Windows 11 using a simple command in Windows Terminal, affecting only your user account.
This is the default setting.
- Open the Windows Terminal app.
- Run this command:
reg delete "HKEY_CURRENT_USER\Software\Classes\DesktopBackground\shell.SpotlightLearnMore" /v ProgrammaticAccessOnly /f
Remove “Explore background” Context Menu for Current User
- Open the Windows Terminal app.
- Run this command:
reg add "HKEY_CURRENT_USER\Software\Classes\DesktopBackground\shell.SpotlightLearnMore" /v ProgrammaticAccessOnly /t REG_SZ /d "" /f
Option 2All Users on Your Computer
Removing the “Explore background” option from the desktop context menu for all users on your Windows 11 computer requires administrator access and a specific command.
Add “Explore background” Desktop context menu for All Users
This is the default setting.
Open the Windows Terminal app as an administrator. Run this command:
reg add "HKEY_CLASSES_ROOT\DesktopBackground\Shell.SpotlightLearnMore" /v CommandStateSync /t REG_SZ /d "" /f
reg add "HKEY_CLASSES_ROOT\DesktopBackground\Shell.SpotlightLearnMore" /v ExplorerCommandHandler /t REG_SZ /d "{5C6B744C-4CD1-5EA7-BDC6-0E6679A956BF}" /f
reg add "HKEY_CLASSES_ROOT\DesktopBackground\Shell.SpotlightLearnMore" /v Position /t REG_SZ /d "Bottom" /f
Remove “Explore background” Desktop context menu for All Users
- Open Registry Editor by typing
regedit.exein your search bar. - In the left pane, navigate to this location:
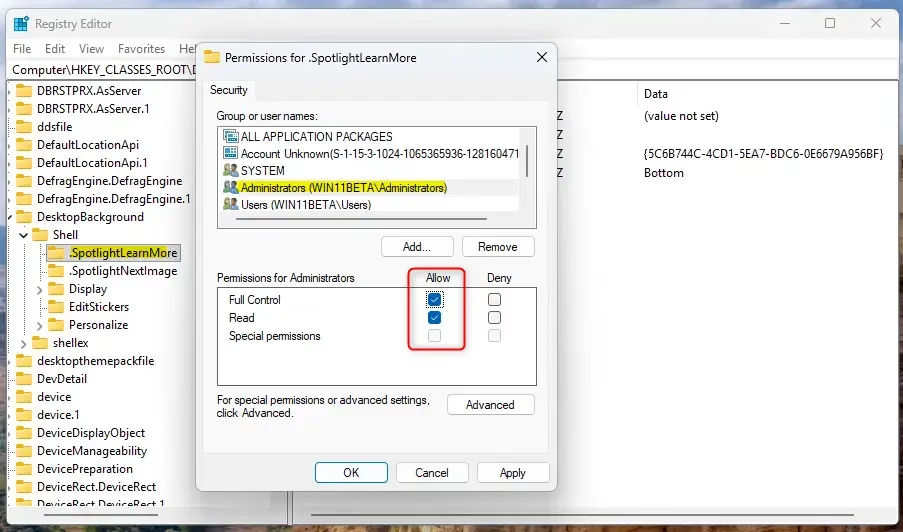
HKEY_CLASSES_ROOT\DesktopBackground\Shell\.SpotlightLearnMore - Important: You need admin privileges to change the owner and permissions. Right-click on the
.SpotlightLearnMorekey and select Properties. - Click the Owner tab. Click Edit, then change the owner to Administrators. Click OK.
- Go to the Permissions tab. Select Administrators and check the box for “Full Control”. Click OK.
- You can now close Registry Editor.
You can then delete the registry key.SpotlightLearnMore. A restart of Explorer or your PC might be needed to see the changes.
reg delete "HKEY_CLASSES_ROOT\DesktopBackground\Shell.SpotlightLearnMore" /f
Summary
You can easily add or remove the “Explore background” option from your Windows 11 desktop context menu depending on whether you want the change for just yourself or for all users.
What is the Explorer context menu?
The Explorer context menu is simply the list of choices that pops up when you right-click on a file, folder, or your desktop in Windows.
How do I get the old Explorer context menu in 🪟 Windows 11?
You can get the old, full Explorer context menu back in Windows 11 by making a specific change in the Windows Registry or by using a third-party tool.
How do I edit the Explorer context menu?
You can edit the Explorer context menu by changing settings in the Windows Registry or by using simple third-party programs designed for this purpose.
How do I go back to the old context menu?
To go back to the old context menu in Windows, you can run a specific command in the Command Prompt after opening it as an administrator.
Was this guide helpful?

About the Author
Richard
Tech Writer, IT Professional
Richard, a writer for Geek Rewind, is a tech enthusiast who loves breaking down complex IT topics into simple, easy-to-understand ideas. With years of hands-on experience in system administration and enterprise IT operations, he’s developed a knack for offering practical tips and solutions. Richard aims to make technology more accessible and actionable. He's deeply committed to the Geek Rewind community, always ready to answer questions and engage in discussions.


No comments yet — be the first to share your thoughts!