How to Turn On or off Arrange Primary Actions Inline on Context Menu in Windows 11

- 2 ways to do it
- Needs administrator rights
- Includes a restart or sign-out
Arranging primary actions inline on the Windows 11 context menu puts common tools like copy, paste and rename into a single horizontal row instead of a vertical list. Microsoft added this space-saving layout in Windows 11 build 22635.3930 to reduce clutter when you right-click files or folders.
You can turn the layout on or off from Settings, or with a Registry tweak if the setting isn’t on your PC. The steps below cover both. With the actions in one row, you can pick the tool you need without scanning through extra lines.
To arrange the Windows 11 context menu’s primary actions inline, open Settings Personalization Context menu and set the toggle for arranging primary actions inline to On. Copy, paste and rename then sit in one row, and no restart is needed. If the toggle is missing, the Registry Editor method can force the change.
What You Need to Know Before Changing Your Settings
This layout only applies to the modern Windows 11 right-click menu, the one with small icons at the top. It does not apply to the classic expanded menu you get from Show more options.
Two PCs on the same Windows 11 version can behave differently, and you may not see the toggle in Settings yet. If so, don’t wait for the update. Use the Registry method further down to force the change.
Both methods can be undone. Switch the setting back, or enter the other value in the registry, and the menu returns to the standard rows.
Method 1Change Your Right-Click Layout Using Windows Settings
The Settings app is the easiest way to change this layout. It takes a few clicks and doesn’t touch any system files. If you don’t see the option, your Windows build is probably older than the one that introduced it, or the feature hasn’t reached your PC yet. In that case, use the Registry method instead.
- Press the Win+I to open Settings . You can also click the Start button and select the gear-shaped icon. The Settings window opens.

Windows 11 Start menu with Settings gear icon highlighted. - Go to Settings Personalization Context menu. Click Personalization in the left pane, then click Context menu in the main area. The context menu options appear on the right.
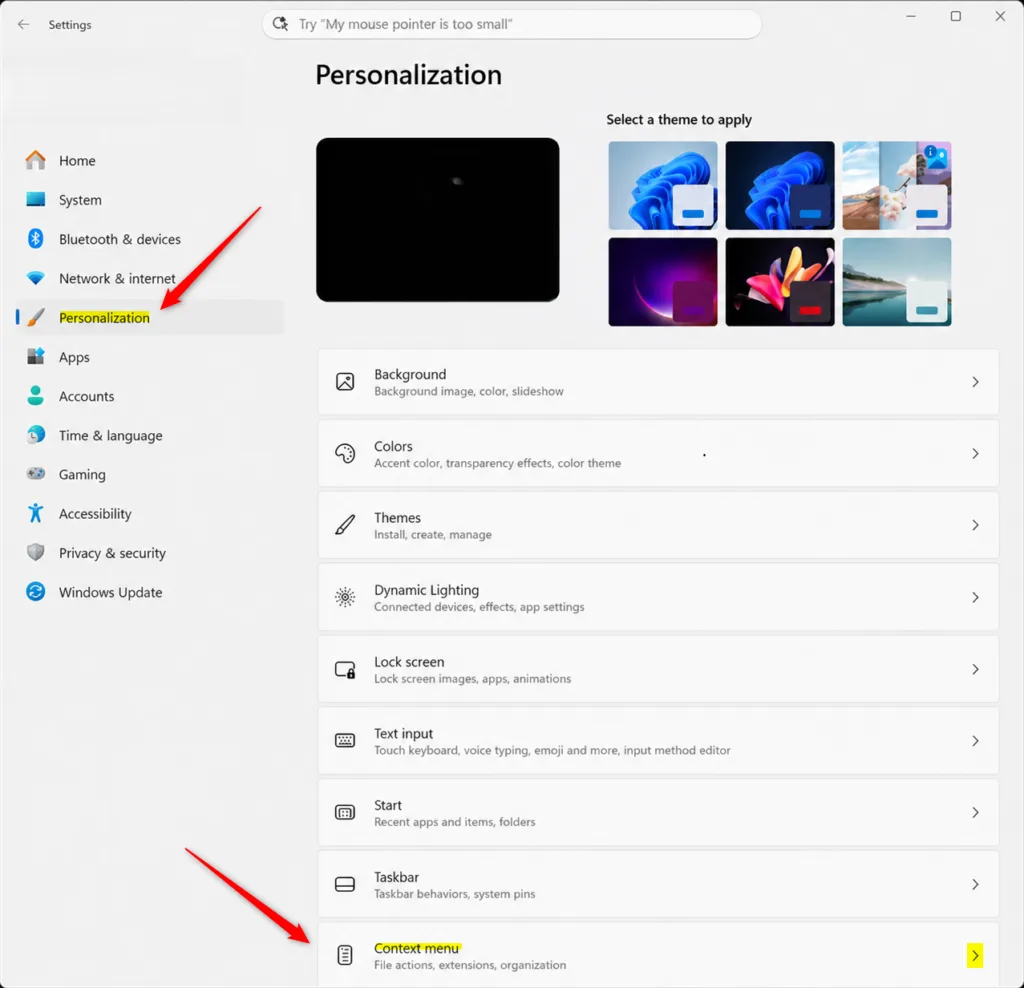
Context menu tile in Windows 11 Personalization settings - Find the section named Additional options and look for the toggle for arranging primary actions inline.
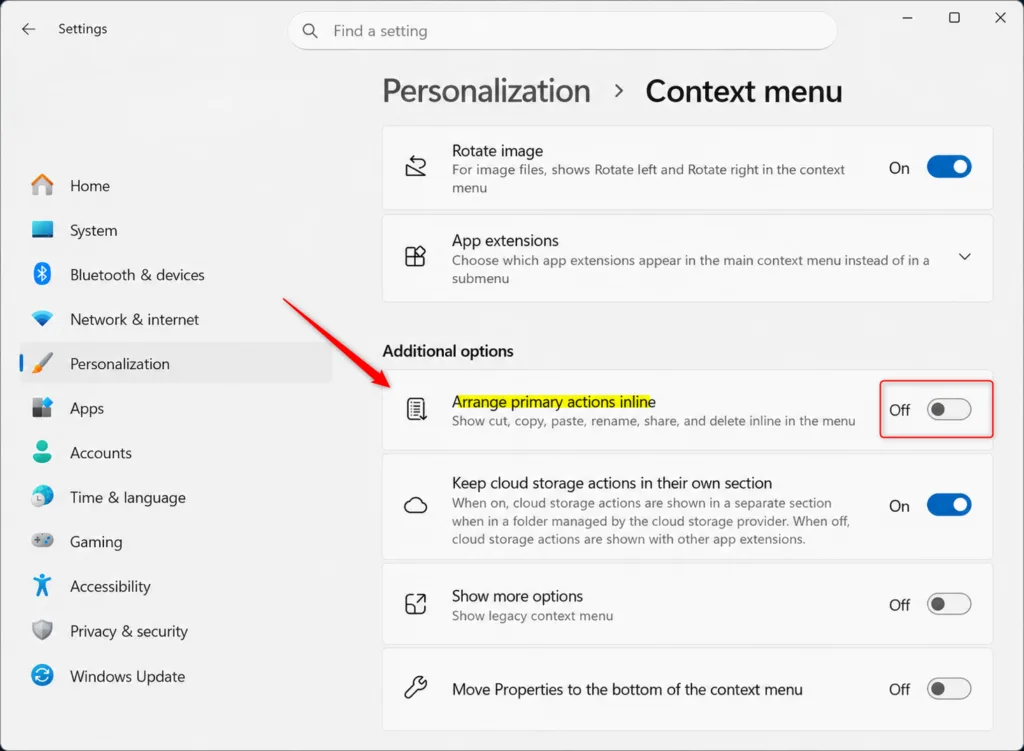
- Set the toggle to On to put copy, paste and the other primary actions side by side. Set it to Off to go back to the standard rows. Changing system settings may require administrator privileges. If the option isn’t there, your Windows version is likely older than what the feature needs, so use the next method.
- Click the X in the top right corner to close Settings.
- Right-click any file on your desktop to test the new layout. You should see the actions in one row, or in separate rows, depending on the toggle. No restart is needed for this method.
Method 2Update Your System Database Manually
Editing the registry lets you force the layout change when Settings doesn’t show the option. The Registry Editor is a database of deep system settings. You will change one value in it to turn the inline arrangement on or off.
Before you start, you can back up the registry. In the Registry Editor, click File Export and save a copy somewhere safe. This method works on all editions, including Home.
- Press the Windows key + R to open the Run box. Type
regeditin the empty text field and press Enter. If Windows asks whether to allow the app to make changes, click Yes. The Registry Editor opens. - Copy this path:
HKEY_CURRENT_USER\Software\Microsoft\Windows\CurrentVersion\Explorer\ContextMenu\Preferences\DemoteTopBarPaste or type it into the address bar at the top of the Registry Editor window, then press Enter. The editor jumps to that folder, called a key. If some of the final subfolders are missing, right-click the key just above the missing one, select New Key, and name the new key to match the path. Repeat until the whole path exists. - Look at the right side of the window and double-click the value named Enabled. A small edit box opens. If the value isn't there, right-click an empty area on the right, select New DWORD (32-bit) Value, and name it Enabled. Then double-click it.
- Type
1in the Value data box to turn the inline arrangement on, or type0to turn it off. Make sure the Base option is set to Hexadecimal, then click the OK button. The new value now shows in the list. - Close the Registry Editor window.
- Restart your computer to apply the change. If you don't want to restart, press Ctrl + Shift + Esc to open Task Manager, find Windows Explorer under Processes, right-click it and select Restart. The taskbar disappears for a moment and comes back. Then right-click a file to check the layout.
To undo the change later, open the same key again and enter the other value.
Summary
You now have two ways to control how primary actions appear on the Windows 11 right-click menu. Use the Settings toggle for a quick change. If the toggle is missing from your PC, set the value in the registry instead. Either way, you can switch back whenever you want.
Have a question about this guide?
Answered by AI from this guide. Good questions may be added to this page — please don't include personal details.
Did this guide fix your problem?

About the Author
Richard
Tech Writer, IT Professional
Richard is a writer at Geek Rewind who turns complex IT tasks into clear, step-by-step guides. He draws on years of hands-on experience in system administration and enterprise IT operations, focusing on Windows, Linux and WordPress: the problems people actually run into, and the fixes that work. His server and WordPress guides come from systems he runs himself. Richard builds and maintains the platform behind Geek Rewind, from its Ubuntu servers and Nginx configuration to its custom WordPress plugins. Many new tutorials start with readers' questions, and he's always glad to answer them in the comments.
No comments yet — be the first to share your thoughts!