How to Customize the Context Menu in Windows 11

Customizing the context menu in Windows 11 means choosing which commands appear when you right-click a file, folder, or the desktop. The context menu is the pop-up list that holds everyday commands such as copy, paste, rename, and open.
Apps add their own options to this list over time, which makes the menu long and messy. A newer Windows 11 settings page, found at Settings Personalization Context menu, lets you hide the clutter. It has File actions and App actions toggles, plus an Additional options section for the layout.
This page needs a recent Windows 11 build and may not be on every PC yet. Every change can be undone by flipping the same switch back.
Open Settings Personalization Context menu to control what appears when you right-click in Windows 11. Turn off File actions switches to hide built-in commands, and use App actions to hide entries added by installed programs. Changes apply the next time you open the menu, and you can turn any switch back on.
Step 1Open the New Context Menu Settings Page
Before you start: this settings page is new. It was announced on the Windows Insider blog in August 2026, and it needs a recent Windows 11 build. It may not have reached all PCs yet, because Windows rolls out new settings in stages. Some options may exist only in Windows Insider preview builds and may be missing from stable releases.
To check your build, open Settings System About and read the OS build line under Windows specifications. Compare it with the build number given in the Insider announcement. I cannot confirm a minimum build number here, so rely on that announcement for the exact figure.
To customize the context menu , open its settings page with either method below. Both end on the same page.
Method 1: The shortcut from the right-click menu
- Right-click an empty space. Use an empty spot on your desktop, or inside a folder in File Explorer . The context menu opens.
- Click Customize menu. It sits at the very bottom of the menu.
- Check the Settings app. It opens on the context menu settings page.
Method 2: Through the Settings app
- Press the Win+I. The Settings app opens.
- Click Personalization. It is in the left-hand column.
- Click Context menu . It is on the right side of the screen, and the context menu settings page opens.
The full path is Settings Personalization Context menu. You can also type “context menu ” into the Settings search box .
Install all pending updates through Settings Windows Update , restart the PC, and check again. Some PCs get new settings pages later than others.
Step 2Choose Which File Actions You Want to See
File actions are built-in Windows shortcuts for managing files and folders. Each one has a toggle switch, so you can hide the shortcuts you never use. Windows also changes which of these options appear based on what kind of file you click.
These steps continue from the settings page you opened above.
- Find the File actions section. It is on the context menu settings page.
- Review the toggles. They are listed for the different file types and commands.
- Turn off the switch next to any command you want to remove. That command leaves your right-click list.
- Right-click a file in File Explorer to check the result. The command you turned off should no longer be in the menu. If it still appears, the command may come from an app, so check App actions or restart File Explorer.💡If the Context menu settings page is missing
If you can't find Customize menu or a Context menu page in Settings, this feature probably isn't in your copy of Windows yet. It is still in development and is only available on PCs enrolled in the Windows Insider Preview program. The editor's note also says it exists only in some editions, such as Pro or Enterprise, not Home. To check your edition, open Settings > System > About and look at the Windows specifications section. If your PC isn't in the Insider program, the steps in this guide won't work. To reach the full older right-click menu, click Show more options at the bottom of the menu.
If you need a shortcut again, return to this page and turn its switch back on. Changes normally apply the next time you open the menu. If an old entry still shows up, close and reopen the File Explorer window, or sign out and back in.
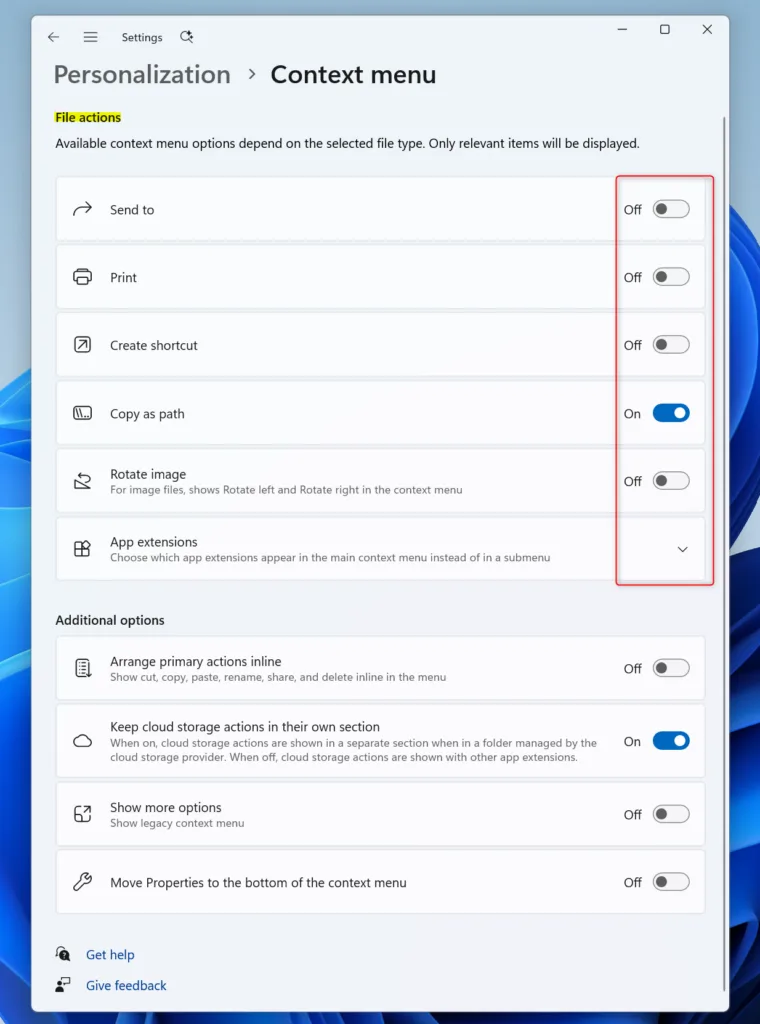
If you hide something important by mistake in the File Explorer context menu settings, come back to this screen and turn the switch back on.
Step 3Control App Extensions and Extras
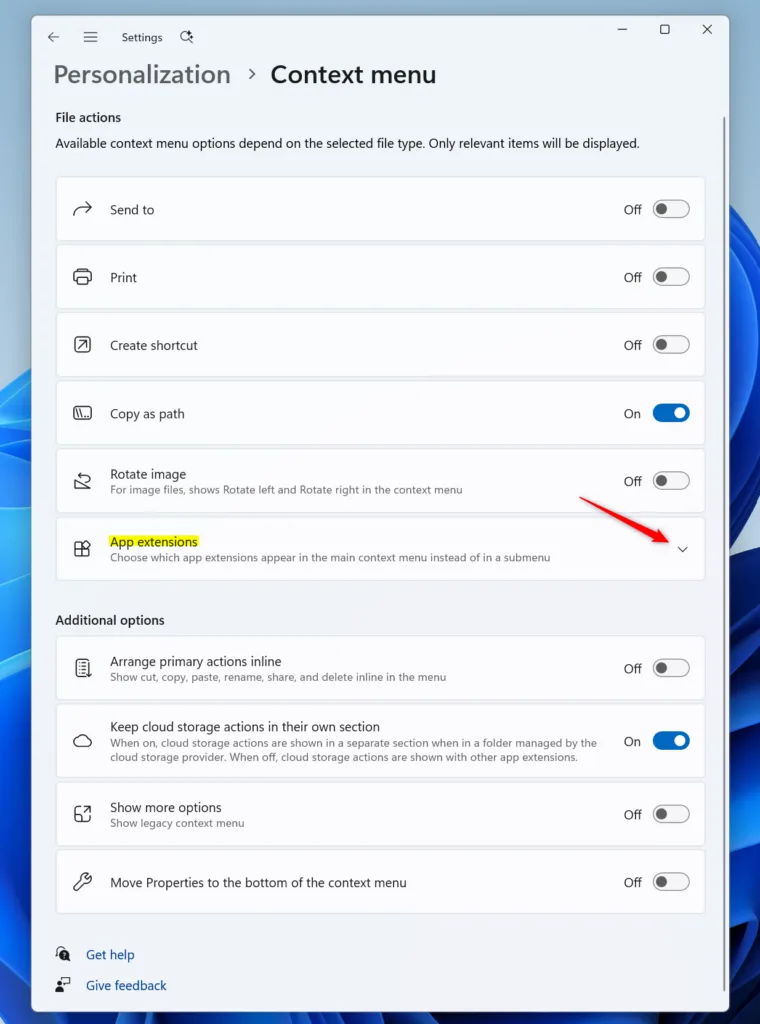
App extensions are extra commands added by programs you install, such as zip tools, photo editors, text editors, or cloud storage tools. Programs add these on their own, which is why the menu grows longer the more software you install. Managing them keeps the list short and puts third-party buttons under your control.
- Open App actions. Find it under the File actions section and click it.
- Look through the list of app extensions. Each entry is named after the program that added it to your right-click menu .
- Turn off the switches for apps you rarely use. If you want a simple look, hide entire submenus the same way.
- Right-click a file or folder to check the result. The entries from the apps you switched off should be gone.
Turning off an extension only removes the menu entry. It does not uninstall the program, and you can switch the entry back on at any time.
Some apps still add their commands only to the full classic menu, and Windows may also tuck other entries away there. To reach it, press Shift+F10 with a file selected, or click Show more options at the bottom of the right-click menu . Both open the full classic menu. Use this when an expected entry is missing from the short menu.
Tip: Cleaning out old app extensions can make the menu feel a bit quicker. Windows has fewer commands to build each time you right-click, and the difference is most noticeable on older or slower PCs.
Step 4Bring Back Classic Menu Styles and Extra Commands
The Additional options section at the bottom of the settings page controls where your main commands live and how they look. It lets you bring back classic menu styles and change where advanced properties appear, if you prefer the way older versions of Windows worked.
- Scroll to the Additional options section. It is at the bottom of the settings page.
- Turn on the setting that lists your main commands as text. Cut, Copy, Paste, Rename, Delete, and Share then appear as a plain text list inside the menu. By default they show as a row of small icons across the top.
- Adjust the setting that moves Properties. It places the Properties button at the very bottom of the list, as in the classic Windows layout.
- Right-click a file in File Explorer to confirm the layout. The menu should now show text labels, with Properties at the bottom if you chose that option.
The exact wording of these settings can vary between Windows 11 builds. If an option is missing from your page, your build does not include it yet, and Windows Update is the first thing to check. To undo a layout change, turn the same setting off again.
References:
Summary
What to do next
Your right-click menu now reflects your preferred layout and tools. Test the changes by right-clicking a file in File Explorer to verify that unwanted items no longer appear. If something you need has gone missing, go back to Settings Personalization Context menu and turn its switch back on.
Frequently asked questions
1right-click on the file?
Right-click a file in File Explorer, and a pop-up list of commands appears, such as Copy, Rename, and Open. Windows 11 shows only the most common commands at first. To see the full list, including older app options, click Show more options at the bottom of the menu.
Where are the context menus in settings for to do?
Open Settings and search for context menu, or right-click an empty spot on the desktop and choose Customize menu at the bottom. Both routes open the context menu settings page, where you can turn File actions and App actions on or off and change Additional options.
Where do I find the context menu?
Right-click a file, a folder, or an empty space on the desktop or inside a folder. The context menu appears at your cursor. Some items sit behind Show more options at the bottom of the list in Windows 11.
How do you organize context menu win 11?
Open the context menu settings page and turn off the File actions and App actions you never use. Apps that add their own entries are listed there too, so you can hide them. Each change is reversed by turning the same switch back on.
Can I customize the 🪟 Windows 11 file explorer context menu?
Yes. The context menu settings page lets you turn off File actions and App actions, which removes entries you do not need. You can also change Additional options. Every change stays reversible, so you can turn any switch back on at any time.
How to activate translate in the context menu 🪟 Windows 11?
Windows 11 has no built-in translate command in the File Explorer right-click menu. You need a translation app that adds one. After you install it, open the context menu settings page and make sure its App actions switch is on so the option appears.
Why is Customize menu or the Context menu page missing from my Windows 11 settings?
Asked by a reader
This Windows 11 context menu feature is still in development and only works on PCs enrolled in the Windows Insider Preview program. It's also limited to some editions, such as Pro or Enterprise, not Home. Open Settings > System > About to check your edition. If your PC isn't in the Insider program, the steps in this guide won't work. Click Show more options at the bottom of the right-click menu to reach older commands.
Still have a question?
Answered by AI from this guide. Good questions may be added to this page — please don't include personal details.
Did this guide fix your problem?

About the Author
Richard
Tech Writer, IT Professional
Richard is a writer at Geek Rewind who turns complex IT tasks into clear, step-by-step guides. He draws on years of hands-on experience in system administration and enterprise IT operations, focusing on Windows, Linux and WordPress: the problems people actually run into, and the fixes that work. His server and WordPress guides come from systems he runs himself. Richard builds and maintains the platform behind Geek Rewind, from its Ubuntu servers and Nginx configuration to its custom WordPress plugins. Many new tutorials start with readers' questions, and he's always glad to answer them in the comments.
No comments yet — be the first to share your thoughts!