How to Find My Photos on This Computer

Missing photos can hide across different drives, folders, or cloud storage. Use these built-in Windows tools to locate your files, restore deleted pictures, or reconnect external devices. Work through the sections in order, because the first two checks are quick and find most lost photos.
Press Win+E to open File Explorer , click This PC, then type *.jpg or kind:=picture in the search box and press Enter. Windows searches every connected drive and displays matching photos. Also check your Pictures folder by opening File Explorer and navigating to 📁C:\
Search using File Explorer
File Explorer is the built-in tool for browsing files and folders. It can search your whole hard drive at once, so you can find your photos on this computer without knowing which folder they are in. You type a file type such as JPG or PNG into the search bar, and Windows lists every matching picture it can find.
- Press Win+E on your keyboard to open File Explorer .
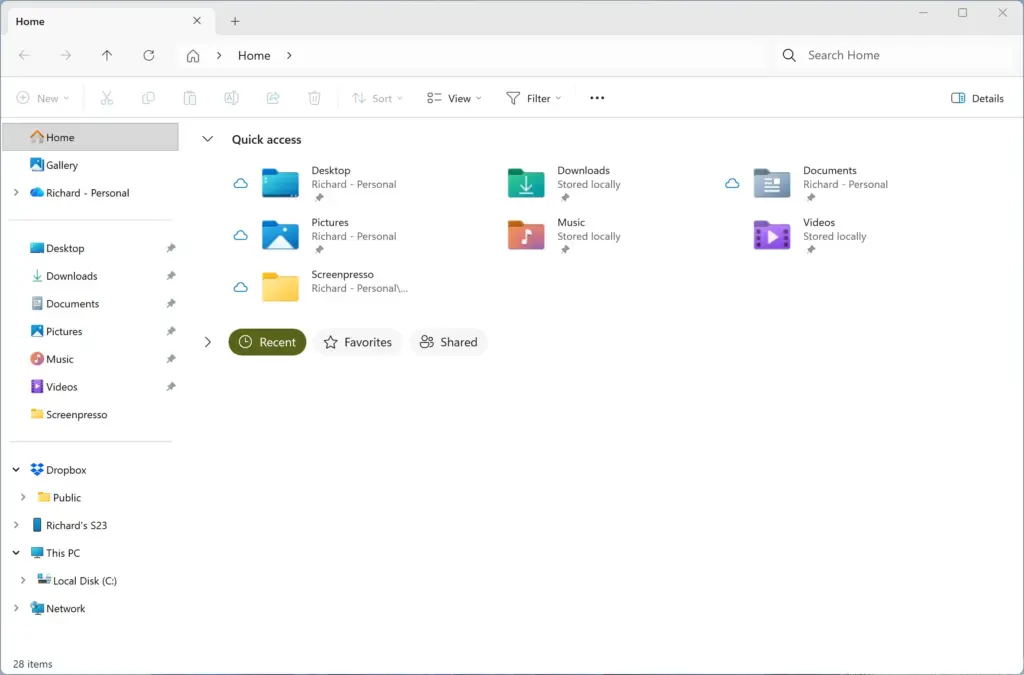
File Explorer - Click This PC in the left-hand sidebar. This makes the search cover every connected drive, not just one folder.
- Click into the search box in the top-right corner of the File Explorer window.
- Type
*.jpgorkind:=pictureinto the search box and press Enter. A green progress bar runs across the address bar while Windows searches. - Wait for the search results to populate, then scan the list for your missing files. A search across a large drive can take several minutes, so let the green bar finish before you decide a photo is not there.
If you find a photo, right-click it and choose Open file location to see which folder it lives in. If the results are empty, repeat the search with the other file type. Photos from phones and cameras often use a different extension, so one search may miss files the other finds.
Check the Pictures folder and default libraries
Windows saves most images in the built-in Pictures folder linked to your user account. Checking this default location is the fastest way to find recently imported or downloaded photos, especially if you never chose a custom save path.
- Open File Explorer and click This PC.
- Double-click your main operating system drive, usually OS (C:). You should now see folders such as Users, Windows and Program Files.
- Open the Users folder, then open the folder matching your account username (e.g., USERNAME).
- Locate and open the Pictures folder.
- Check any subfolders inside the Pictures directory, such as Camera Roll or Saved Pictures.
If the Pictures folder looks empty, check whether OneDrive has taken it over. When OneDrive folder backup is turned on, your Pictures folder can live inside the OneDrive folder in your user profile instead. You can also open Pictures directly from the left-hand sidebar in File Explorer , which follows the folder wherever it has been moved.
Recover deleted photos from the Recycle Bin
Deleted pictures stay there until you empty it manually or Windows clears it to free up space. If you removed photos by mistake, you can open this desktop folder and restore them to their original locations.
- Minimize all open windows to reveal your desktop.
- Double-click the Recycle Bin icon. A window opens listing everything you have deleted.
- Scan the list of deleted items for your photo files or folders. Click the Date deleted column heading to sort by when you removed them.
- Right-click the items you want to recover and select Restore to send them back to their original locations.
If that folder no longer exists, Windows recreates it. The Recycle Bin will not help in every case. Files deleted with Shift + Delete skip it, and so do files deleted from USB drives, memory cards and network locations. If the bin is empty, the photos were probably removed one of those ways or the bin has been emptied.
Locate photos transferred from smartphones and cameras
Connecting a phone or camera with a Universal Serial Bus (USB) cable lets you copy pictures straight to your hard drive. You need to unlock the device and allow file transfer so Windows can show its photos.
- Plug your phone or camera into your computer using a data-capable USB cable. Some cables only charge, and with those the device never appears in Windows.
- Unlock your phone screen and tap the prompt to allow file transfers or access to photos (MTP mode). On an Android phone, this is usually the USB notification where you choose file transfer. On an iPhone, tap Allow or Trust when asked.
- Open Settings, navigate to Bluetooth & devices, and check that your device appears in the connected list.
- Open File Explorer, click This PC, and look for your device listed as an external drive or portable device.
- Double-click the device name and navigate through the internal storage folders (typically labeled DCIM) to access your photos.
If the device does not show up, try a different USB port and a different cable, then unlock the phone again and repeat the permission prompt. To copy photos, select them and drag them into a folder on your PC, or use copy and paste. Copying leaves the originals on the phone, so you can check the copies before deleting anything.
Stop backup sync loops and duplicate uploads
Cloud backup apps save your files to online storage. They sometimes get stuck uploading the same pictures over and over. You can stop these sync loops by opening your backup tool's settings from the taskbar and pausing the upload.
- Click the system tray arrow in the bottom-right corner of your taskbar to view running background apps.
- Open your cloud backup client (such as Google Drive or OneDrive) and access its settings menu. In OneDrive, click the cloud icon, then the gear icon for Help & Settings.
- Pause the synchronization process temporarily while you verify your local folder paths. OneDrive offers Pause syncing for 2, 8 or 24 hours, and Google Drive has a similar pause option.
- Review the backup folder selections to ensure the application is not scanning temporary or system directories.
- Restart the synchronization client and select the option to verify existing files instead of re-uploading them. The wording of this option differs between apps, so look through the sync settings for it.
Pausing is not permanent. If you want to undo it, open the same menu and choose Resume syncing. Your files are not deleted while sync is paused.
What to do next
You should now see your image files and have your storage devices connected. Move on to setting up automated backups to prevent future data loss.
Frequently asked questions
Where do I find my photos on my computer?
Most photos are in the Pictures folder, which sits under your user profile. To open it, press Windows Key + E, then click Pictures in the left sidebar under Quick access or This PC. Photos from a phone or camera may be in other folders, so search every drive with File Explorer if you can't find them.
How do I find my photos on this device?
Open File Explorer by pressing Windows Key + E. Click This PC in the left sidebar, then click the search box in the top-right corner. Type kind:=picture and press Enter. Windows lists every picture on connected drives, so scan the results for the one you need. Sort by Date modified to find recent ones.
How do I access all of my photos?
Open the Photos app from the Start menu. It gathers pictures from your Pictures folder and OneDrive in one view. To reach photos stored elsewhere, open File Explorer with Windows Key + E, click This PC, and search for kind:=picture. This catches photos on every connected drive, not just one.
How do I get my pictures to show up on my computer?
Copy them into the Pictures folder, which Windows shows in the Photos app by default. If the photos are on a phone or camera, connect it with a USB cable and copy the files across in File Explorer. Photos stored in OneDrive appear only after the folder syncs. If they still do not appear, restart the computer.
Still have a question?
Answered by AI from this guide. Good questions may be added to this page — please don't include personal details.
Did this guide fix your problem?

About the Author
Richard
Tech Writer, IT Professional
Richard is a writer at Geek Rewind who turns complex IT tasks into clear, step-by-step guides. He draws on years of hands-on experience in system administration and enterprise IT operations, focusing on Windows, Linux and WordPress: the problems people actually run into, and the fixes that work. His server and WordPress guides come from systems he runs himself. Richard builds and maintains the platform behind Geek Rewind, from its Ubuntu servers and Nginx configuration to its custom WordPress plugins. Many new tutorials start with readers' questions, and he's always glad to answer them in the comments.
No comments yet — be the first to share your thoughts!