How to Find Personal Photos in the Pictures Folder on Windows 11

Missing personal photos on Windows 11 are usually not deleted. They have been moved, hidden by a broken preview, or synced to the cloud. This guide covers the places they most often end up: the default Pictures folder, search results , OneDrive, the Recycle Bin , and the thumbnail and search caches. Windows 11 keeps your images in 📁C:\
Work through the sections in order, because each one takes only a few minutes and the quickest checks come first. Finding the originals before you copy or re-import anything also keeps you from making duplicates.
Open File Explorer with Win+E, click This PC, then double-click the Pictures folder. If photos aren’t there, press Win+S and search for *.jpg or kind:=picture to find images across your entire drive, then right-click results to see their exact folder location.
Using File Explorer to Locate Picture Folders
File Explorer is the built-in tool for browsing your drive, and it is the first place to look. The Pictures folder is where most apps, cameras, and phones save images by default. You can sort the contents by date or name without installing anything.
- Press the Win+E to open File Explorer .
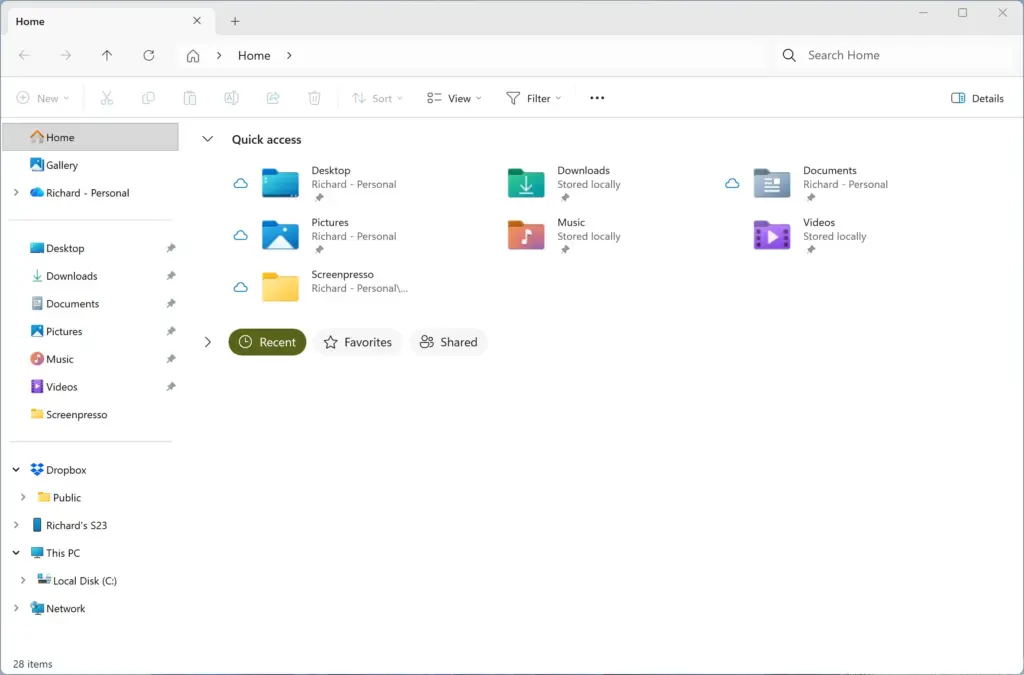
File Explorer - Click This PC in the left sidebar. You should see your drives and a list of standard folders.
- Double-click the Pictures folder under the Folders section. If you don’t see that section, click Pictures in the left sidebar instead, or paste the path 📁C:\
Users\ into the address bar with your own user name.USERNAME\ Pictures - Open subfolders such as Camera Roll and Saved Pictures and check them for recent transfers. These folders only exist if an app like Camera has created them.
- Click Sort in the toolbar and choose Date modified to bring the newest files to the top.
If the folder is empty or the photos aren’t there, move on to Windows Search.
Searching the Entire Hard Drive
Windows Search can look for image files across your drives when they are not in the usual folders. A file-type filter finds images by format, whatever folder they ended up in.
- Press the Win+S to open the search bar.
- Type
*.jpgorkind:=pictureinto the search box to filter for image formats. Run each one separately if the first doesn’t show what you expect. - Click the Documents or More tab if necessary, then select Folders or look at the main search results list.
- Right-click any image you find and select Open file location. File Explorer opens with the file selected, showing its exact folder path.
If results look thin, see the Indexing Options section below. Cloud-only OneDrive files may also be missing from these results.
Checking OneDrive and Cloud Backups
OneDrive is the online storage service built into Windows. If Pictures backup is turned on, your photos are synced to the cloud. With Files On-Demand, they can also be set to online-only, which frees disk space but makes them look missing when you are offline. Checking the sync settings tells you whether that happened.
- Click the cloud icon in the system tray at the bottom right of the taskbar. If you can't see it, click the small up arrow to show hidden icons first.
- Click the gear icon in the flyout and select Settings.
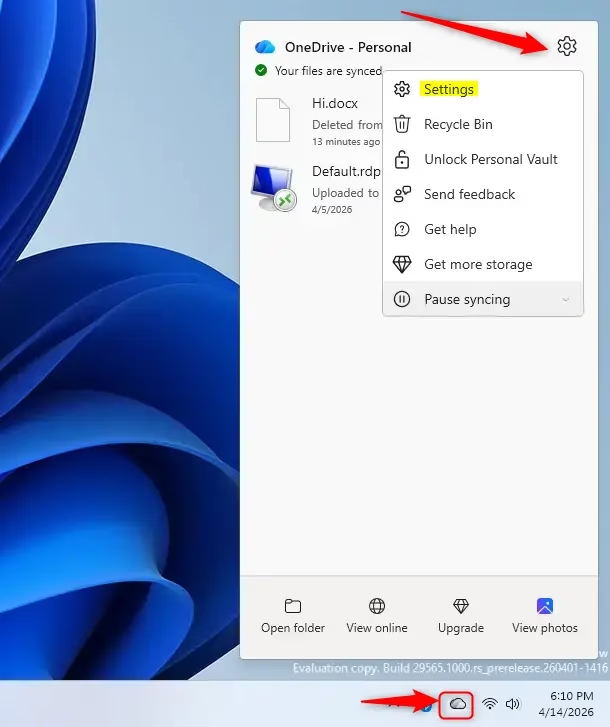
Click the OneDrive settings gear icon to access options. - Open the Sync and backup tab to see whether the Pictures folder is backed up to online storage.
- Open File Explorer and click OneDrive - Personal in the left pane to browse your online files. A cloud symbol next to a file means it is stored online only.
If your photos are in OneDrive, you can open them from there, or right-click a file and choose to keep it on this device. If you don't see the cloud icon at all, OneDrive may not be running or signed in. Open it from the Start menu and sign in with your Microsoft account.
Recovering Deleted Pictures from the Recycle Bin
Files deleted from USB drives or network locations, or removed with Shift + Delete, skip the Recycle Bin and won't appear in it.
- Minimize all open windows to see the desktop. You can also press the Windows key + D.
- Double-click the Recycle Bin icon. The window lists everything that has been deleted and not yet emptied.
- Scan the list for your images. Hold the Ctrl key and click to select several items at once.
- Right-click the selected files and choose Restore. Each file goes back to the folder it was deleted from.
If you can't find the Recycle Bin icon, it may be hidden from the desktop. You can turn it back on under Settings, Personalization, Themes, Desktop icon settings.
Fixing Missing Thumbnails and Rebuilding the Image Cache
Sometimes the photos are safe but their previews are broken, so folders show blank or generic icons. Clearing the thumbnail cache with Disk Cleanup makes Windows create fresh previews the next time you open the folder. This deletes only the preview cache, not your pictures.
- Open the Start menu, type
Disk Cleanup, and press Enter. - Select your main operating system drive, usually C:, and click OK. Disk Cleanup scans for a moment, then shows a list of file types.
- Check the box next to Thumbnails. You can uncheck everything else if you only want to reset previews.
- Click OK, then click Delete Files to confirm.
Open your Pictures folder again. Previews may load slowly the first time while Windows rebuilds them. No restart is needed.
Managing Indexing Options for Faster Searches
Indexing Options controls which folders Windows catalogs for search. If your photo folders are not included, Windows Search can return blank results even though the files are there. Adding them, and rebuilding the index if needed, fixes that.
- Open the Start menu, type
Indexing Options, and press Enter. - Click the Modify button at the bottom of the window.
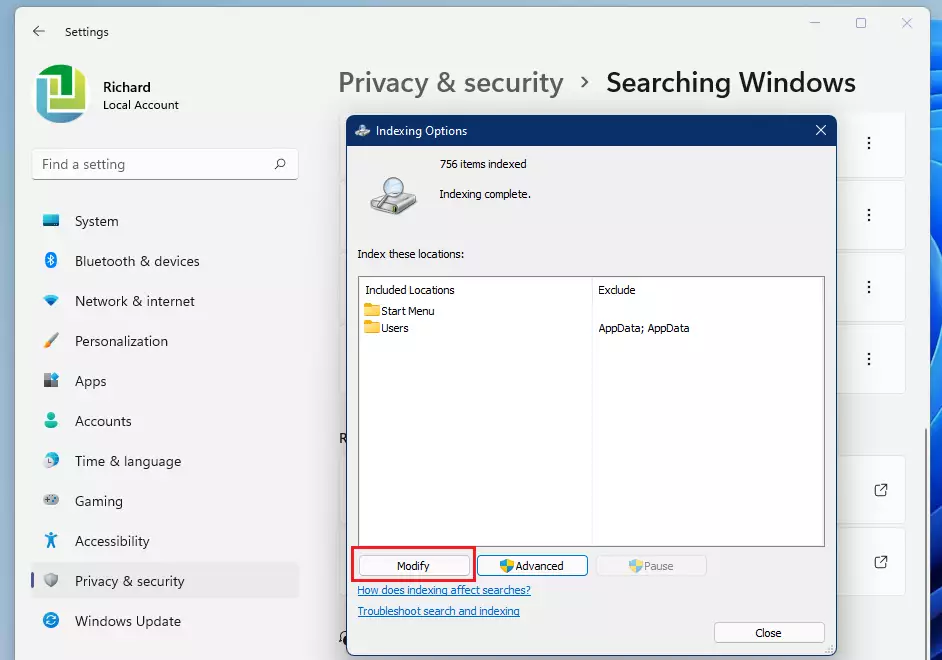
windows 11 indexing options modify - Check the box next to the Users folder, or tick the specific folders that hold your photo collections.
- Click OK, then click Advanced and select Rebuild to clear and recreate the search database.
Rebuilding can take from several minutes to a few hours, depending on how many files you have. Search results may be incomplete until it finishes, but you can keep using the PC in the meantime.
What to do next
Once you have found your photos, organize them into clearly labeled subfolders, for example by year or event. Then set up automated backups with File History so a failed transfer or accidental deletion doesn't cost you your pictures again. After that, you can move on to editing your photos or building a regular backup routine.
Frequently asked questions
Where do I find my photos on my computer?
Your photos are usually in the Pictures folder. Open File Explorer, click This PC, then double-click Pictures under Folders. The default location is the Pictures folder inside your user folder, which is named after your Windows account. If the photos are not there, check OneDrive or search the drive by file type.
How do I find my photos on this device?
Open File Explorer and search for the photos by file type. Click the search box at the top right, type *.jpg, *.png, or *.heic, and press Enter. Results from all drives appear in one list, so you can sort them by date. Check the Pictures folder and OneDrive if nothing shows up.
How do I access all of my photos?
Open the Photos app from the Start menu to see every image in one place. It gathers pictures from your Pictures folder, OneDrive, and any other folders you add. To add more folders, select Settings, then Sources, and choose Add a folder. A large library can take a few minutes to load.
How do I get my pictures to show up on my computer?
Your pictures show up once they are in a folder File Explorer can read. Open File Explorer, click View, then Show, and tick Hidden items to reveal files marked as hidden. If thumbnails are blank, run Disk Cleanup and select Thumbnails to clear the cache. Windows rebuilds the thumbnails the next time you open the folder.
Still have a question?
Answered by AI from this guide. Good questions may be added to this page — please don't include personal details.
Did this guide fix your problem?

About the Author
Richard
Tech Writer, IT Professional
Richard is a writer at Geek Rewind who turns complex IT tasks into clear, step-by-step guides. He draws on years of hands-on experience in system administration and enterprise IT operations, focusing on Windows, Linux and WordPress: the problems people actually run into, and the fixes that work. His server and WordPress guides come from systems he runs himself. Richard builds and maintains the platform behind Geek Rewind, from its Ubuntu servers and Nginx configuration to its custom WordPress plugins. Many new tutorials start with readers' questions, and he's always glad to answer them in the comments.
No comments yet — be the first to share your thoughts!