How to Hide and Unhide Files and Folders in Windows 11

Hiding a file or folder in Windows 11 keeps it out of normal view in File Explorer . It’s handy for tidying a cluttered folder or keeping personal documents out of sight. Each item has a Hidden attribute, and you can turn it on or off from Properties or from the command line.
Windows also hides some system files by default so nobody deletes important setup files by accident. When you need to find or edit hidden items, you can switch the view setting on and off at any time.
Hiding is not security. Anyone using your account can turn on Hidden items and see everything. If you need real protection, use a separate user account, NTFS permissions or encryption.
Open File Explorer , right-click the file or folder, select Properties, and tick or clear the Hidden checkbox under Attributes. Click OK. The item disappears from view if Hidden items display is off, or use the attrib command in Windows Terminal for multiple items at once.
How to Hide or Unhide Files Using File Properties
This method works the same on Windows 11 Home and Pro. If the item is already hidden, turn on Hidden items first (see the last section) so you can see it.
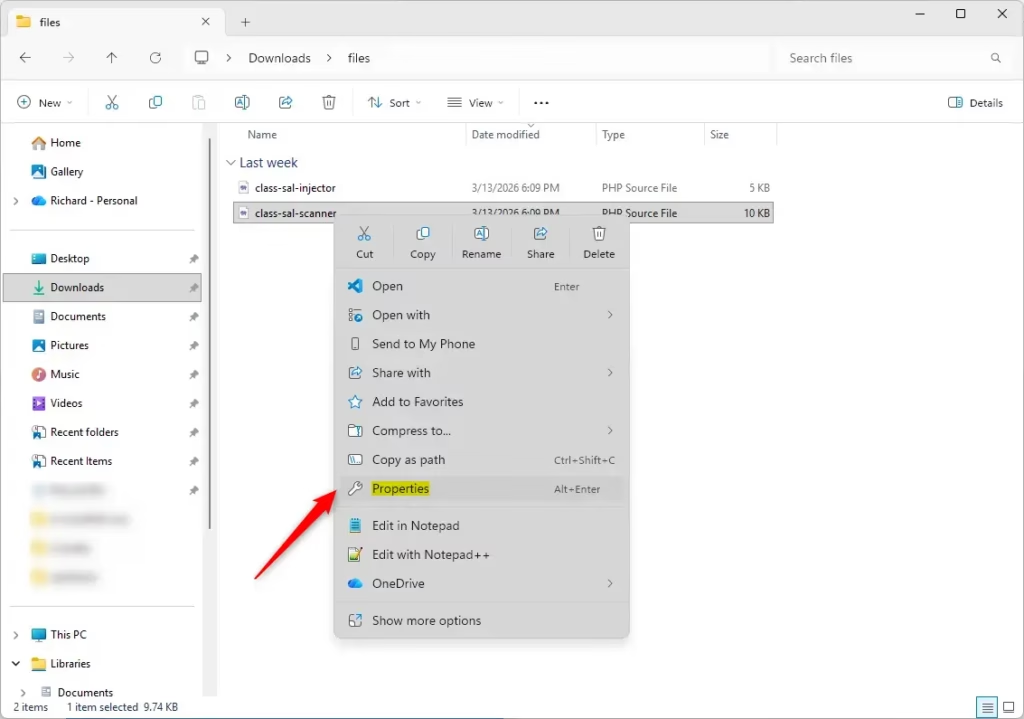
- Open File Explorer and browse to the file you want to hide or unhide.
- Right-click the file and choose Properties. The Properties window opens.
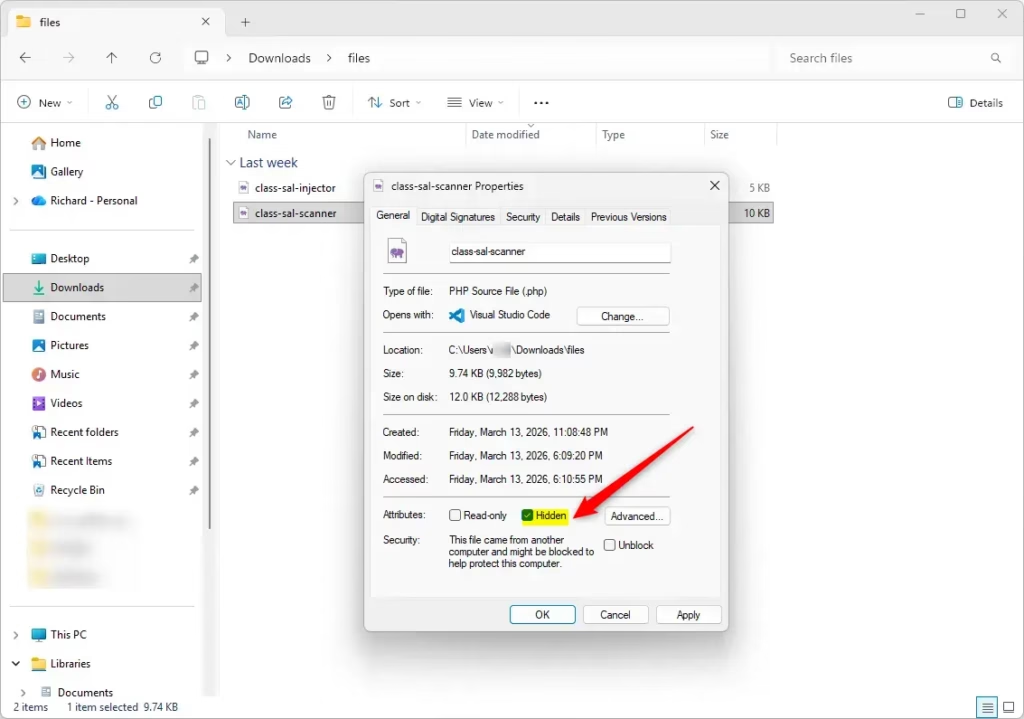
- Stay on the General tab and find the Hidden checkbox next to Attributes near the bottom.
- To hide the file, tick the Hidden box. To unhide it, clear the box.
- Click OK to save. If you hid the file and Hidden items is off, it disappears from the folder right away. If it doesn’t, press F5 to refresh.
Try again from an administrator account.
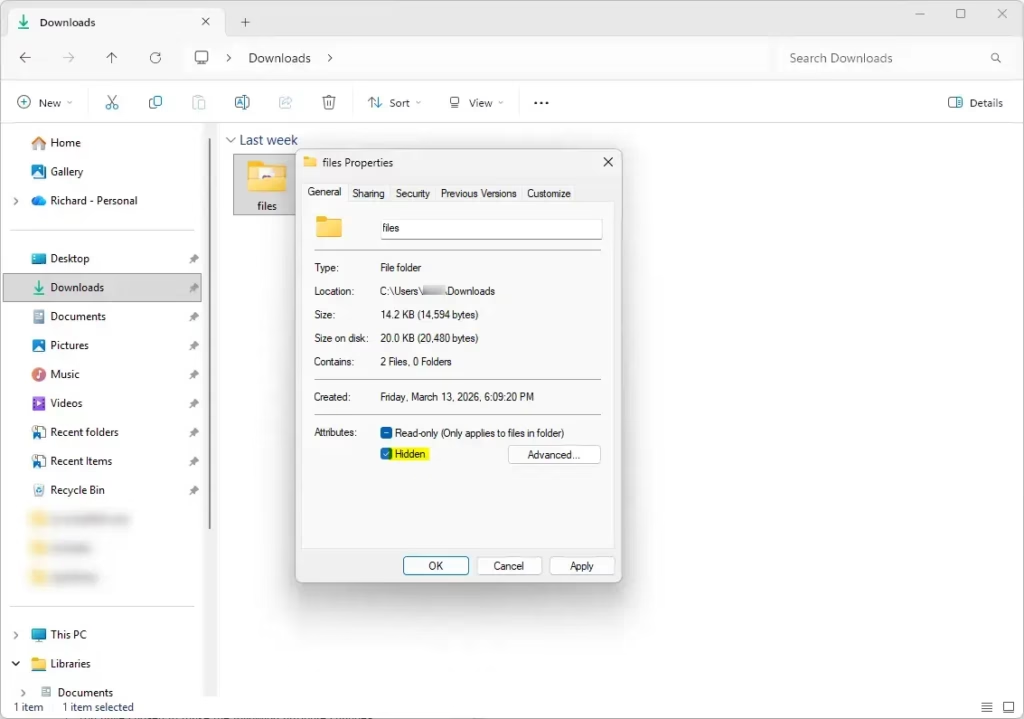
How to Hide or Unhide Folders Using File Properties
Folders work almost the same way, with one extra question about the contents.
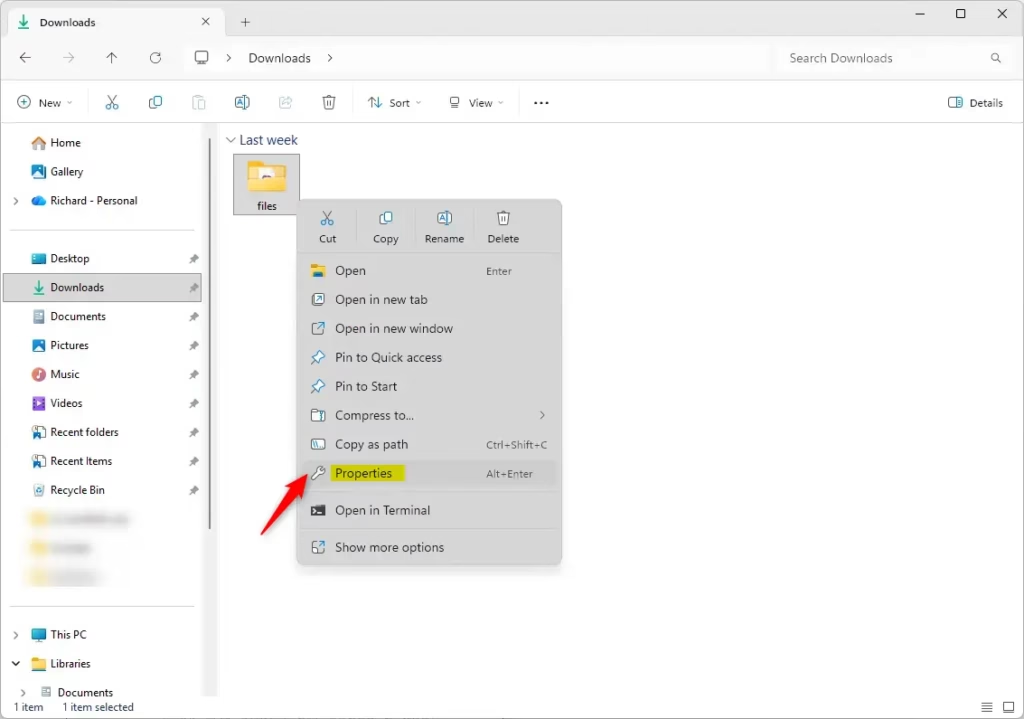
- Open File Explorer and browse to the folder you want to hide or unhide.
- Right-click the folder and select Properties.
- On the General tab, tick or clear the Hidden box.
- Click OK. If the folder has anything inside, a Confirm Attribute Changes window appears with two options:
- Apply changes to this folder only – Only the folder itself is hidden or unhidden. The files inside keep their current state.
- Apply changes to this folder, subfolders and files – Everything inside is hidden or unhidden too.
- Choose the option you want and click OK.
For most cases, hiding the folder only is enough, because nobody can browse into a folder they can't see. Pick the second option when you want the whole tree to change, for example when you later want to unhide everything in one go.
To sum up this method: open the item's Properties and tick or clear Hidden. It is the quickest way to hide or unhide one item at a time, and it needs no extra tools or commands.
How to Hide or Unhide Files Using Commands
Windows Terminal or Command Prompt can hide and unhide items with the attrib command. This is much quicker than clicking through menus when you have many items, or when you want to put the commands in a script.
- Open Windows Terminal or Command Prompt. Search for either one in the Start menu and click it. A window opens with a prompt.
- Type the command below and press Enter.
To hide a file:
attrib +h "full_path_to_file"To unhide a file:
attrib -s -h "full_path_to_file"Replace full_path_to_file with the actual file location, including the name and extension. If the path contains spaces, put the whole path in quotation marks.
The command prints nothing when it works. Check the result in File Explorer, or open the file's Properties and look at the Hidden box.
Example:
attrib +h "C:\Users\YourName\Desktop\secret.txt"attrib -s -h "C:\Users\YourName\Desktop\secret.txt"
How to Hide or Unhide Folders Using Commands
The steps for a single folder are the same as for a file. The folder's path replaces the file path in the command.
- Open Windows Terminal or Command Prompt.
- Type the command and press Enter.
Hide or unhide only the folder:
Hide:
attrib +h "full_path_to_folder"Unhide:
attrib -s -h "full_path_to_folder"Used this way, the command changes only the folder itself, not the files inside it.
Hide or unhide the folder and everything inside it (subfolders and files):
To change a whole directory, including its subfolders and every file inside, the attrib command needs extra switches. With the right switches, the change applies to the main folder, all subfolders and all files in one pass. The unhide command below reverses it, and the example shows a complete line.
attrib +h "full_path_to_folder" | attrib +h "full_path_to_folder*" /s /dUnhide:
attrib -s -h "full_path_to_folder" | attrib -s -h "full_path_to_folder*" /s /dExample:
attrib +h "C:\Users\YourName\Desktop\MyFolder" | attrib +h "C:\Users\YourName\Desktop\MyFolder*" /s /dattrib -s -h "C:\Users\YourName\Desktop\MyFolder" | attrib -s -h "C:\Users\YourName\Desktop\MyFolder*" /s /d
How to Show Hidden Files and Folders in File Explorer
Use this setting to show hidden items so you can find them, open them or unhide them. It is a view option, not a change to the files themselves.
- Open File Explorer (press Windows + E).
- Click the View menu at the top of the window.
- Hover over Show and click Hidden items. A tick appears next to it.
Hidden files and folders now appear, and their icons look faded so you can tell them apart from normal items.
To hide them again, go back to View Show and clear Hidden items. The setting stays on until you turn it off, so don't leave it on if you want the folders to look tidy.
Windows controls those separately in the Folder Options window, and it is best to leave that setting alone.
Summary
- Hidden files and folders don't show up by default, which keeps things tidy and protects system files.
- You can hide or unhide files and folders from their Properties or with commands.
- When visible, hidden items appear faded in File Explorer.
- Commands are faster when you need to hide or unhide many files or folders at once.
- Hiding is for convenience, not security.
Hidden items stay out of sight by default, which keeps your folders tidy and prevents accidental deletion of important system data. Whenever you need to reach them, use the Properties window for single items, the command prompt for bulk changes, or the Hidden items view option to see everything.
More help and info: Microsoft Support: Show hidden files and folders
Was this guide helpful?

About the Author
Richard
Tech Writer, IT Professional
Richard is a writer at Geek Rewind who turns complex IT tasks into clear, step-by-step guides. He draws on years of hands-on experience in system administration and enterprise IT operations, focusing on Windows, Linux and WordPress: the problems people actually run into, and the fixes that work. His server and WordPress guides come from systems he runs himself. Richard builds and maintains the platform behind Geek Rewind, from its Ubuntu servers and Nginx configuration to its custom WordPress plugins. Many new tutorials start with readers' questions, and he's always glad to answer them in the comments.



No comments yet — be the first to share your thoughts!