How to Configure File Explorer Folder View Defaults in Windows 11 Advanced Settings

Folder views in Windows 11 reset themselves because Windows assigns a default template to each folder based on what it holds, such as Documents or Pictures. File Explorer remembers a view per folder, and when it re-detects the contents it can switch the template and drop your layout. Folder Options lets you push one view to every folder that uses the same template, so you stop changing icon sizes and columns by hand.
The view is applied per template type, not to every folder on the PC at once. To cover everything, repeat the steps below once for each type you use. Everything here applies to Windows 11 Home and Pro alike.
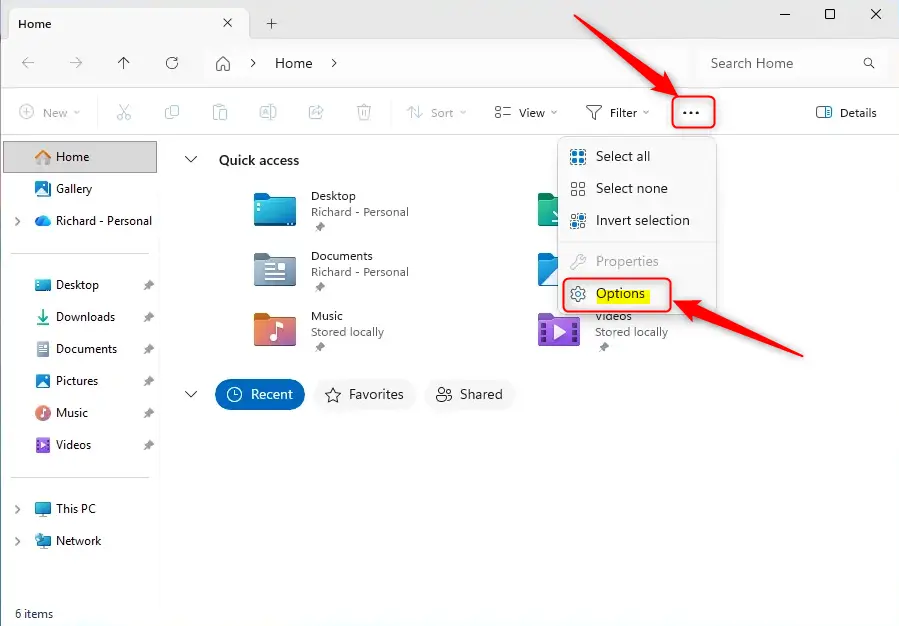
Open File Explorer , click the three dots icon on the command bar, select Options, go to the View tab, set your preferred layout like Details view, then click Apply to Folders. Windows applies that view to all folders using the same template type.
Understanding File Explorer Folder Types and Default Templates
Windows 11 sorts every folder into one of five folder types: General Items, Documents, Pictures, Music, and Videos. File Explorer checks the files in a folder and picks the template automatically. A folder full of photos gets the Pictures template, and a folder of mixed files gets General Items.
This is why a layout you set in one folder can vanish after you add different file types to it. The template is chosen from what is inside, not from the folder’s name. You can see the current template by right-clicking a folder, choosing Properties, and opening the Customize tab. The Optimize this folder for setting shows it.
How to Apply a Custom View to All Folders of a Specific Type
Applying a view to all folders of one type saves you from setting up every directory by hand. You set up one folder the way you like, then tell Windows to copy that view to every other folder using the same template.
- Press Win+E to open File Explorer .
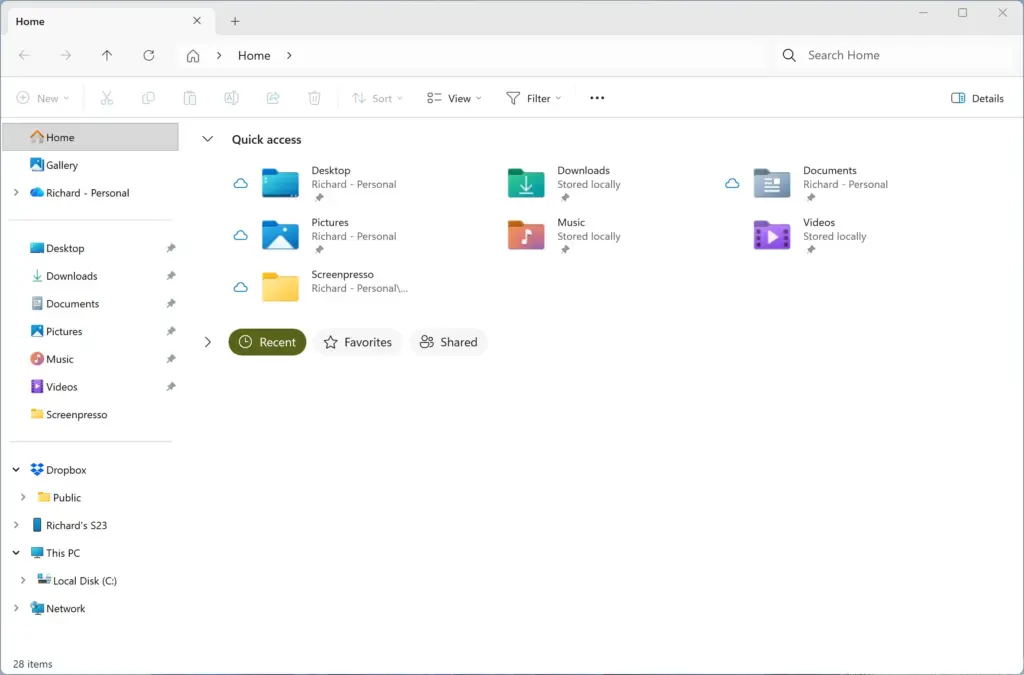
File Explorer - Go to a folder that uses the template type you want to change, such as Documents or Pictures. You should see the folder’s files in the main window.
- Click the View menu at the top of the window and choose your layout, such as Details or Large icons. In Details view you can also right-click a column header to add or remove columns, and drag the headers to resize or reorder them. The folder should redraw with your layout straight away.
- Click the three dots (See more) icon on the command bar and select Options. The Folder Options window opens.
File Explorer options window showing folder open settings in Windows 11. - Click the View tab at the top of the Folder Options window.
- Click the Apply to Folders button in the Folder views section. If the button is greyed out, the current folder is not a normal file folder, for example This PC or Home. Go back to a real folder and try again.
- Click Yes on the confirmation prompt. This tells Windows you want all folders of this type to match the current folder’s view.
- Click OK to close Folder Options.
Open another folder of the same type to check that the layout carried over. No restart is needed. To undo it, use the reset steps in the next section.
Resetting All Folder Views Back to Factory Defaults
It clears your saved view settings, so File Explorer forgets your custom changes and starts over with the original defaults. It only affects how folders look. It does not touch your files.
- Press Windows Key + E to open File Explorer.
File Explorer - Click the three dots (See more) icon on the command bar and select Options.
- Click the View tab in the Folder Options window.
- Click the Reset Folders button in the Folder views section.
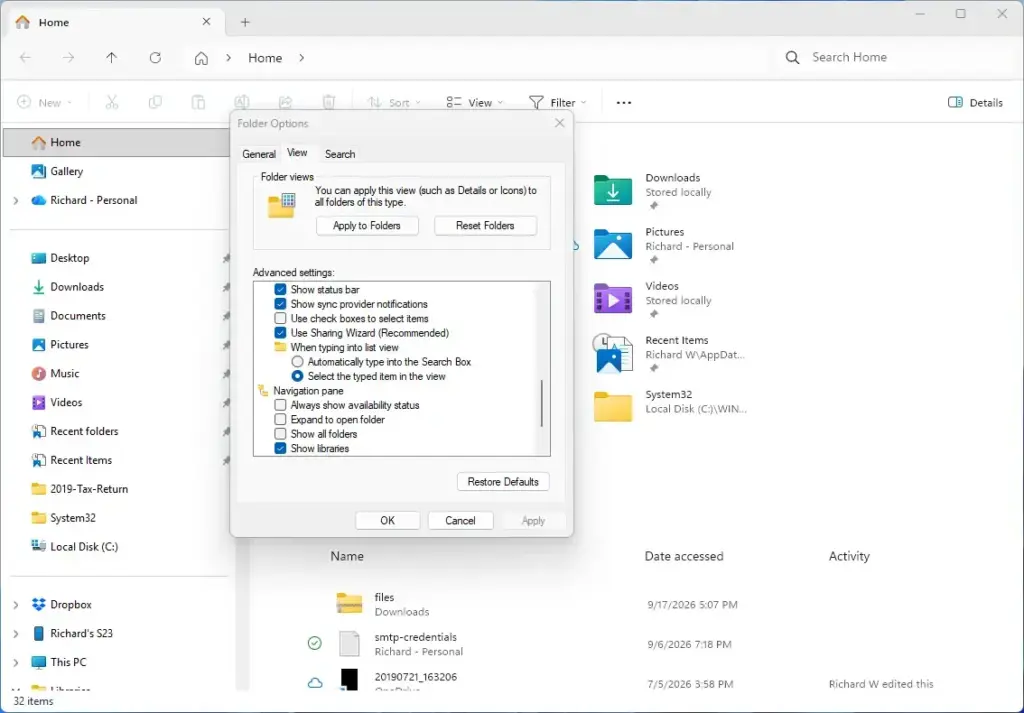
- Click Yes on the confirmation dialog to restore all folder views to their system defaults.
- Click OK to close Folder Options.
Open a few folders to confirm they are back to the default layout. If an open File Explorer window still shows the old view, close it and open a new one.
Configuring Advanced File Explorer Navigation and Launch Behavior
The advanced settings control where File Explorer opens and whether hidden files and extensions show up. They are worth setting once, because they affect every folder you open afterwards.
- Open File Explorer, click the three dots (See more) icon on the command bar, and select Options.
- On the General tab, find the Open File Explorer to: drop-down and change it from Home to This PC. This skips the cloud-integrated Home page. In Windows 11 22H2 and later, the list may also offer other choices, such as Downloads or OneDrive.
- Under Privacy on the same tab, uncheck Open files from Office.com and Show recent files in Home if you want a quieter start page. The wording of the Office.com option varies slightly between builds, and it only appears if you sign in with a Microsoft account.
- Click the View tab to reach the deeper settings.
- Scroll down the Advanced settings list and select Show hidden files, folders, and drives if you need to see protected directories. Leave this off if other people use the PC and might delete things they should not touch.
- Uncheck Hide extensions for known file types so file formats such as .docx and .exe are always visible. This also makes disguised files easier to spot.
- Uncheck Hide empty drives so card readers and empty removable drives still appear.
- Click Apply, then OK. The changes take effect right away. If an open window looks unchanged, press F5 to refresh it.
To undo any of these, return to the same tab and reverse the setting. The Restore Defaults button on each tab puts that tab's options back as they were.
Restoring the Left Navigation Pane and Quick Access Elements
If your sidebar or pinned shortcuts have vanished, you can bring them back from the View menu and the right-click menu. Nothing needs a restart.
- Open File Explorer.
- Click the View menu at the top of the window, point to Show, and make sure Navigation pane has a check mark. If it was off, the left pane should reappear as soon as you click it.
- If a pinned folder is missing from the sidebar, browse to it in the main window.
- Right-click the folder and select Pin to Quick access. It appears near the top of the navigation pane. In Windows 11, the same entry is under Show more options if you see the shortened menu.
- If you unpinned folders and want them back, see Microsoft Support's File Explorer guide for more ways to restore your layout.
To remove a pinned folder later, right-click it in the navigation pane and choose Unpin from Quick access.
Enabling Cloud Search and Enhanced Indexing Integration
This needs a Microsoft account, so it does not apply if you sign in with a local account.
- Press Windows Key + I to open the Settings app.
- Click Accounts in the left-hand sidebar.
- Check that you are signed in with your Microsoft account and that your sync status looks healthy. If it does not, sign in again here first.
- Go back to the sidebar and click Privacy & security, then Search permissions.
- Under Cloud Content Search, turn on the Microsoft account toggle so your cloud content can appear in search results. Labels here can differ slightly between builds.
Search also works best for OneDrive files that are available on the PC. Files stored online only may not show up in every search, so keep the folders you search often set to stay on the device.
If this didn't work
When folder views keep resetting, the cause is usually a Windows update or a damaged user profile. Start with the simple fixes. Re-apply your view with Apply to Folders, then use Reset Folders and set the layout up again from scratch. Folder view settings are stored per user, so if the problem only affects one account, a damaged profile is the likely cause.
To test this, create a second user account, sign in, and see whether the layout sticks there. If it does, your original profile has the problem. Also check that Windows is fully up to date, as updates sometimes fix File Explorer bugs, and restart the PC after any update. Rebuilding the search index, which you can start from Settings under Privacy & security and Searching Windows, helps with search problems, but it will not change how folder views behave.
Have a question about this guide?
Answered by AI from this guide. Good questions may be added to this page — please don't include personal details.
Did this guide fix your problem?

About the Author
Richard
Tech Writer, IT Professional
Richard is a writer at Geek Rewind who turns complex IT tasks into clear, step-by-step guides. He draws on years of hands-on experience in system administration and enterprise IT operations, focusing on Windows, Linux and WordPress: the problems people actually run into, and the fixes that work. His server and WordPress guides come from systems he runs himself. Richard builds and maintains the platform behind Geek Rewind, from its Ubuntu servers and Nginx configuration to its custom WordPress plugins. Many new tutorials start with readers' questions, and he's always glad to answer them in the comments.
No comments yet — be the first to share your thoughts!