Turn Off Cloud Content Search in Windows 11

Cloud content search is a Windows 11 setting that lets Windows Search show results from your online accounts, such as your Microsoft account and work or school account, alongside results from your PC. You can turn it off in Settings Privacy & security Search permissions, under the Cloud content search heading.
Switch off the Microsoft account and Work or school account toggles, and Windows Search stops pulling in results from those accounts. The change takes only a few seconds and does not need administrator rights.
To undo it later, turn the same toggles back on using the same steps.
You turn off cloud content search in Settings Privacy & security Search permissions, under the Cloud content search heading. Set the Microsoft account and Work or school account toggles to Off. Windows Search then stops pulling results from your online accounts. No administrator rights are needed, and each toggle takes effect immediately.
What Cloud Content Search Does
Windows Search is the search you use from the taskbar and the Start menu . By default it searches your PC. It can also ask the online accounts you are signed in with for matching results. That second part is cloud content search.
Windows 11 treats two kinds of account separately:
- Microsoft account: the personal account you use to sign in to Windows, Outlook.com, OneDrive and other Microsoft services.
- Work or school account: an account issued by an employer or school and managed by their IT department.
Each account has its own toggle, so you can turn off one and leave the other on. People usually turn this off for one of three reasons:
- They do not want content from their accounts surfacing in a search box that others may see over their shoulder.
- They want search to stay fast and limited to the files on the PC.
- They share a PC and do not want one person's account content appearing for someone else.
Before You Start
If you run an early build of Windows 11 and the page looks different, update Windows first. The label and layout can vary between builds, and this guide does not cover those.
You do not need administrator privileges. The settings apply to the user account you are signed in with, not the whole PC. On a work or school PC, your organization can lock these toggles. The troubleshooting section below covers that case.
Turn Off Cloud Content Search in Settings
Use this method. It switches off cloud results for the account types you choose. It switches off cloud results for the account types you choose.
- Open Settings. Press the Windows key + I, or right-click the Start button and select Settings.

Windows 11 Start menu with Settings gear icon highlighted. - Select Privacy & security in the left-hand list. The privacy options open on the right.

- Scroll down to the Windows permissions section and select Search permissions. The page opens with groups of options such as SafeSearch, Cloud content search and History.
- Find the Cloud content search heading. Two toggles sit under it: Microsoft account and Work or school account.
- Set the Microsoft account toggle to Off. This stops Windows Search from using your Microsoft account to find content online. The toggle slides left and the label changes to Off.
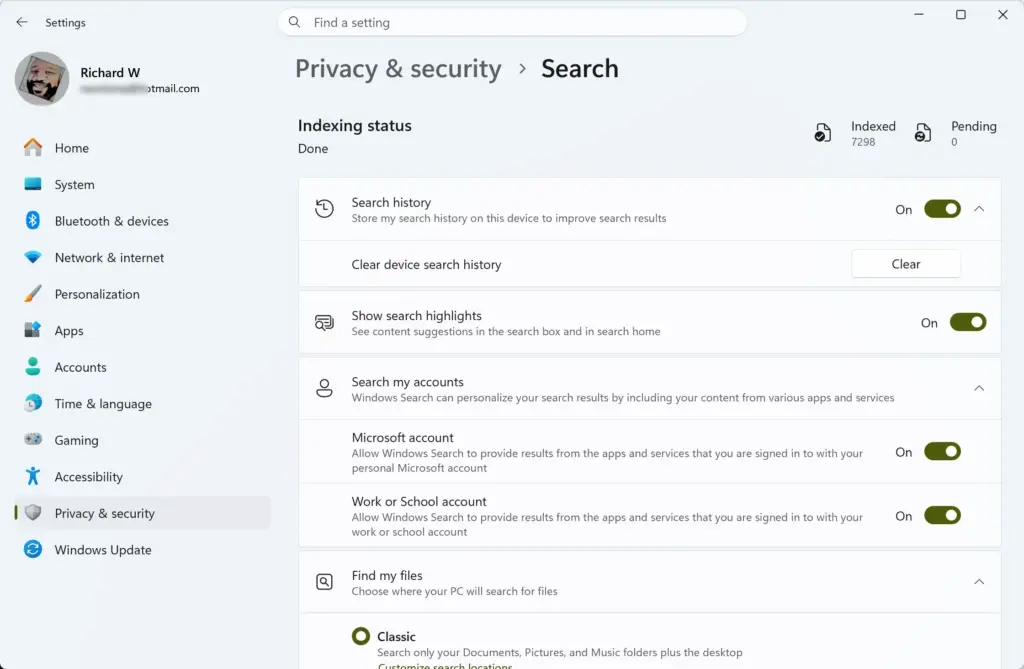
Settings › Privacy & security › Search - Set the Work or school account toggle to Off. This does the same for an account from your employer or school. The label changes to Off.
- Close Settings. There is no Save or Apply button. Each toggle takes effect as soon as you flip it.
You do not need to restart the PC. If you only want to stop one source, flip that toggle and leave the other as it is.
Open the Page With a Shortcut
If you change this setting on several PCs, you can jump straight to the page. This skips the first three steps above.
- Press the Windows key + R to open the Run dialog.
- Type
ms-settings:search-permissionsand press Enter. The Search permissions page opens in Settings.Settings › Privacy & security › Search - Continue from step 4 in the list above.
Check That It Worked
A quick test confirms the change. Pick a word that appears only in online content, such as an email in your Outlook.com mailbox that is not stored on this PC.
- Click the search box on the taskbar, or press the Windows key and start typing.
- Type the word and look at the results. You should see only local results, such as apps, settings and files on this PC, plus any web suggestions Windows offers.
- If online results from your account still appear, close the search window, reopen it and search again. Restart the PC only if they still appear after that.
Cloud search can take a moment to stop after you flip the toggle. One old result right after the change is normal.
If the Toggles Are Missing or Greyed Out
Most problems with this setting come down to one of the cases below.
You See "Some Settings Are Managed by Your Organization"
On a work or school PC, an administrator can control these toggles. If the toggles are greyed out, or a message says some settings are managed by your organization, you cannot change them from Settings. Ask your IT department to change the setting or to confirm why it is locked. Do not try to work around a managed setting on a PC you do not own.
The Work or School Toggle Does Not Do Anything for You
The Work or school account toggle only matters if a work or school account is signed in on the PC. The page may look different on a PC that has only a local account, so compare what you see with the steps above., so what you see there may differ. If you have no account of that type, you can leave the toggle alone.
You Use a Local Account
If you sign in to Windows with a local account (one that exists only on the PC) and have not added a Microsoft account, the Microsoft account toggle has nothing to search. The page may look different from the steps above on such a PC. Settings for each Windows user are separate, so check the page while signed in as the user you care about.
Search Permissions Is Not Listed
If Search permissions is not in the list under Windows permissions, scroll further down the Privacy & security page, or use the search box at the top of Settings and type Search permissions. If it is still missing, check your Windows build under Settings System About and update Windows. Older builds use different layouts.
What This Setting Does Not Change
The toggles do not do everything people assume. Here is what they leave alone. Turning off cloud content search does not:
- Delete anything. Your email, OneDrive files and other online content stay where they are. Only Windows Search stops asking for them.
- Stop OneDrive syncing. Syncing (keeping files up to date between the PC and the cloud) is a separate feature. Files in your OneDrive folder on this PC are ordinary local files, so Windows Search can still find them by searching the PC.
- Turn off web suggestions in the search box. Those come from a different setting, and this guide does not cover it.
- Clear your search history. The History section on the same page controls what the PC remembers about your searches. It is a separate setting.
- Affect other users on the PC. Each Windows user has their own settings.
To limit what Windows Search finds on the PC itself, such as which folders it indexes (scans them so results appear faster), change a different setting. That is a separate task from this one.
Registry and Group Policy Methods
Settings is the method to use. The Registry Editor (the built-in tool for viewing and changing Windows configuration values) has a key that holds search settings for your user account:
HKEY_CURRENT_USER\SOFTWARE\Microsoft\Windows\CurrentVersion\SearchSettings
It does not confirm which value controls cloud content search or what data that value takes, so do not guess. Editing registry values at random can break search or other features, so do not change anything in this key based on a guess.
[Registry method: to be verified]
The same applies to Group Policy, which IT administrators use to apply a setting to many PCs at once. I do not have a confirmed policy name for this setting, so I do not list one. If you manage several PCs, check Microsoft's current documentation for the exact policy before you deploy anything.
Turn Cloud Content Search Back On
Reversing the change takes the same steps in the opposite direction, and nothing is lost by turning it off.
- Open Settings Privacy & security Search permissions
- Under Cloud content search, set the Microsoft account toggle to On.
- Set the Work or school account toggle to On if you want that source back too.
- Close Settings. The toggles take effect straight away, so there is nothing to save.
Results from your online accounts may take a little while to appear again. Search for something you know is in your account and give it a moment.
What to Do Next
The toggles belong to each Windows user, so repeat the steps for every account on a shared PC. A new user profile starts with its own defaults and does not inherit your choice. After you add a new work or school account later, open Settings Privacy & security Search permissions and check that the toggles still show the state you want. A related task to look at next is the History section on the same page, which controls the search history stored on the PC.
Have a question about this guide?
Answered by AI from this guide. Good questions may be added to this page — please don't include personal details.
Did this guide fix your problem?

About the Author
Richard
Tech Writer, IT Professional
Richard is a writer at Geek Rewind who turns complex IT tasks into clear, step-by-step guides. He draws on years of hands-on experience in system administration and enterprise IT operations, focusing on Windows, Linux and WordPress: the problems people actually run into, and the fixes that work. His server and WordPress guides come from systems he runs himself. Richard builds and maintains the platform behind Geek Rewind, from its Ubuntu servers and Nginx configuration to its custom WordPress plugins. Many new tutorials start with readers' questions, and he's always glad to answer them in the comments.
No comments yet — be the first to share your thoughts!