How to Enable or Disable Windows 11 Search Indexing

Windows 11 search indexing controls how fast your PC finds files and how much power it uses for search.
This feature uses a program called SearchIndexer.exe to build and update a list, or index, of your files. Think of it like a library’s card catalog; Windows uses this list to find your files super quickly.
With search indexing turned on, Windows 11 can often find results in less than a second. If you turn it off, Windows has to look through your whole computer for every search, which makes finding things much slower and uses more PC power.
When indexing is active, your computer keeps track of file details. Turning it off means searches will take longer, and some files might not show up in search results at all.
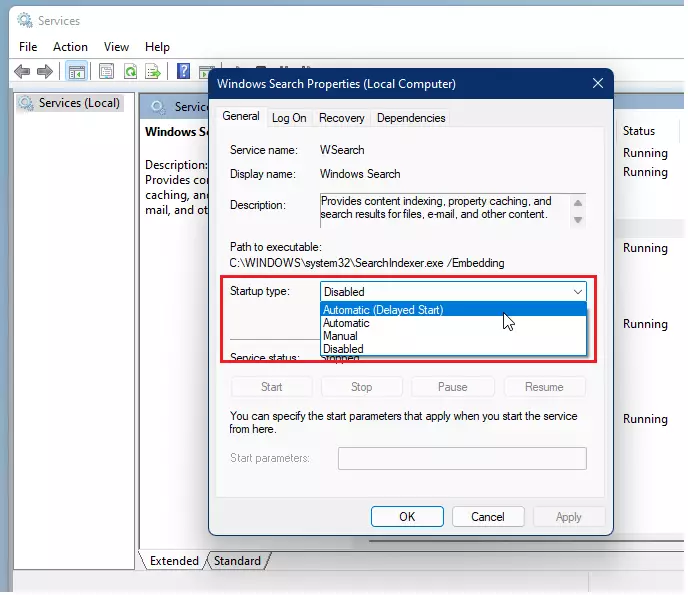
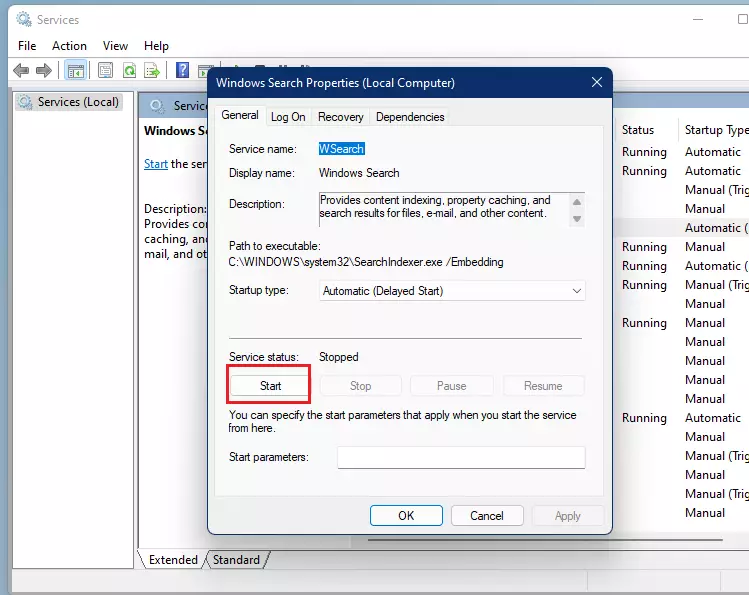
To disable Windows 11 search indexing, open Services, find “Windows Search,” click Stop, and set Startup type to Disabled. To enable it, set Startup type to Automatic (Delayed Start) and click Start.
Pros and Cons of Disabling Indexing
| Pros | Cons |
|---|---|
| Slightly lower CPU and disk usage | Search results become very slow |
| Less background disk activity | Some files may not show up in search |
| Reduced wear on older hard drives | Outlook PST files may not be searchable |
How to Rebuild the Index
If your Windows 11 search isn’t finding files or shows old results, rebuilding the search index is a good step. This process creates a fresh catalog of your computer’s content, helping Windows Search find items more accurately.
1. Open the Control Panel and select Indexing Options.
2. Click the Advanced button. Note: Changing these settings requires administrator privileges.
3. Under the Troubleshooting section, click the Rebuild button.
4. Click OK. Your computer will now re-scan your files, which may take some time depending on how many files you have.
Troubleshooting Indexing Issues
If Windows 11 search indexing is paused, it often means your computer is busy or running on battery power; check that it's plugged in and the Windows Search service is configured to start automatically.
Managing Indexed Locations
You can manage Windows 11 search indexing locations by adding or removing specific folders in the Indexing Options, which helps reduce system workload by excluding unnecessary files.
Disable Windows Search Indexing
You can disable Windows 11 search indexing by stopping the Windows Search service. This stops Windows from constantly running in the background to update its search catalog, which can save system resources.
- Open the Services console on your PC.
- Scroll down and find the service named Windows Search.
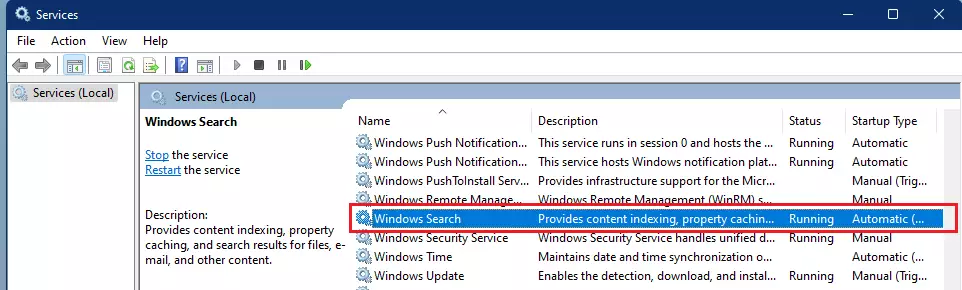
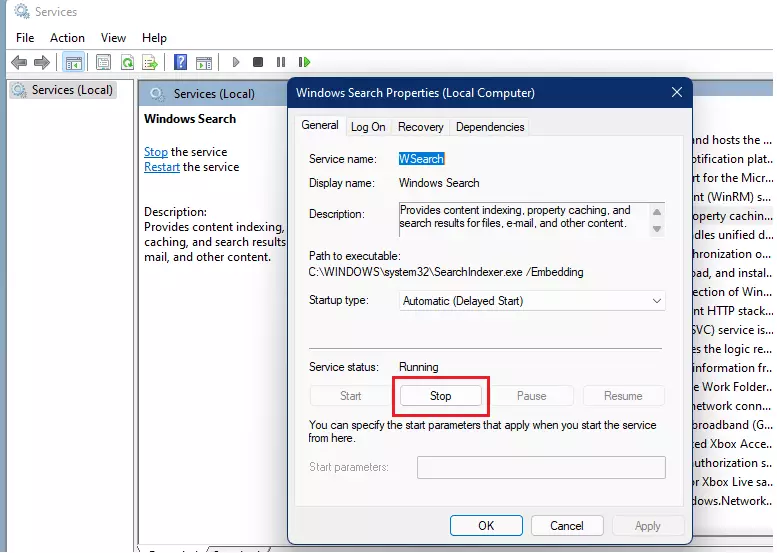
3. Click on Windows Search to open its settings.
4. Click Stop to turn off the service immediately.
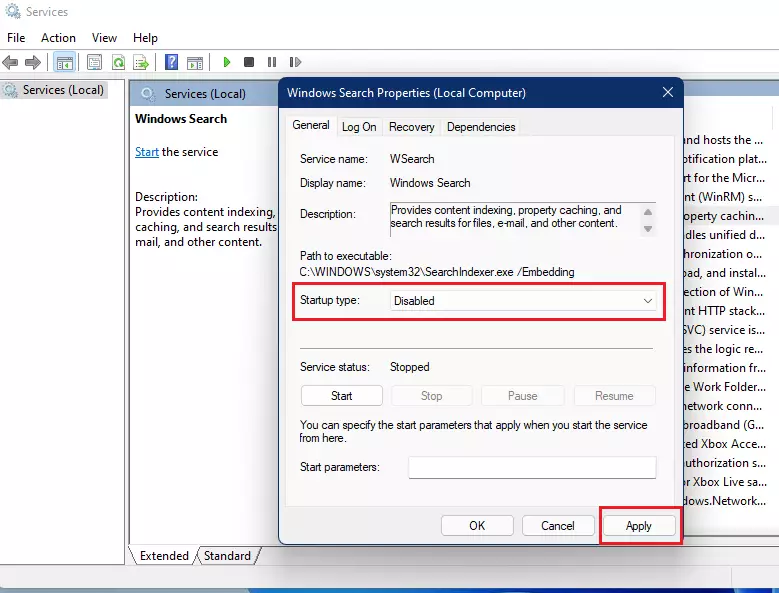
5. In the Startup type menu, select Disabled.
6. Click Apply to save.
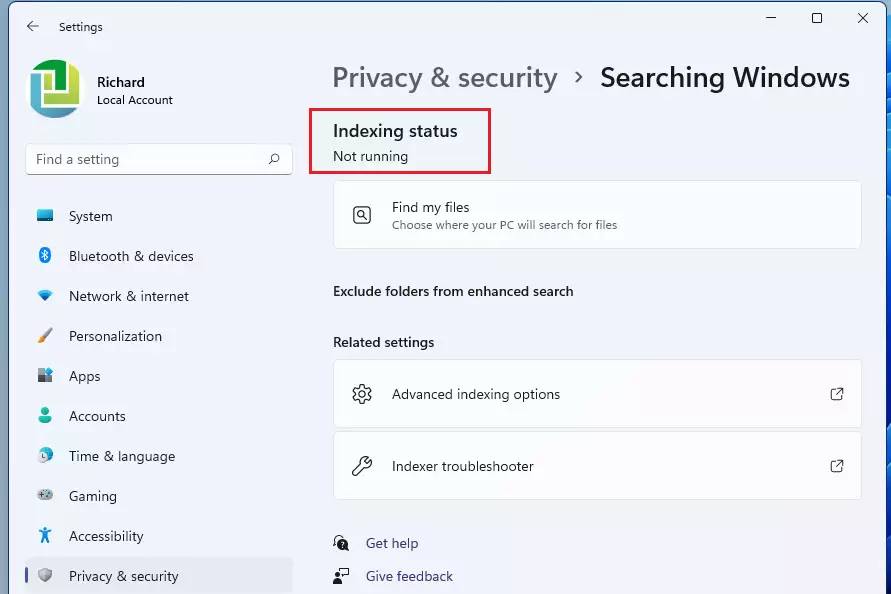
Windows 11 search indexing is now turned off. A user can verify this by checking the service status, which will display "Not running" when indexing is inactive. This ensures that the computer does not use resources to continuously scan files for search purposes.
Enable Windows Search Indexing
If you want to turn the feature back on, follow these steps:
1. Open the Services console and find Windows Search.
2. Set the Startup type to Automatic (Delayed Start).
3. Click Apply.
4. Click the Start button to begin the service.
Use Command Prompt
To use this method, open the Command Prompt as administrator.
To enable indexing:
sc config "wsearch" start=delayed-auto && sc start "wsearch"To disable indexing:
sc stop "wsearch" && sc config "wsearch" start=disabledSummary
Windows 11 search indexing creates a catalog of your files to help you find them quickly. You can choose to index specific folders or your entire PC. Managing this feature involves using system tools like Indexing Options and Services.- Indexing creates a catalog of your files to make searching faster.
- You can choose between Classic (limited folders) or Enhanced (entire PC) modes.
- Disabling the indexer stops the background search process but slows down future search results.
- You can control this feature through the Services menu or the Command Prompt.
- For more information, visit the official Microsoft Support page.
Why does indexing automatically run at all times?
Indexing runs in the background to ensure your search catalog stays current. Whenever you create, move, or edit a file, the indexer updates its records. This constant monitoring ensures that when you search for a file, the results are accurate and appear immediately without needing a full system scan.
How much disk space does the search index use?
The Windows 11 search index typically uses between 500MB and 2GB of disk space, depending on your number of files, which is usually small compared to modern storage.
Was this guide helpful?

About the Author
Richard
Tech Writer, IT Professional
Richard, a writer for Geek Rewind, is a tech enthusiast who loves breaking down complex IT topics into simple, easy-to-understand ideas. With years of hands-on experience in system administration and enterprise IT operations, he’s developed a knack for offering practical tips and solutions. Richard aims to make technology more accessible and actionable. He's deeply committed to the Geek Rewind community, always ready to answer questions and engage in discussions.


I would break this into two articles.
Also, there are countless typos and grammatical errors which need to be corrected.