How to Choose Where Windows Search for Files in Windows 11


Windows search indexing builds a hidden map of your computer in the background so you can find documents, photos, and apps almost instantly. When you type in the taskbar search box , Windows looks through this saved list instead of scanning your whole hard drive every time.
You choose which folders and drives go into that map in the Privacy & security settings. Adding an external drive or a project folder fixes most “why isn’t my file showing up” problems, and it makes results come back faster. Here is how to get to the setting:
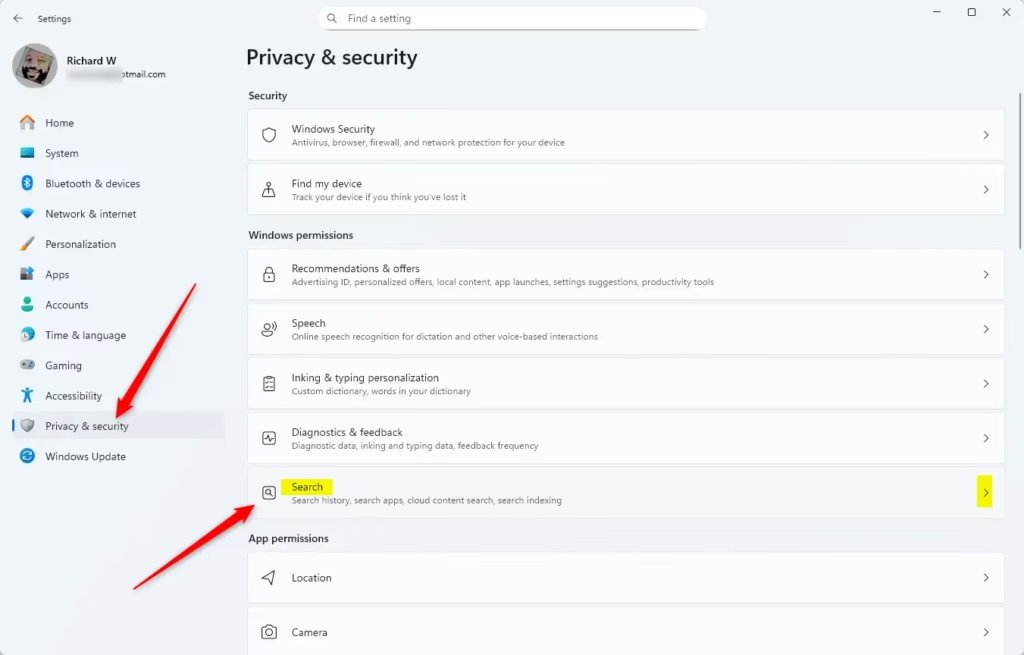
- Open Settings Privacy & security Searching Windows
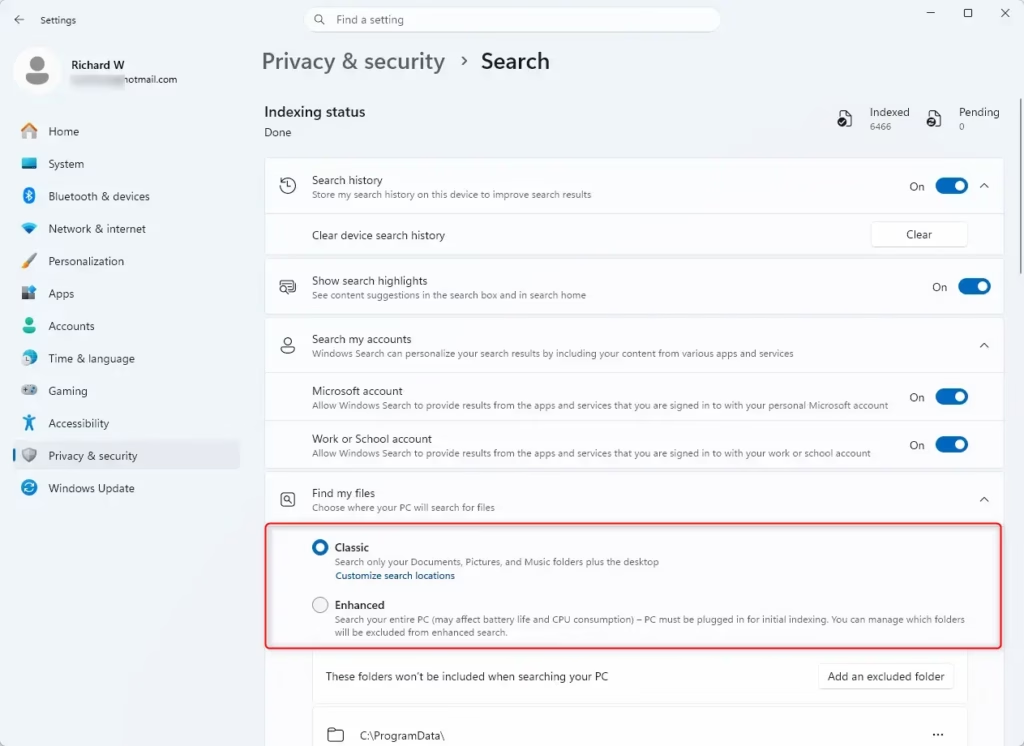
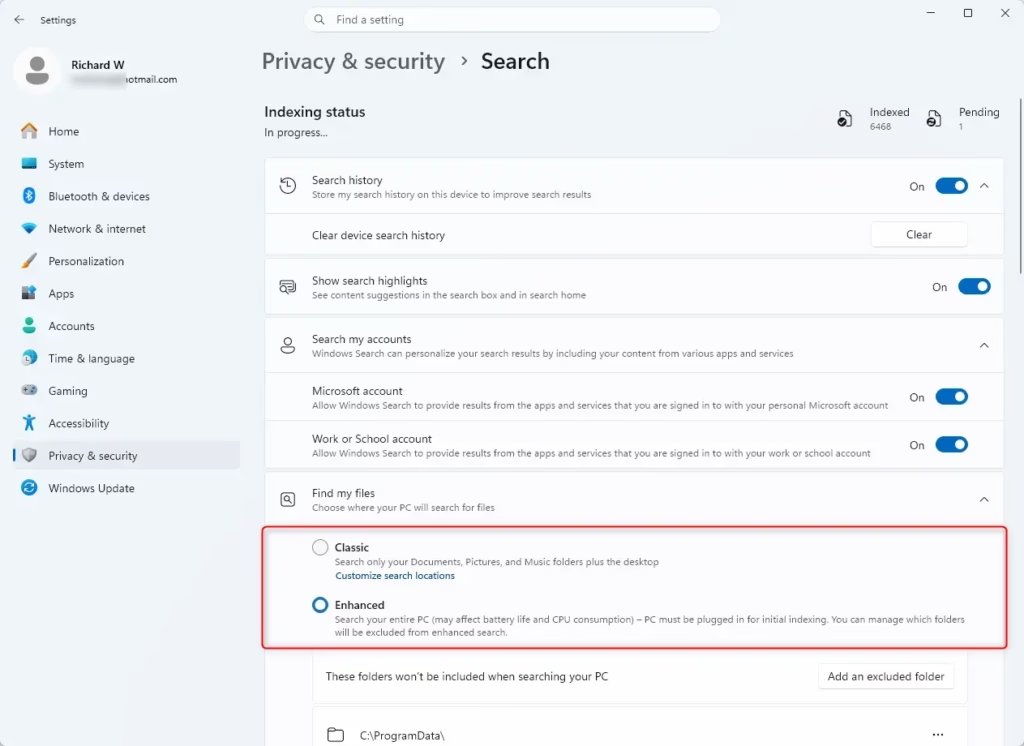
- Find the Find my files section. You should see two options, Classic and Enhanced, with one selected.
- Pick the mode you want. The change applies right away, and you do not need to restart.
This works the same on Windows 11 Home and Pro. If you have a work or school PC, an administrator may have locked these options, and they will appear greyed out.
Access indexing settings via the Windows search bar. Choose “Enhanced mode” to index your entire PC, or “Classic mode” to select specific folders like Documents, Pictures, and Desktop. You can customize Classic mode further by adding or removing specific locations.
How Windows Search Indexing Works
The search index is a background database that tracks your files. It stores file names, locations, and the text inside documents. Windows Search can then point straight to what you need instead of scanning the whole computer each time you type a query.
Think of it as the table of contents in a book. Windows checks the table of contents, not every page, so results appear quickly. The catch is that a file only shows up in a search if its folder is covered by the index. If a file is missing from results, check whether its location is indexed before you assume the file is gone.
Choosing Your Search Mode: Classic vs. Enhanced
The Searching Windows page gives you two modes that control how much of the PC gets indexed. Classic covers your personal folders. Enhanced covers everything. The sections below explain each one so you can choose.
1The Classic Mode: Focused and Efficient
Classic mode is the default. It indexes only your standard user folders: Documents, Pictures, Music, and Desktop. That keeps search fast while keeping background activity low.
- Your Documents folder
- Your Pictures folder
- Your Music folder
- Your Desktop
Classic mode works well if you keep your files in the standard locations. It also uses less power, which helps on older computers and on laptops running on battery.
You do not have to switch to Enhanced mode to index a folder outside the defaults. Classic mode lets you add extra folders, such as a project directory or a folder on a second drive. On the Searching Windows page, look for Customize search locations. It opens the indexing options, where the Modify button lets you tick the folders you want included.
After you add a folder, Windows needs some time to index its contents. Keep in mind that each extra folder adds to the work Windows Search does in the background, so add only what you actually search. To undo it, open the same list and untick the folder.
2The Enhanced Mode: The All-Seeing Eye
Enhanced mode extends the index across the whole computer, covering every file on every connected drive. Use it when your documents are scattered across many folders or several user accounts and you do not want to track down each location by hand.
In Enhanced mode, Windows can find any saved item in any directory without you adding folders one at a time. If there are places you do not want searched, such as a backup drive or a folder of temporary files, use the exclusion option on the same page to leave them out. To go back, select Classic again.
Enhanced mode gives the most complete search results, but it costs more. Building and maintaining an index of the whole PC takes steady processing power and disk activity. If your computer slows down after you turn Enhanced mode on, or if the hardware is modest, switch back to Classic mode. Indexing only the folders you need is a better fit for those machines.
Practical Tip: Start with Classic and Add
Classic mode is enough for most Windows 11 users. Start there, then add any other locations through Customize search locations. This gives you precise control and keeps Windows from scanning areas you never search.
Warning: Indexing Takes Time
Building or updating the index is not instant. It can take several hours, especially in Enhanced mode, depending on how many files you have. While the first build runs, search results will be incomplete, and the PC may feel a bit slower. Leave the computer on and plugged in if you can. Once the index finishes, searches will be fast and complete.
What Information Gets Indexed?
The index stores more than file names. Windows reads specific details about each item. The database tracks exact file paths, creation dates, and the words inside text-heavy items such as documents and emails. That is why you can find a file by typing a keyword from its contents.
- File Names: The most basic and important info.
- File Paths: Where the file is on your drive.
- File Contents: For text files (like documents, code, or emails), Windows can even index the words *inside* the file. This lets you search for specific phrases or words in your documents, not just their titles.
- File Properties: This includes details like the author of a document, when it was created or changed, tags, and other file information.
Applications such as Microsoft Outlook also feed into the Windows 11 index. Outlook indexes your emails so inbox searches finish quickly, even without an internet connection.
Summary
Whether you stay in Classic mode or move to Enhanced, tuning your search indexing settings helps you find files faster and more reliably. Start with Classic, add the folders you really use, and switch to Enhanced only if you need whole-PC coverage.
Have a question about this guide?
Answered by AI from this guide. Good questions may be added to this page — please don't include personal details.
Did this guide fix your problem?

About the Author
Richard
Tech Writer, IT Professional
Richard is a writer at Geek Rewind who turns complex IT tasks into clear, step-by-step guides. He draws on years of hands-on experience in system administration and enterprise IT operations, focusing on Windows, Linux and WordPress: the problems people actually run into, and the fixes that work. His server and WordPress guides come from systems he runs himself. Richard builds and maintains the platform behind Geek Rewind, from its Ubuntu servers and Nginx configuration to its custom WordPress plugins. Many new tutorials start with readers' questions, and he's always glad to answer them in the comments.
No comments yet — be the first to share your thoughts!