Add or Remove Other Users Accounts in Windows 11

Adding or removing other user accounts in Windows 11 takes a few clicks in Settings Accounts Other users An administrator account is required for these changes. Select Add account to create a sign-in for someone else, or pick an existing account and select Remove to delete it.
This article also covers three older tools: the netplwiz window, Local Users and Groups, and Command Prompt. Some of these methods are the only ones that work on certain editions of Windows 11.
On Windows 11 version 24H2 and later, the page is named Other users. Earlier versions call it Family & other users, and the steps stay the same. To check whether your account is an administrator, open Settings Accounts Your info The word Administrator appears under your name if it is.
To add or remove other users accounts in Windows 11, you need an administrator account. Open Settings , select Accounts, then select Other users (called Family & other users on older builds). Select Add account to create a sign-in for someone else, or select an existing account and choose Remove to delete it. Removing in Settings also deletes that person’s profile folder.
Before You Add or Remove an Account
Four points decide which method you use and what happens to the person’s files.
- Account type. A Microsoft account signs in with an email address and keeps settings in sync through the cloud (online storage that copies your settings to each PC you sign in to). A local account (an account that exists only on this PC, with no Microsoft sign-in) uses a name and password stored on the computer.
- Standard or Administrator. A new account is a Standard User by default. A standard user can run apps and change their own settings, but cannot install most software or change system settings without an administrator’s password. Give administrator rights only to people who need them.
- Removing deletes data in some methods. The Settings app deletes the account and everything in that person’s profile folder. Other methods remove the account but leave the files behind. The sections below say which is which.
- The profile folder is created at first sign-in. A new account does not get its own folder under 📁C:\
Users until that person signs in for the first time.
Add Another User in Settings
This is the quickest method on Windows 11 Home and Pro. It needs administrator rights.
Add a User with a Microsoft Account
Use this when the person already has a Microsoft account (an Outlook.com, Hotmail, or other Microsoft-registered email address). They sign in with that address and their usual password.
- Press Windows key + I to open Settings.

Windows 11 Start menu with Settings gear icon highlighted. - Select Accounts in the left pane.
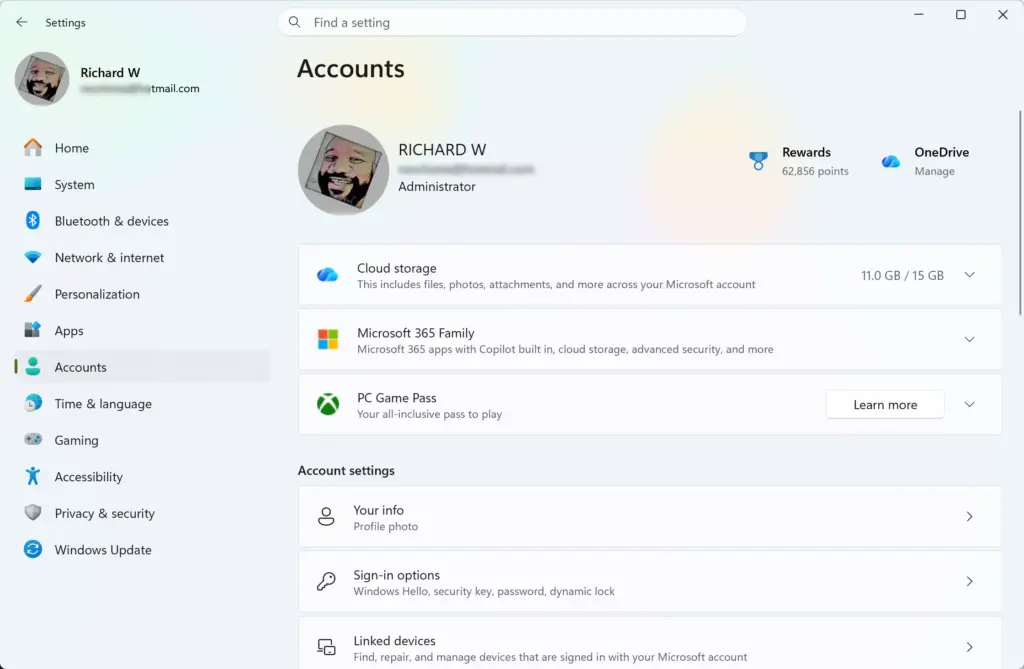
Settings › Accounts - Select Other users. On older builds, select Family & other users.
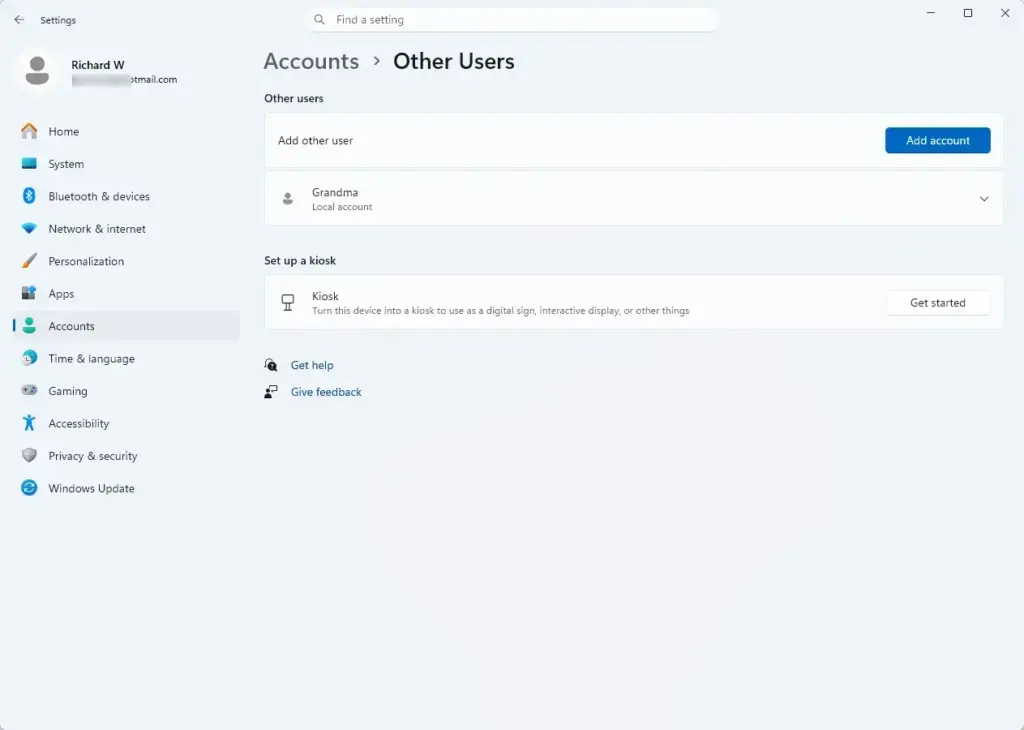
Settings › Accounts › Other users - Find the Other users section and select Add account. On 24H2 and later, the button may sit next to the label Add other user. A Microsoft account window opens and asks How will this person sign in?
- Type the person's email address or phone number in the box.
- Select Next, then select Finish.
The account now appears in the list under Other users, labelled with the email address and the word Local account or Microsoft account. The person signs in from the lock screen. The PC needs an internet connection for the person's first sign-in. Windows uses that connection to verify the account and build the profile.
If the next screen says the address is not a Microsoft account, Windows offers to create one. Either let the person finish that setup or use the local account method below.
Add a Local Account Without a Microsoft Account
Use this for a shared PC, a child's account, or anyone who does not need a Microsoft sign-in. Windows places this option behind a link, so check the first window carefully.
- Open Settings Accounts Other users, then select Add account.
- In the How will this person sign in? window, select I don't have this person's sign-in information at the bottom.
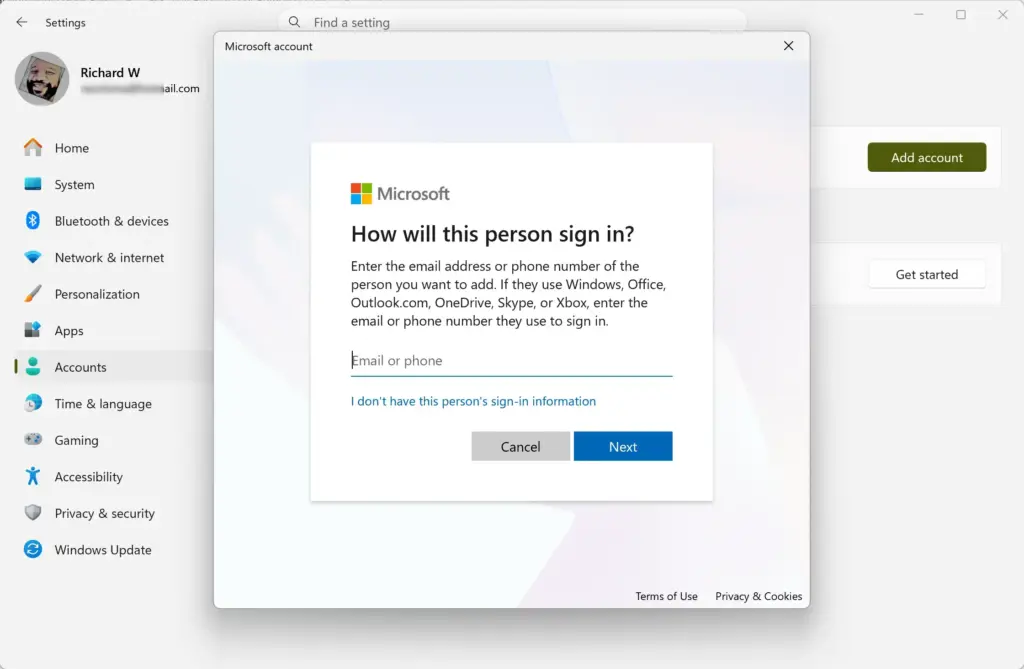
- Select Add a user without a Microsoft account on the next screen.
- Type a name in the User name box.
- Type a password in the Password box and again in the confirmation box. Windows may also ask you to choose three security questions. These let the person reset the password later if they forget it.
- Select Next.
The new local account appears under Other users. It has no password protection if you leave the password blank, and a blank-password account cannot be used to sign in from another computer over a network. Set a password unless you have a reason not to.
If the Add a user without a Microsoft account link is missing or the window loops back to the Microsoft sign-in page, some recent builds have hidden or changed it. Use the netplwiz or Command Prompt method later in this article instead.
Change a User to Administrator or Standard
This step changes what the account is allowed to do. It needs administrator rights.
- Open Settings Accounts Other users
Settings › Accounts › Other users - Select the account name to expand it.
- Select Change account type.
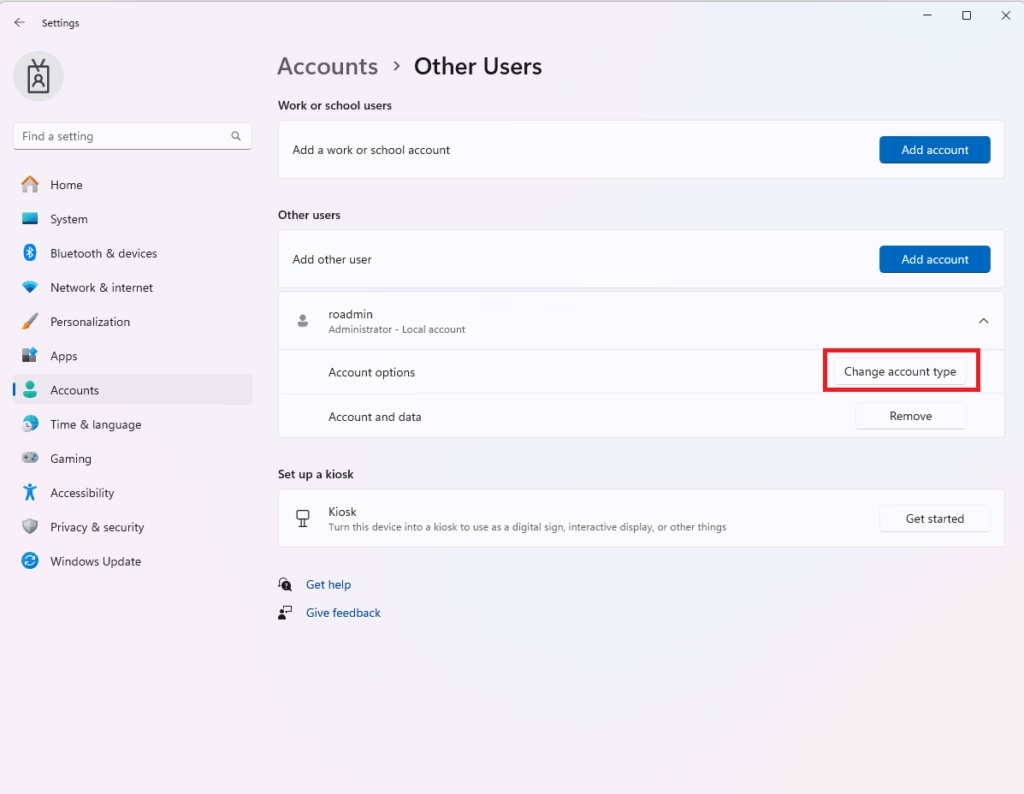
Changing user account type in Windows 11 settings for permissions. - Choose Administrator or Standard User from the Account type list.
- Select OK.
The change applies the next time that person signs in. If they are signed in now, ask them to sign out and back in.
Remove Another User in Settings
You cannot undo it from Windows, so copy anything you need to keep before you start.
- Sign in with an administrator account. Make sure the account you are removing is not the one you are signed in with.
- Open Settings Accounts Other users
- Select the account you want to remove. The entry expands.
- Select Remove next to Account and data.
- Read the warning that says the account and data will be deleted. Select Delete account and data to confirm.
The account disappears from the list. The profile folder at C:\Users\USERNAME is removed with it.
If the Remove Button Is Missing or Greyed Out
There are three common causes.
- You are not an administrator. A standard user cannot remove other accounts. Sign in with an administrator account, or ask the person who owns one to do it.
- The account is still signed in. Windows will not delete a signed-in profile. Fast user switching (leaving one user signed in while another uses the PC) keeps the account active in the background. Press Ctrl + Shift + Esc to open Task Manager, select the Users tab, right-click the account, and select Sign off. Then try the removal again.
- The account is the only administrator on the PC. Windows needs at least one administrator account. Promote another account to Administrator first, as described above, then remove the old one.
Add or Remove a User with netplwiz
netplwiz opens the older User Accounts window. It works on Windows 11 Home, Pro, and Enterprise. This method needs administrator rights.
Add a User in netplwiz
- Press Windows key + R to open the Run box.
- Type
netplwizand press Enter. Approve the User Account Control prompt (the box that asks permission to make changes) if it appears. - On the Users tab, select Add.
- Follow the same wizard shown in Settings. Enter a Microsoft account email, or select Sign in without a Microsoft account (not recommended) and then Local account to create one that stays on this PC.
- Select Finish.
The new user appears in the Users for this computer list.
Remove a User in netplwiz
This removes the account but does not delete the files in its profile folder. The folder stays at C:\Users\USERNAME, which is useful when you want the data afterwards.
- Open netplwiz as described above.
- Select the account in the Users for this computer list.
- Select Remove.
- Select Yes to confirm.
The account is gone from the list and can no longer sign in. The files remain until you delete the folder yourself in File Explorer, which requires administrator approval.
Add or Remove a User in Local Users and Groups
Local Users and Groups gives you the most control, including the option to force a password change at first sign-in. It is only available in Windows 11 Pro, Enterprise, and Education. On Windows 11 Home it does not exist, and the command lusrmgr.msc returns an error. Use netplwiz or Command Prompt instead. This method needs administrator rights.
Create a Local User
- Press Windows key + R, type
lusrmgr.msc, and press Enter. - Select the Users folder in the left pane.
- Right-click an empty area in the middle pane and select New User.
- Type a name in User name. Add a Full name and Description if you like.
- Type a password in Password and Confirm password.
- Choose the options you want. User must change password at next logon is the default and works well when you set a temporary password for someone else. Password never expires and Account is disabled are also here.
- Select Create, then Close.
The new account appears in the user list. It is a standard user until you change it.
Make the User an Administrator
- In the Users folder, double-click the account.
- Select the Member of tab.
- Select Add, type
Administrators, and select Check Names. - Select OK, then OK again.
To reverse this, return to the same tab, select Administrators, and select Remove.
Delete or Disable a Local User
Deleting here removes the account but leaves the profile folder in place, like netplwiz. To keep the account but block sign-in, disable it instead.
- Open
lusrmgr.mscand select Users. - Right-click the account.
- Select Delete and confirm with Yes. To block sign-in without deleting, select Properties, tick Account is disabled, and select OK.
Deleting a local account here cannot be undone. A new account with the same name is a different account to Windows and will not regain access to the old one's files or settings.
Add or Remove a User from the Command Line
The command line works on every edition and is the fastest method if you manage several PCs. It creates local accounts only. This method needs administrator rights.
- Right-click the Start button and select Terminal (Admin). Approve the User Account Control prompt.
- To create the account, run the following command. Windows then prompts you for a password: [Verification Required: command text missing from source]Code
net user USERNAME * /addType the password when asked, then type it again to confirm. Nothing shows on screen as you type. The command prints The command completed successfully when it works.
- Make the account an administrator, if needed, with:Code
net localgroup Administrators USERNAME /add
To reverse the administrator change, run:
net localgroup Administrators USERNAME /deleteTo block sign-in without deleting the account, run:
net user USERNAME /active:noTo turn it back on, run net user USERNAME /active:yes.
To delete the account, run:
net user USERNAME /deleteThe profile folder stays on the disk.
If you see System error 5 has occurred. Access is denied, the terminal is not running as administrator. Close it and reopen it with Terminal (Admin). If you see The user name could not be found, check the spelling. Run net user with no other text to list all accounts on the PC.
Check Which Accounts Exist on the PC
Settings only lists the accounts you added, not built-in accounts or your own. [Verification Required: confirm this statement against Windows 11 behaviour before publishing] To see every local account, including disabled ones, open Terminal and run net user. The list shows account names only. Built-in accounts such as DefaultAccount and WDAGUtilityAccount are part of Windows. Do not delete them.
Delete Leftover Profile Folders
The netplwiz, Local Users and Groups, and command-line methods leave the old folder under C:\Users. Delete it when you no longer need the files, to free disk space.
- Open File Explorer and go to C:\Users.
- Right-click the folder named after the removed account and select Delete.
- Select Continue when Windows asks for administrator permission.
The folder moves to the Recycle Bin, so you can restore it until you empty it. If Windows says a file is in use, restart the PC and try again.
What to Do Next
If you deleted an account by mistake, check for a backup or File History copy first. Without one, Windows cannot recover the data from Settings. With the other methods, you can recover the files by copying them out of C:\Users\USERNAME. To set up a new person, create a fresh account and sign in once so Windows builds the profile. Then use Settings Accounts Other users > Change account type to give them the right access level.
How do I add a user account in 🪟 Windows 11?
Open Settings, select Accounts, then select Other users. Next to Add other user, select Add account. Enter the person's email address for a Microsoft account, or select "I don't have this person's sign-in information" and then "Add a user without a Microsoft account" to make a local account. You need an administrator account to do this.
How do I add other users to 🪟 Windows 10?
Open Settings, select Accounts, then select Family & other users. Under Other users, select Add someone else to this PC. Enter the person's Microsoft account email, or select "I don't have this person's sign-in information" and then "Add a user without a Microsoft account" to create a local account. You need an administrator account to make this change.
How do I remove a user from 🪟 Windows 10?
Back up the person's files first, because removing the account deletes them. Open Settings, select Accounts, then select Family & other users. Select the account, choose Remove, and confirm with Delete account and data. You need an administrator account to remove another user.
How do I manage user accounts on 🪟 Windows 11?
Open Settings, select Accounts, then select Other users to add, remove, or change accounts. Select an account to change its account type, such as Standard user or Administrator. Older tools, including netplwiz and Local Users and Groups, handle some tasks the Settings page cannot. You need an administrator account to make these changes.
Did this guide fix your problem?

About the Author
Richard
Tech Writer, IT Professional
Richard is a writer at Geek Rewind who turns complex IT tasks into clear, step-by-step guides. He draws on years of hands-on experience in system administration and enterprise IT operations, focusing on Windows, Linux and WordPress: the problems people actually run into, and the fixes that work. His server and WordPress guides come from systems he runs himself. Richard builds and maintains the platform behind Geek Rewind, from its Ubuntu servers and Nginx configuration to its custom WordPress plugins. Many new tutorials start with readers' questions, and he's always glad to answer them in the comments.
No comments yet — be the first to share your thoughts!