How to Rename User Profile Folder in Windows 11

Renaming a user profile folder in Windows 11 changes the folder name under 📁C:\
Fixing it takes a few careful steps in the Registry Editor and File Explorer . Simply typing a new name in File Explorer breaks your account, because Windows still looks for the old path. You need administrator rights to do this safely. The steps are the same on Windows 11 Home and Pro.
This changes only the folder name on disk. It does not change your account name, your display name, or your Microsoft account.
To rename a user profile folder in Windows 11, sign out, log in to an administrator account, and use Registry Editor to point the account’s ProfileImagePath to the new folder name under 📁C:\
Getting Ready to Rename
Do these things first. A mistake in the registry can lock you out of your profile, so a few minutes of preparation is worth it.
- Back up the files in your profile, or at least Documents, Desktop, Pictures, and Downloads, to an external drive or cloud storage.
- Create a restore point if System Protection is turned on for your drive. That gives you a way back if something goes wrong.
- Choose the new folder name now. Keep it short, with no spaces or special characters, and write it down exactly. You will type it several times.
- Save any open work and close your apps.
- Make sure you have a second administrator account. If you don’t, the next sections show how to create one.
Step 1Sign Out of Your Account
Windows can’t rename a profile folder while the account is signed in, because the folder is in use. So sign out of the account you want to rename first.
- Click the Start button.
- Click your user account picture or name.
- Choose Sign out.
You should now see the lock screen. Don’t sign back in to this account until the very end.
Step 2Log In to an Administrator Account
Sign in to a different account with administrator rights. You need its permissions to change the registry and rename another account's folder.
If you don't have a second admin account, create a temporary one. You can do this before you sign out, from your main account:
- Open Settings Accounts Other users
- Click Add account and follow the prompts. A local account is fine for this.
- Select the new account in the list and click Change account type.
- Set Account type to Administrator and click OK.
Then sign out of your main account and sign in to the temporary one. Delete the temporary account once your profile folder has been renamed and you have confirmed everything works. Remove it from Settings Accounts Other users If you already had another admin account, skip all of this and just use that one.
Step 3Open Windows Terminal
Next, you need to find your account's SID. Windows Terminal is the easiest way to do that.
- Right-click the Start button.
- Choose Windows Terminal (Admin). On some builds the entry is labeled Terminal (Admin).
- Click Yes if User Account Control asks for permission.
A dark terminal window opens. The title or tab usually says Windows PowerShell. Running it as administrator is what gives it the permissions it needs.
Step 4Find Your Account's Unique ID (SID)
A Security Identifier (SID) is a unique code Windows uses to tell user profiles apart. To see the SIDs of all local accounts, do this:
- In the terminal window, type powershell "Get-LocalUser | Select-Object -Property @('Name', 'SID')" and press Enter.
- Read the list that appears. It has two columns, Name and SID.
- Find the row with the username of the account you want to rename.
- Write down that SID exactly.
A SID is a long string of numbers and dashes, similar to S-1-5-21-.... You can also select the text in the terminal and press Ctrl + C to copy it, then paste it into Notepad to keep it handy.
If you edit the wrong profile in the registry, you can break a different account.
Editing the Windows Registry
Now you will edit the Windows Registry to tell Windows the new location of your user folder. The Registry Editor is a powerful tool and it doesn't ask you to confirm changes, so go slowly and change only the value described here.
Step 5Open Registry Editor
- Press Windows key + R to open the Run box.
- Type
regeditand press Enter. - Click Yes if a User Account Control window appears.
The Registry Editor opens, with a key tree on the left and values on the right.
Step 6Go to the List of User Profiles
You need the key where Windows stores its list of user profiles. Go to HKEY_LOCAL_MACHINE\SOFTWARE\Microsoft\Windows NT\CurrentVersion\ProfileList. You can expand each key in the left pane one by one, or paste that path into the address bar at the top of the Registry Editor and press Enter.
- Expand the
ProfileListkey. - Look at the subkeys under it. Each one is named after the SID of an account on your computer.
- Click the subkey that matches the SID you wrote down.
The right pane now shows the values for that profile.
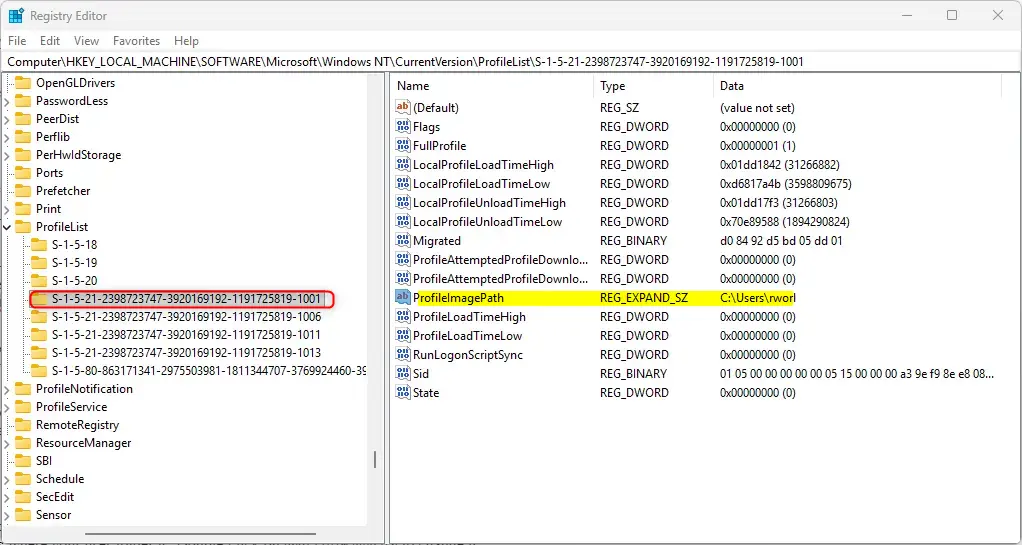
Look at the ProfileImagePath value in the right pane. It shows the current user folder path, like C:\Users\YourOldName. When the path ends with your old folder name, you have the right key. Some of the shorter SIDs belong to system accounts, so you can ignore those.
Step 7Change the Profile Path
With the correct SID key selected, look at the right pane. You should see an entry named ProfileImagePath. This tells Windows where your user folder is. Double-click ProfileImagePath to open it for editing.
Step 8Enter the New Folder Name
You are now going to change that path so it ends with your new folder name.
- In the Edit String window, find the Value data box.
- Replace only the old folder name at the end of the path with your new name. Type the full updated path, using a short name without spaces or special characters.
- Check the spelling carefully. It must match the name you will give the folder in File Explorer.
- Click OK to save.
The new path should now show in the Data column next to the value.
Important: Use a simple name without unusual characters. Remember the exact new name and its full path for the next steps. If you change your mind later, you can edit this value back to the old path, as long as you haven't renamed the folder yet.
Close the Registry Editor and Windows Terminal.
Renaming the Actual Folder
The registry now has the new path. Next, rename the folder on your computer so it matches. If the two don't match when you sign in, Windows can't load your profile and may sign you in with a temporary one.
Step 9Open File Explorer
Press Windows key + E to open File Explorer.
Step 10Go to the Users Folder
In File Explorer, go to the main folder where user profiles are kept. It's usually here: C:\Users
You should see a folder for each account on the PC, plus a few system folders such as Public.
Step 11Rename the Profile Folder
- Find the folder with your old user profile name.
- Click it once to select it.
- Click the Rename icon on the toolbar at the top, or right-click the folder and choose Rename.
The folder name becomes editable.
Step 12Enter the New Name
Now type the new name. It must match, letter for letter, the name you put in the registry path.
- Type the exact new name you chose earlier.
- Press Enter to confirm.
- Click Continue if Windows asks for administrator permission.
The folder now shows the new name in the list.
Tip: If you get an error saying the folder is in use, make sure you are signed out of the account you're renaming and logged in to an administrator account. If the error persists, restart the PC, sign in directly to the admin account, and try again before opening any other apps.
Creating a Shortcut (Optional but Recommended)
This next step is a bit more advanced, but it helps prevent problems. Some older programs may still look for your folder under the old name. A symbolic link, often called a symlink, works like a smart shortcut. It redirects requests for the old path to the new folder.
Step 13Open Command Prompt as Administrator
- Click the Start button and search for
cmd. - Right-click the result and select Run as administrator.
- Click Yes if User Account Control appears.
A Command Prompt window opens. Its title should say Administrator: Command Prompt.
Step 14Create the Symbolic Link
Create the link with the mklink command. Its format is mklink /d "C:\Users\YourOldFolderName" "C:\Users\YourNewFolderName". Replace the placeholder text with your actual old and new folder names. The first path is the link you are creating, which is the old name. The second path is the real folder, which is the new name.
For example, if your old folder was C:\Users\Richard2 and your new one is C:\Users\Richard3, the command would be: mklink /d "C:\Users\Richard2" "C:\Users\Richard3"
Press Enter. If it works, you will see a message saying the symbolic link was created. A new folder with a small shortcut arrow on its icon now appears in your C:\Users folder.
Warning: If you skip the symbolic link and later find that some apps can't find your files, reopen Command Prompt as administrator and create the link then.
Final Checks
You're almost done. First sign out of the admin account, then sign in to your renamed account. Windows should load your desktop and files as normal. If you see a message about a temporary profile, stop and check that the registry path and the folder name match exactly. Then do these last checks so everything works with the new folder name.
Step 15Check OneDrive Settings (If You Use It)
If you use OneDrive, check it after you sign in. Its folder paths may still point to the old profile name, which can cause syncing errors or missing files.
- Click the OneDrive cloud icon in the system tray.
- Click the gear icon, then choose Settings.
- Go to Settings Account Choose folders and check that your folders are listed and syncing.
If OneDrive still shows errors or points to the old path, go to Settings Account, click Unlink this PC, and sign in again. Your files in the cloud are not deleted by this.
Step 16Rebuild the Windows Search Index
After a rename, search can be slow or show outdated results because the index still lists the old file locations. Rebuilding the index fixes this.
- In the Start menu search, type
Indexing Optionsand open it. - Click the Advanced button.
- Under "Troubleshooting," click the Rebuild button.
- Click OK to confirm.
The window will show that indexing is in progress. This can take a while, depending on how many files you have, and your computer might feel a bit slower during this time. You can keep working while it runs.
Summary
To rename a user profile folder safely in Windows 11, sign in to a different administrator account, find your account's SID, update the ProfileImagePath value in the registry, rename the folder in File Explorer, and create a symbolic link from the old name to the new one. Then check OneDrive and rebuild the Windows search index so your apps and files work normally. Once you've confirmed everything works, delete any temporary admin account you created.
Have a question about this guide?
Answered by AI from this guide. Good questions may be added to this page — please don't include personal details.
Did this guide fix your problem?

About the Author
Richard
Tech Writer, IT Professional
Richard is a writer at Geek Rewind who turns complex IT tasks into clear, step-by-step guides. He draws on years of hands-on experience in system administration and enterprise IT operations, focusing on Windows, Linux and WordPress: the problems people actually run into, and the fixes that work. His server and WordPress guides come from systems he runs himself. Richard builds and maintains the platform behind Geek Rewind, from its Ubuntu servers and Nginx configuration to its custom WordPress plugins. Many new tutorials start with readers' questions, and he's always glad to answer them in the comments.
Unable to open the folders on This PC. Getting an error saying that the location is not available. How should I proceed?
Won’t allow the folder name change, says it’s in use.
Hi Chris,
you need to use an different account than this one which you want to rename. Use netplwiz.exe to create a new user with admin rights, log off the account you want to change and use the created one instead. The folder of the account you logged in with is always in use and cannot be edited
Devi riavviare il pc e eseguire il login come amministratore e riprovare. A me ha funzionato. Poi se usi oneDrive una volta fatto il login come utente apri l’app onedrive e imposta la nuova path utente.
For some reason in Windows 11, following this, while it works there are two problems.
One drive brings an error in each login that it cannot find the old folder.
I cannot pin anything to taskbar
Tried it in Windows 11, but search in settings is no longer working, cannot search anything in windows settings
That is totally correct, yet all these posts fail to mention that and now you are stuck!! A lot of these so called guru-charlatan just copy from one site some info, yet don’t have clue or never test this themselves.
Thank you very much. It works.
As soon as I did this in same order my windows icon did not work. I tried to go back and lost windows .. I tried to restore and nothing is working.. even I created another admin user before I started this and its not working either .. this is crazy !!
don’t do this on windows 11 if you’re logged in with a Microsoft account!!
I second that! These instructions will likely make some of your programs not work.
did not do the make a new account and i did it all in the account i want the folder to rename and now its stuck at preparing windows
Thanks for a great and straightforward set of instructions. That Microsoft would make it so hard to make such a simple change is mind-boggling. I guess there must be some security reason, but obfuscation has never been a useful security strategy!
This broke my windows – cannot open start menu and the windows 11 context menu broke.
Don’t know if its related to the account being a Microsoft account – but no other way to restore but to reinstall windows.
Honestly, don’t fucking do this.
You went into safe made, so you can undo the steps to rename back to the original name it was and you will be back to the same condition.
This worked for me, but later on none of the already installed apps can be updated/uninstalled as it looks at the path with the old name and errors out.
Not working. Rename option not enabled.
I keep getting the error: Cannot edit ProfileImagePath: Error writing the value’s new contents.
I’m logged out of my main account, logged into a local account I created. I opened command prompt with administrator access. Not really sure what I’m doing wrong here.
This article caused more damage than the problem I was trying to solve.
Maybe it works for some people, but if like me, your PC was preinstalled with Windows 11, then chances are your desktop and environment are actually romaing, and pointing to OneDrive directories.
So after going through all the steps.. creating an admin user in order to rename original user, logging back in as original user, and then opening explorer it complained that the Desktop folder didnt exist, every single time I opened it.
Luckily you can fix this. Open regedit, and navigate to..
HKEY_CURRENT_USER\Software\Microsoft\Windows\CurrentVersion\Explorer\Shell Folders
Now modify each value to replace each key where the value contains user1, and replace that bit with your new username