How to Enable the Hidden Administrator Account in Windows 11
The hidden Administrator account in Windows 11 gives you full power over your PC without standard limits.
This special account, known as a super-user, has the highest level of access to all your system files and settings. Windows 11 keeps it turned off by default to stop you from making accidental system changes.
You might need to turn on this account for advanced fixes or big system changes that your regular account can’t do. You can open it using the Command Prompt or Computer Management.
Open Command Prompt as administrator, type net user Administrator /active:yes, and press Enter. Then, set a password using net user Administrator your_strong_password. This enables the account for advanced system control.
What is the Built-in Administrator Account?
Windows 11 includes a special, hidden Administrator account. This account wields more power than your typical user account, allowing for significant system modifications.
How to Turn On the Hidden Administrator Account
The Command Prompt tool activates the hidden administrator account in Windows 11. Activating this special account is a straightforward process that grants extensive system control. Following specific commands in the Command Prompt unlocks this powerful administrative access.
Open Command Prompt as Administrator
- Click on the Start button (Windows icon) or press the Windows key.
- Type
cmdor Command Prompt. - Right-click on Command Prompt and choose Run as administrator. ⚠️ Admin privileges required
- If a security box pops up, click Yes to allow it.

Enable the Administrator Account
You can turn on the hidden Administrator account in Windows 11 using a specific command in Command Prompt. This special account gives you full control over your computer. It’s particularly handy for fixing serious issues when your normal account encounters problems.
net user Administrator /active:yes
If the command was successful, you’ll see a message similar to this:
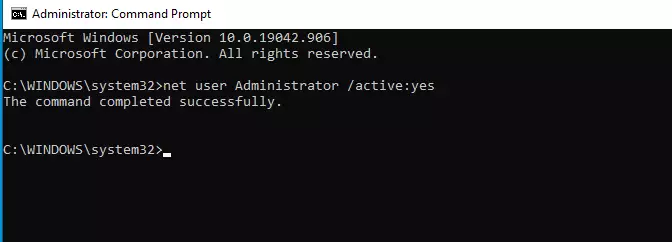
The Administrator account now functions. However, users cannot log into the Administrator account until a password is set, as the account currently lacks one.
Set a Password for the Administrator Account
Once enabled, the Administrator account in Windows 11 requires a strong password immediately. This is crucial because the account holds total control over your PC. A robust password will prevent unauthorized access and unwanted system changes.
In the same Command Prompt window, type this command but replace your_strong_password with a password you want to use (make it something strong and hard to guess):
net user Administrator your_strong_password
For example, if your password is MySecurePass123!, type:
net user Administrator MySecurePass123!
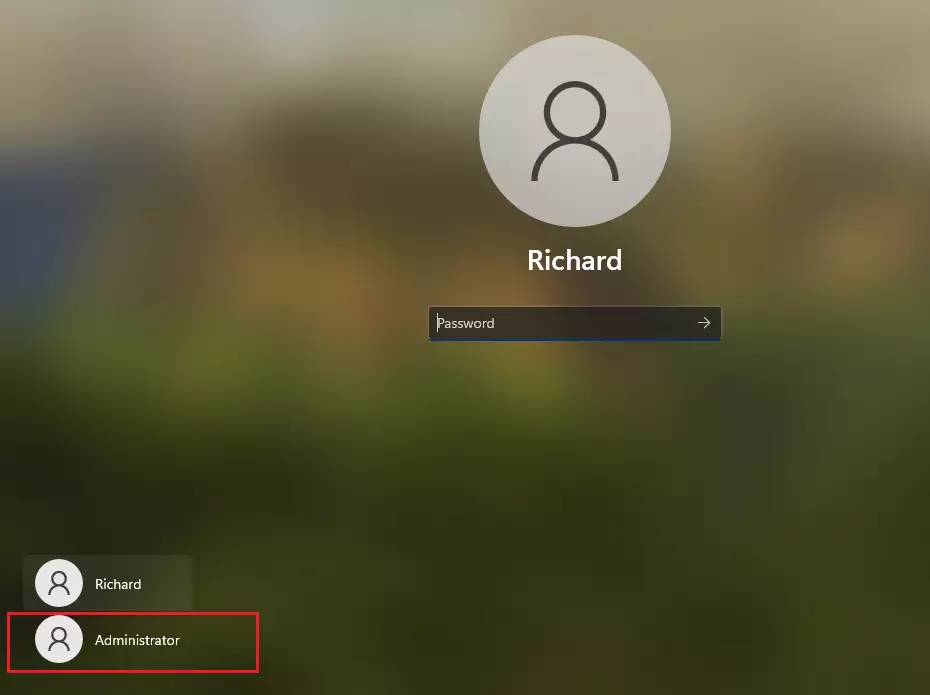
After this, you can log out of your current account and see the Administrator account as an option to sign in with your new password.
How to Turn Off the Administrator Account
It’s important to turn off the hidden Administrator account in Windows 11 once you’re finished using it. Disabling the Administrator account prevents accidental system changes and protects your PC from unauthorized access. Remember to disable the Administrator account when it’s no longer needed.
Open Command Prompt as administrator (refer to the steps above), then type this command and press Enter: ⚠️ Admin privileges required
net user Administrator /active:no
Summary
- The hidden Administrator account has full control of Windows 11.
- It’s useful if your main account stops working or you need to fix big problems.
- Always set a strong password when you turn it on.
- Be careful using this account — it can make big changes to your PC.
- Turn off the Administrator account when you don’t need it to keep your PC safe.
- If you want to learn more about Windows 11 tips and tricks, visit Microsoft Support for Windows.
The hidden Administrator account in Windows 11 grants full control over your PC. This account is useful for resolving significant issues or when your primary account malfunctions. Always assign a strong password to the hidden Administrator account and remember to turn off the hidden Administrator account after use to ensure system safety.
Was this guide helpful?

About the Author
Richard
Tech Writer, IT Professional
Richard, a writer for Geek Rewind, is a tech enthusiast who loves breaking down complex IT topics into simple, easy-to-understand ideas. With years of hands-on experience in system administration and enterprise IT operations, he’s developed a knack for offering practical tips and solutions. Richard aims to make technology more accessible and actionable. He's deeply committed to the Geek Rewind community, always ready to answer questions and engage in discussions.

No comments yet — be the first to share your thoughts!