How to Rename Folders in Windows 11

Renaming a folder in Windows 11 changes its label in File Explorer or on your desktop so you can find your files faster. You can do it in two clicks or by pressing the F2 key on your keyboard. The steps are the same on Windows 11 Home and Pro. This guide covers five ways to do it, from the keyboard shortcut to the command line.
Windows 11 restricts certain special characters in folder names, including the slash (/), backslash (\), colon (:), and question mark (?). The asterisk (*), double quote (“), less-than (<), greater-than (>) and pipe (|) are also blocked. If you type one, Windows shows an error that lists the characters you can’t use. Click OK or press Esc and try a different name.
Right-click the folder in File Explorer , select Rename, type the new name, and press Enter. Or select the folder, press F2, type the new name, and press Enter. Both methods work in Windows 11 Home and Pro.
1Rename Using Keyboard Shortcut
The F2 key is the fastest way to rename a folder in Windows 11. Select the folder in File Explorer , press F2, type the new name, and press Enter. You don’t need menus or the mouse beyond the first click.
You’ll need: File Explorer open on your computer.
- Find the folder you want to rename.
- Click the folder once to select it. It should be highlighted.
- Press the
F2key on your keyboard. The folder name becomes editable, and the current name is highlighted. - Type the new name for the folder. Your typing replaces the highlighted text.
- Press
Enter. The new name is saved and the folder moves to its new place in the sort order.
If pressing F2 does nothing on a laptop, your function keys may be set to control volume or brightness. Hold the Fn key and press F2, or use one of the other methods below.
To undo a rename, press Ctrl+Z straight after you make it, while File Explorer is still in focus. You can also just rename the folder again.
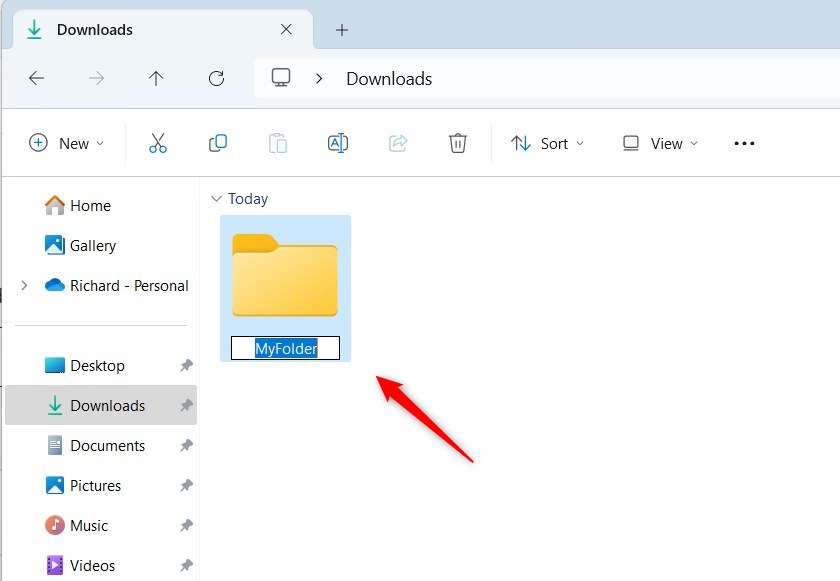
After you press Enter, the folder shows its new name. If the name is unchanged, check that you pressed Enter and didn't click elsewhere first.
2Rename With a Single Click
You can also rename a folder with a slow double-click. Click once to select the folder, pause for a second, then click the name a second time. The text becomes editable. Type the new name and press Enter.
The pause matters. If you click too fast, Windows treats it as a double-click and opens the folder instead. If that happens, go back to the parent folder and try again with a longer pause.
You'll need: File Explorer open on your computer.
- Click the folder you want to rename once to select it.
- Wait a second, then click the folder name text once more (slowly). The name becomes editable, with a box around the text.
- Type the new name.
- Press
Enter. The box closes and the folder shows its new name.
If you change your mind while the name is still editable, press Esc to keep the old name.
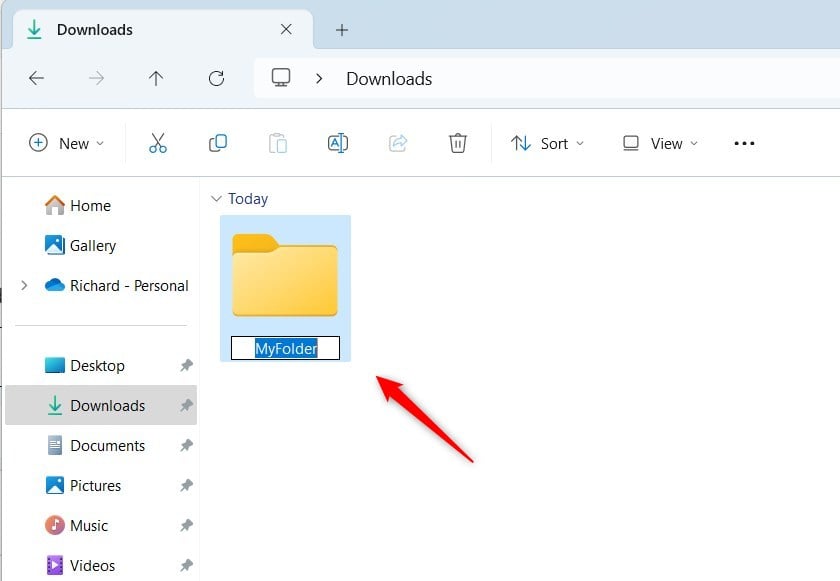
The folder name should now be updated in the file list. If you see the folder's contents instead, you double-clicked by mistake.
3Rename Using File Explorer Command Bar
Why use this method? The command bar at the top of File Explorer gives you a clear Rename button, so you don't need to remember a shortcut or a click timing.
You'll need: File Explorer open on your computer.
- Select the folder you want to rename by clicking it once.
- Click the Rename button on the top command bar. In Windows 11 it is an icon with no text label. If you aren't sure which one it is, hover over the icons until the tooltip says Rename. The folder name becomes editable.
- Type the new folder name.
- Press
Enter. The folder shows its new name.
Some system folders can't be renamed, and a folder that another program is using may also refuse. Close the program that has it open and try again.
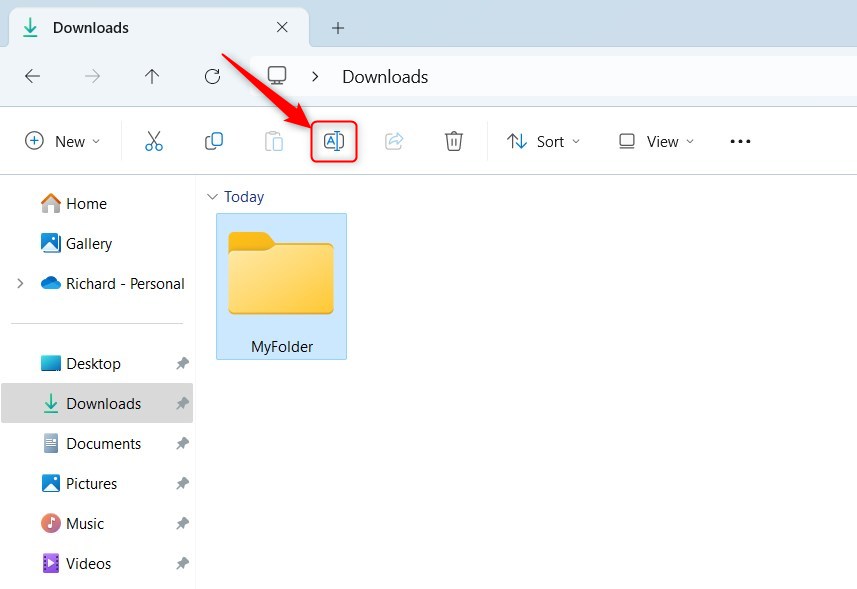
The name is now editable in the file list, and the new name appears once you confirm it.
4Rename Using Right-Click Menu
The right-click context menu in File Explorer is the traditional way to rename a folder. Right-click the folder, choose Rename, type the new name, and press Enter. It is reliable and easy to remember.
- Open File Explorer.
- Right-click on the folder you want to rename. A context menu appears.
- Click Rename from the menu. In the compact Windows 11 menu, Rename may appear as an icon in the row at the top rather than as a word in the list. Hover over it to confirm. The folder name becomes editable.
- Type the new name.
- Press
Enter. The folder shows its new name.
SHIFT key while right-clicking to bring up the complete menu immediately.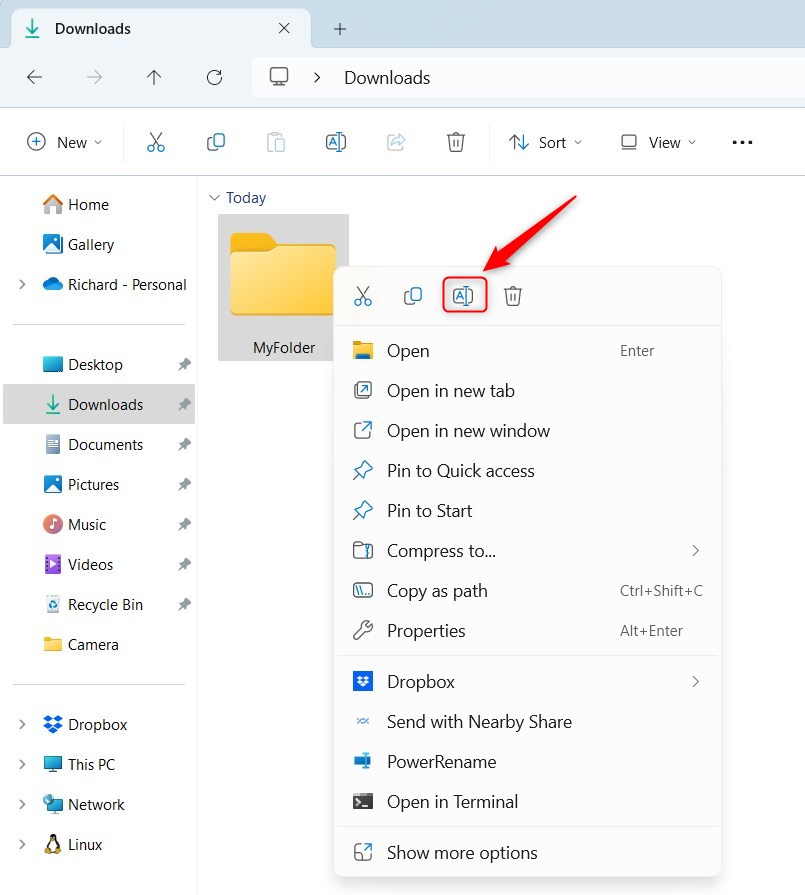
If you used the full menu, Rename sits in the list below the copy and paste entries. Either way, the result is the same.
5Rename Using PowerShell (for advanced users)
PowerShell is useful when you want to rename several folders or automate file management. You run the Rename-Item command with the folder's current path and the new name, and PowerShell does the rest. For a single folder, one of the methods above is quicker.
What happens: You type a command. PowerShell renames the folder for you.
⚠️ Admin privileges required
Open the terminal as administrator. For folders in a protected location, such as one under Program Files, a normal window will fail with an access denied error. For folders inside your own user profile, a normal window usually works.
- Open Windows Terminal and select the PowerShell tab. To run as administrator, right-click the Terminal entry in the Start menu and choose Run as administrator. If a User Account Control prompt appears, click Yes.
- Type the following command. Replace the text in quotes with your folder's full path and the new name you want. The new name is just a name, not a full path. Keep the quotes, which let the command handle spaces in folder names.
Rename-Item -Path "FullPathToFolder" -NewName "NewFolderName" -ForceExample:
Rename folders in Windows 11 using Command Prompt. After opening Command Prompt, use the `ren` command, stating the folder current location and the new name. This Command Prompt method offers precise control over folder renaming operations.
Press Enter to run the command. If it works, PowerShell returns to the prompt without a message. If you see an error, check the path for typos and make sure the folder isn't open in another program.
What happens: You type a command. Command Prompt renames the folder for you.
⚠️ Admin privileges required
The same rule applies here. Use an administrator window for protected locations.
- Open Windows Terminal with the Command Prompt tab. Run it as administrator in the same way as above if you need to.
- Type the command below. Replace the folder path and new name with yours. Again, the new name is only a name, not a full path, and you should put quotes around anything with spaces.
ren "FullPathToMyFolder" "NewFolderName"Example:
ren "C:\Users\UserName\Downloads\MyFolder" "FolderNewName"Press Enter to run it. Command Prompt returns to the prompt with no message if the rename worked. Open File Explorer to confirm the new name. To undo it, run the same command again with the names swapped.
Summary
You can rename folders in Windows 11 using several different methods depending on what feels most natural to you. Whether you prefer pressing the F2 keyboard shortcut, using a slow mouse click, right-clicking for the menu, or running batch commands in PowerShell, keeping your files organized is quick and simple.- Renaming folders helps keep your files organized and easy to find.
- You can rename folders by pressing
F2, clicking twice slowly, using the command bar, or using the right-click menu. - Advanced users can rename folders using PowerShell or Command Prompt. Both require admin privileges.
- Remember not to use these characters in folder names:
/:*?"<>| - Organizing folders well makes your computer easier to use and keeps things tidy.
- Now you know several easy ways to rename your folders in Windows 11!
Did this guide fix your problem?

About the Author
Richard
Tech Writer, IT Professional
Richard is a writer at Geek Rewind who turns complex IT tasks into clear, step-by-step guides. He draws on years of hands-on experience in system administration and enterprise IT operations, focusing on Windows, Linux and WordPress: the problems people actually run into, and the fixes that work. His server and WordPress guides come from systems he runs himself. Richard builds and maintains the platform behind Geek Rewind, from its Ubuntu servers and Nginx configuration to its custom WordPress plugins. Many new tutorials start with readers' questions, and he's always glad to answer them in the comments.
No comments yet — be the first to share your thoughts!