What Happens When You Disable Printer Discovery in Windows 11

- 39 steps
- Needs administrator rights
Disabling Network discovery in Windows 11 stops your PC from finding network printers automatically, but printers you’ve already set up will usually keep working. Windows 11 doesn’t have a separate “printer discovery” setting — it uses Network discovery (the same setting that lets your PC find other devices on your local network) to locate printers.
When you turn off Network discovery, Windows stops scanning for new printers on the network, but it won’t disconnect printers you’ve already installed. Some printer functions may stop working depending on the type of printer and how it communicates with your PC.
This guide walks you through what stops working and what doesn’t, how to turn off Network discovery, how to check the change took effect, and how to turn it back on if you change your mind.
Disabling Network discovery in Windows 11 stops Windows from finding network printers automatically when you select Add device in Settings Bluetooth & devices Printers & scanners. Printers you have already installed usually keep working, but WSD-port printers may go offline, and other PCs cannot see printers you share. USB and Bluetooth printers are unaffected.
What Printer Discovery Means in 🪟 Windows 11
When you open Settings Bluetooth & devices Printers & scanners and select Add device, Windows scans the network for printers. It listens for devices that announce themselves using protocols like WSD (Web Services on Devices, a Microsoft protocol for finding printers and scanners) and mDNS (multicast DNS, used by many wireless printers for name lookup). It also uses SSDP (Simple Service Discovery Protocol—a broadcast message asking ‘who is on this network’).
The Network discovery setting controls whether your PC takes part in that conversation. It also controls the Windows Defender Firewall rules that allow the traffic. Turn it off and your PC stops asking for devices and stops answering when others ask for it.
What Happens When You Disable It
What stops working
- Add device finds no network printers. The scan in Printers & scanners returns nothing for printers that are only reachable over Wi-Fi or Ethernet. You see the spinner, then nothing useful.
- The Network folder is empty or shows a warning. In File Explorer, Network shows a banner saying network discovery and file sharing are turned off, and other computers and devices are not visible.
- Other PCs cannot see your PC. If you share a printer from this computer, people on the network no longer see it when they browse. They cannot find it in their Add device scan either.
- Printers installed on a WSD port can go offline. A WSD port relies on discovery to locate the printer again, especially if the printer’s IP address changes. If a printer starts showing as Offline after you turn discovery off, this is the likely cause. The fix is in the section on switching to a Standard TCP/IP port below.
- Network scanning can fail. Scanners that use WSD, including the Windows Scan app with some models, depend on the same discovery. Manufacturer scan utilities often use their own method, so results vary by model.
What keeps working
- USB printers. They do not use the network at all.
- Bluetooth printers. Bluetooth pairing is separate from network discovery.
- Printers installed on a Standard TCP/IP port. These talk to a fixed IP address or hostname, so they do not need discovery.
- Connecting to a shared printer by name. If the PC hosting the printer has File and printer sharing turned on, you can connect with a path such as
\\COMPUTER-NAME\PrinterName. The path works because you supply the location yourself. The host PC just does not appear when you browse. - Adding a printer manually. Entering an IP address or hostname does not need discovery.
What does not change
Turning off discovery does not turn off sharing, so a printer you share stays shared. People who know the path can still reach it. If you want to stop others from using your shared printer, you have to turn off sharing for that printer too.
Check Your Network Profile First
Network discovery is set per network profile. Windows keeps one set of options for Private networks, one for Public networks, and a third group labelled All networks. If your PC is joined to a domain (a corporate network managed by an administrator), a domain profile can also apply. Turn off discovery on the wrong profile and nothing changes for the network you are on.
Public networks have discovery off by default. So on a Public profile, you may already be in the state this article describes.
- Open Settings and select Network & internet.
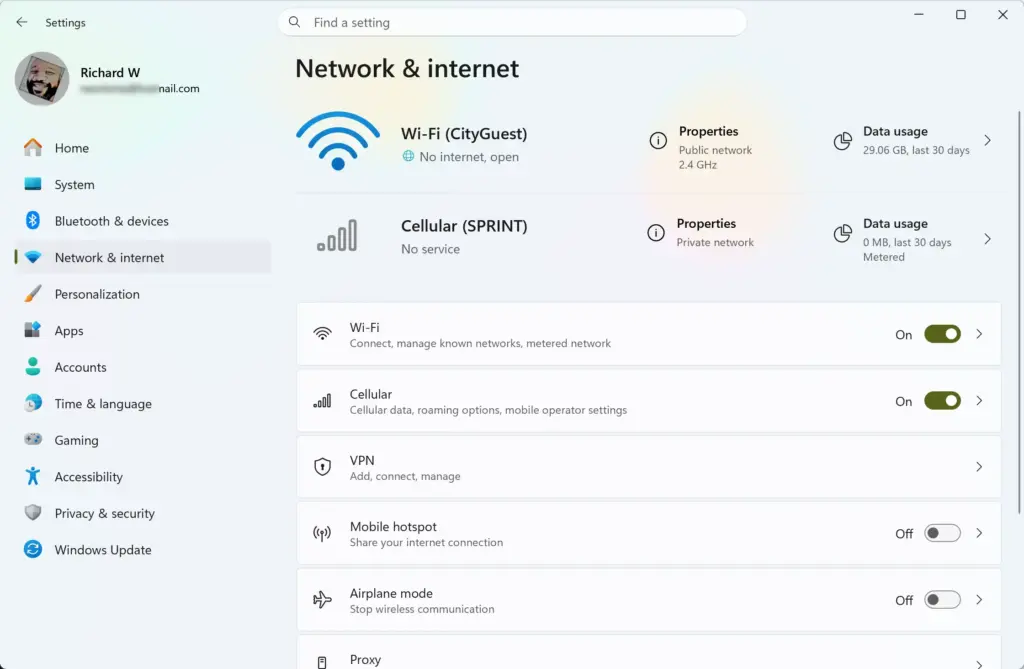
Settings › Network & internet - Select Wi-Fi or Ethernet, depending on how you connect.
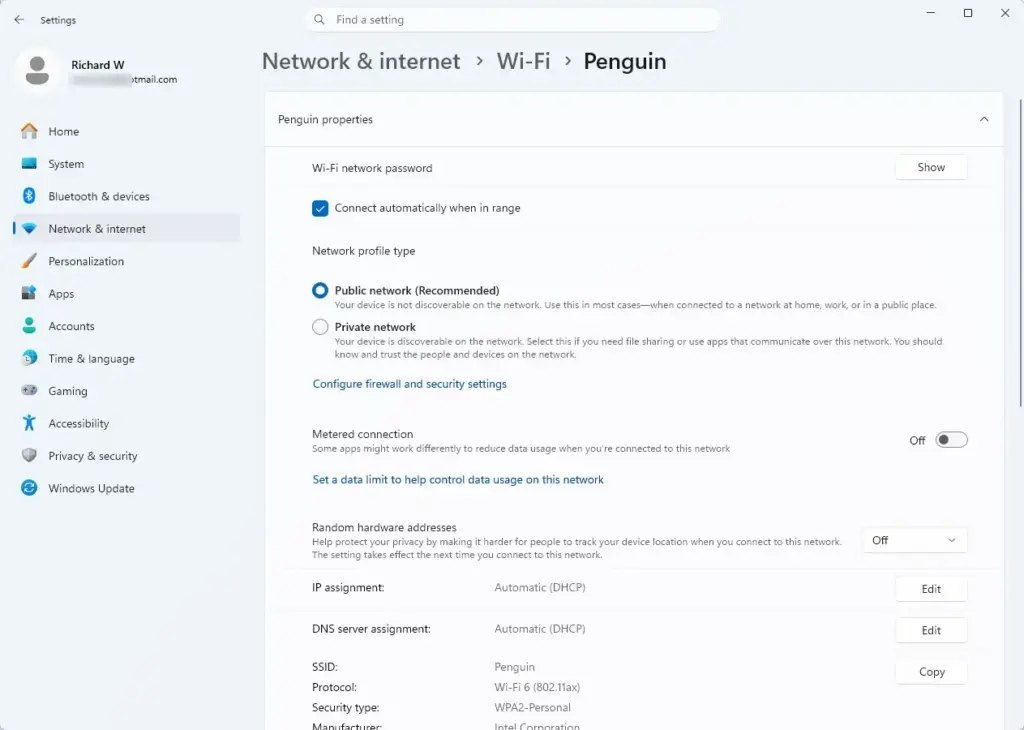
- Select the properties of your connection. For Wi-Fi , this is the network name under Wi-Fi , or Manage known networks for a saved one.
- Read Network profile type. It shows Public network or Private network.
Settings > Network & internet > Airplane mode
Note which one is selected. You need that when you choose which section to change in the next part.
How to Turn Off Network Discovery
This step needs administrator permission. If you use a standard account, Windows asks for an administrator’s password when you save the change. The steps below are for Windows 11. The page layout is the same in Home and Pro.
- Open Settings and select Network & internet.
- Scroll down and select Advanced network settings. You now see your network adapters and a list of related settings.
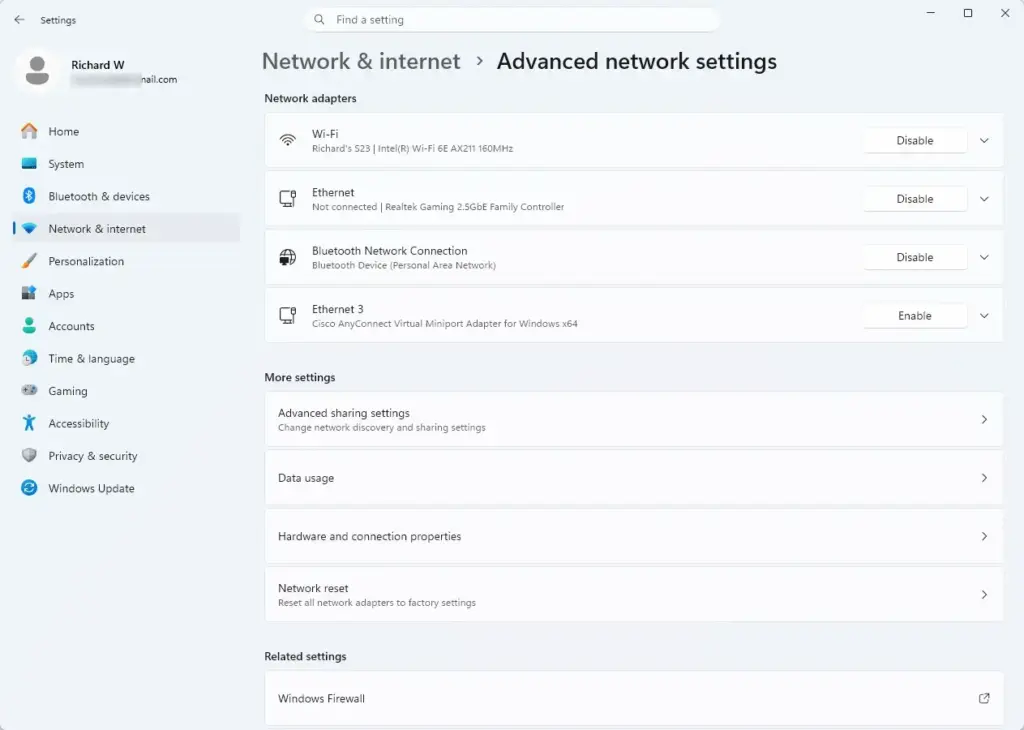
Settings › Network & internet › Advanced network settings - Under More settings, select Advanced sharing settings. The page shows expandable sections for Private networks, Public networks and All networks.
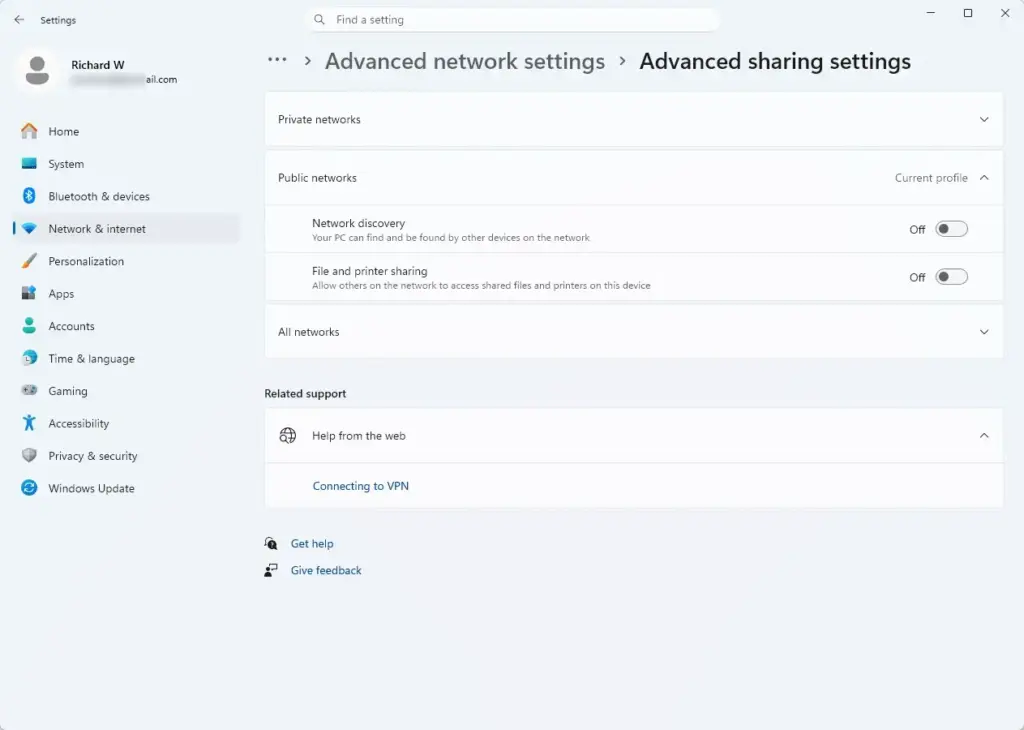
Settings › Network & internet › Advanced network settings › Advanced sharing settings - Expand the section that matches your current profile. For most home and office networks, this is Private networks.
- Set Network discovery to Off. In the Private section there is also a checkbox called Set up network connected devices automatically. This checkbox only matters when discovery is on, so you can ignore it.
- If Windows shows a User Account Control prompt, select Yes or enter administrator credentials. This confirms the change.
The toggle now reads Off. You do not need to restart. Windows applies the change straight away.
If the toggle will not stay off, or the option is missing
- It switches back to On. A work or school device can have the setting enforced by an administrator through policy. Your IT team has to change it. If you manage the PC yourself, check that you are editing the profile your connection is actually using (see the previous section).
- The toggle is greyed out. You usually need to be signed in as an administrator, or approve the prompt, for the page to let you change it. Sign in with an administrator account and try again.
- Windows shows a message that it could not change the setting. Make sure the dependent services are running. See the next section.
Check That It Took Effect
This confirms discovery is off, so you are not guessing when a printer behaves differently.
- Open File Explorer and select Network in the left pane.
- Look for a yellow banner that says network discovery and file sharing are turned off. If you see it, discovery is off for your current profile.
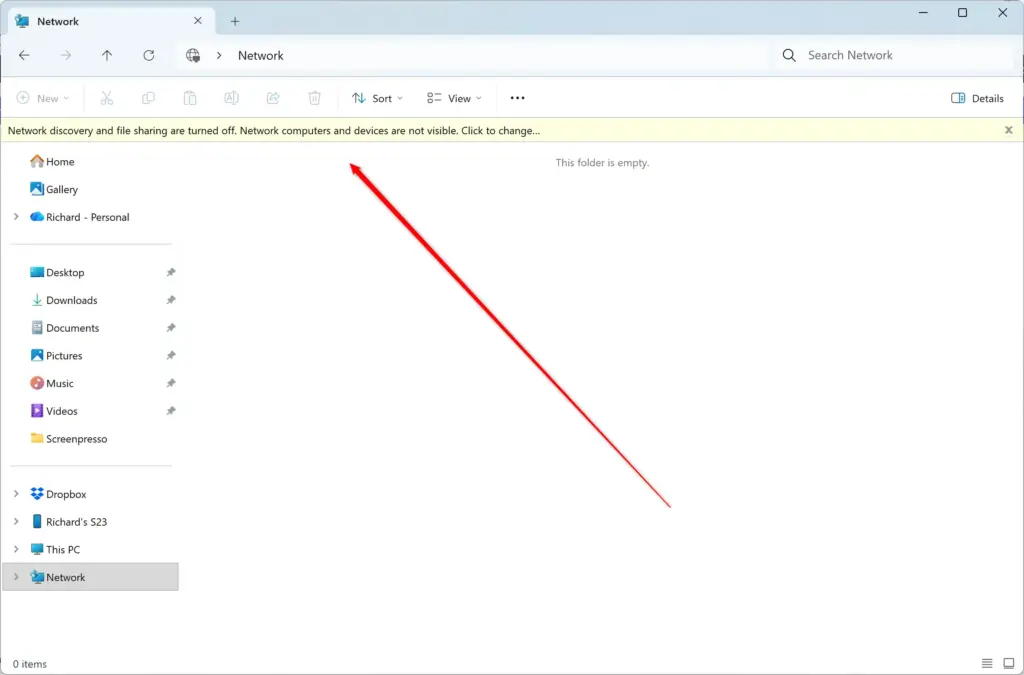
File Explorer - Open Settings Bluetooth & devices Printers & scanners and select Add device. A network printer that was found before should no longer appear.
If you see the banner, the change worked. If the banner does not appear and Windows still finds printers, you changed the wrong profile or a policy is overriding your choice.
Services Behind Discovery
Three Windows services handle discovery: Function Discovery Resource Publication, SSDP Discovery and UPnP Device Host. You do not have to touch them to turn discovery off. They matter if you turn discovery back on and it will not stay on. If someone disabled these services, the setting fails or reverts.
To check them, you need administrator rights.
- Press Win+R, type
services.msc, and press Enter. The Services window opens. - Find Function Discovery Resource Publication, SSDP Discovery and UPnP Device Host in the list.
- Double-click one. Check Startup type. If it says Disabled, change it to Manual and select Apply.
- Select Start if the service is not running, then select OK.
- Repeat for the other two services.
Do not disable these services to “make sure” discovery stays off. Other Windows features use them, and the Network discovery toggle already does the job.
Keep a Network Printer Working With Discovery Off
Moving it to a Standard TCP/IP port ties it to a fixed address. First, give the printer a fixed IP address or a DHCP reservation—a router setting that always assigns the same address to the same device. Otherwise the address can change and the port stops working. The printer’s own menu or your router’s admin page is where you set this. The method varies by brand, so check the printer’s manual.
Add a printer by IP address
Use this to add a network printer without any discovery.
- Open Settings Bluetooth & devices Printers & scanners.
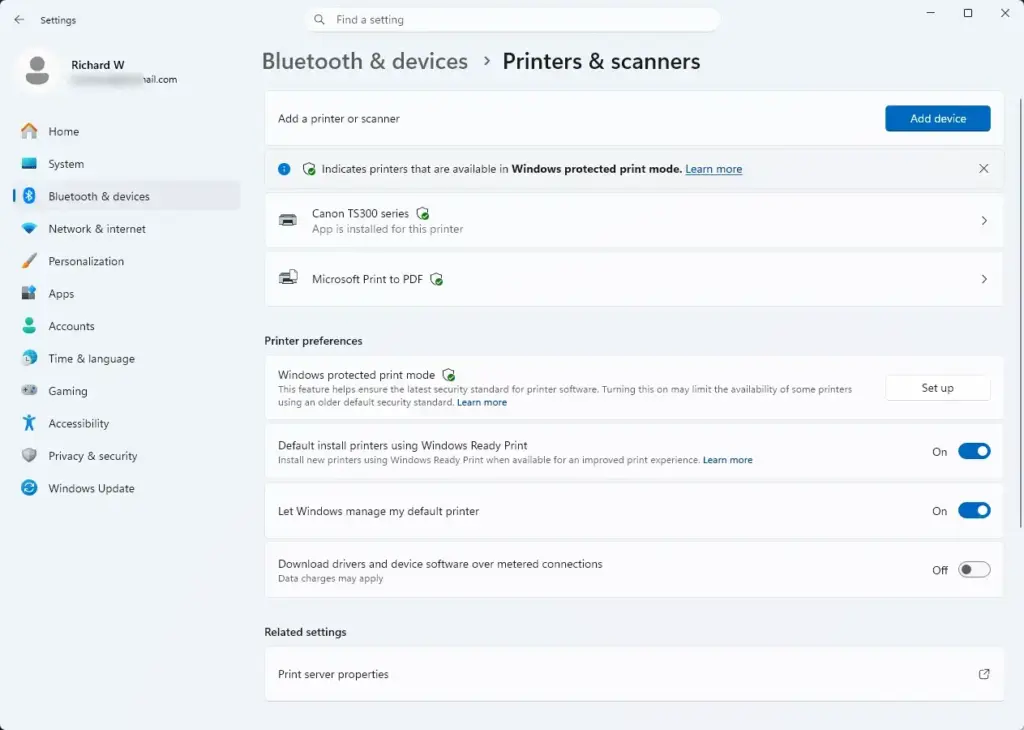
Settings › Bluetooth › Printers - Select Add device. Wait for the scan to finish. With discovery off, it will probably find nothing.
- Select Add manually. On some builds, the link reads The printer that I want isn't listed. The Add Printer window opens.
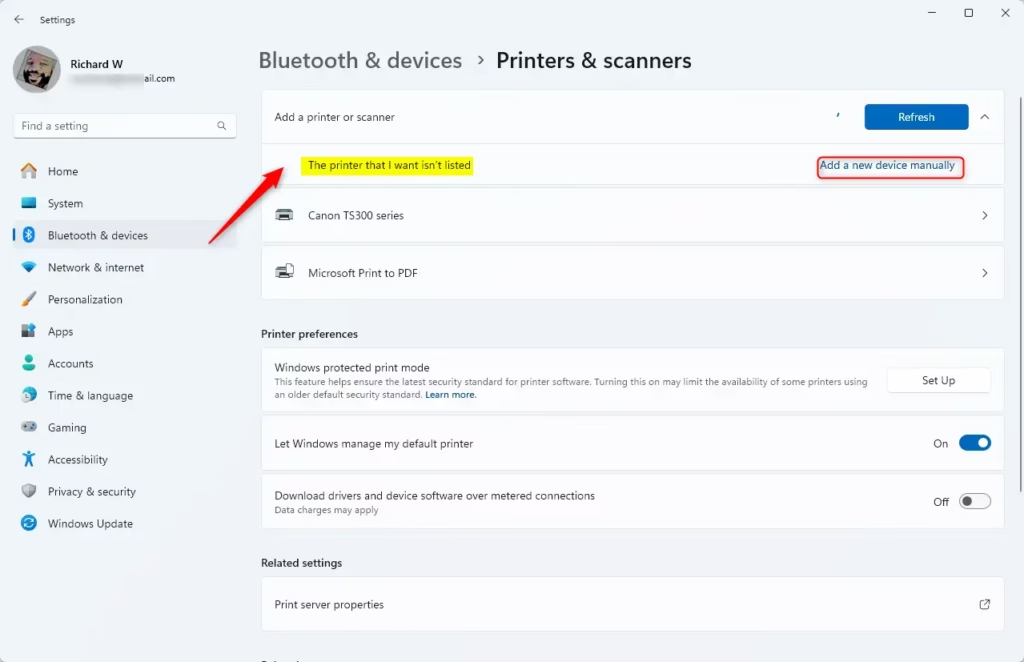
- Select Add a printer using an IP address or hostname, then select Next.
- Set Device type to TCP/IP Device. Autodetect also works.
- Enter the printer's address in Hostname or IP address, for example
192.0.2.10. Leave Query the printer and automatically select the driver to use ticked, then select Next. - Follow the prompts to pick or install the driver, then finish the wizard. The printer appears in the Printers & scanners list.
If Windows says it cannot connect, check that the printer is on and on the same network. Then confirm the address is correct. You can find it on the printer's network settings page or in a test page it prints.
Move an existing WSD printer to a TCP/IP port
Use this if a printer you already installed shows Offline now that discovery is off.
- Open Settings Bluetooth & devices Printers & scanners.
- Select the printer, then select Printer properties.
- Open the Ports tab. The port in use, such as one beginning with WSD, is ticked.
- Select Add Port, choose Standard TCP/IP Port, then select New Port.
- Enter the printer's IP address, for example
192.0.2.10, and follow the wizard. - Back on the Ports tab, confirm the new port is ticked. Select Apply, then OK.
Print a test page to confirm. The printer should no longer show as Offline. If it does, the address in the port is wrong, or the printer's address changed.
Connect to a Shared Printer With Discovery Off
This applies if another PC shares the printer and you cannot browse to it. You need the host's name and the printer's share name. Ask whoever manages the host PC, or find them in the printer's sharing tab on the host.
- Press Windows + R, type
\\COMPUTER-NAME\PrinterName, replacing both with the real names, and press Enter. - If Windows asks for credentials, enter an account that exists on the host PC.
- Double-click the printer in the window that opens. Windows installs it and any needed driver.
If you see an access or network path error, File and printer sharing is probably off on the host. It can also mean the firewall is blocking the connection, or the account you entered has no permission on the host. Other causes are outside what this article covers.
Why You Might Disable It
Typical reasons are reducing broadcast traffic on a shared network, keeping a laptop from appearing to other devices on a café or hotel Wi-Fi, or following a security baseline that asks for it. Those are valid. The cost is losing automatic printer finding on that profile. If you print mainly to one or two known printers, a fixed IP address and a TCP/IP port give you most of the convenience back.
How to Undo It
To turn discovery back on, you need administrator permission.
- Open Settings Network & internet Advanced network settings Advanced sharing settings.
- Expand the profile that matches your connection, usually Private networks.
- Set Network discovery to On.
- Tick Set up network connected devices automatically if you want Windows to configure printers and similar devices itself.
- Approve the User Account Control prompt if it appears.
The Network folder banner disappears, and Add device starts finding network printers again. If it does not, close and reopen Settings, then run the scan again. If discovery will not stay on, check the three services in the services section above.
What to do next
If a printer is still offline or missing after you change this setting, work through the printer-specific checks: its power, its network connection, its driver and the Print Spooler service. If you want to stop others from using a printer you share, turn off sharing for that printer in its Printer properties on the Sharing tab. Discovery does not control that. To reverse everything, turn Network discovery back on and remove any manually added printers you no longer need.
Frequently asked questions
How do I turn off network discovery and file sharing?
Open Settings Network & internet Advanced network options Advanced sharing options. Under your network profile, turn off Network discovery and file and printer sharing. Select Save changes. This stops Windows from broadcasting your PC on the local network.
How to remove default printer 🪟 Windows 11?
Open Settings Bluetooth & devices Printers & scanners. Find the printer you want to remove, click it, then select Remove. Windows stops sending print jobs to that printer, but it doesn't uninstall the driver.
How do I add a printer to a computer on a network?
Open Settings Bluetooth & devices Printers & scanners Add device. Windows scans for network printers. When you see yours, click Add device. If it doesn't appear, enter the printer's IP address manually or use the printer's setup software.
How to block printer access in 🪟 Windows 11?
Turn off Network discovery in Settings Network & internet Advanced network options Advanced sharing options under your profile. This stops other PCs from finding shared printers on your computer, but doesn't block access from already-connected devices.
Still have a question?
Answered by AI from this guide. Good questions may be added to this page — please don't include personal details.
Did this guide fix your problem?

About the Author
Richard
Tech Writer, IT Professional
Richard is a writer at Geek Rewind who turns complex IT tasks into clear, step-by-step guides. He draws on years of hands-on experience in system administration and enterprise IT operations, focusing on Windows, Linux and WordPress: the problems people actually run into, and the fixes that work. His server and WordPress guides come from systems he runs himself. Richard builds and maintains the platform behind Geek Rewind, from its Ubuntu servers and Nginx configuration to its custom WordPress plugins. Many new tutorials start with readers' questions, and he's always glad to answer them in the comments.
No comments yet — be the first to share your thoughts!