How to Locate and Open Downloaded Files on This Computer in Windows 11

The Downloads folder in Windows 11 saves every file, photo, and app installer you download from the web by default. It is usually located at 📁C:\
This guide shows where Windows puts downloads, how to change that location in Chrome, Firefox, and Edge, how to move the whole Downloads folder to another drive, and what to check when a downloaded file will not open.
Open File Explorer and click Downloads in the left sidebar, or press Win+R, type shell:Downloads, and press Enter. Your downloaded files appear in 📁C:\
Where Windows Stores Downloaded Files by Default
Windows saves downloads to your personal user folder by default. The quickest way in is to open File Explorer and click Downloads in the left-hand navigation pane. Every new file you save from the internet goes to this folder unless you pick a different spot, or your browser is set to use another one (covered below).
If the shortcut is missing from the sidebar, you can walk to the folder yourself. These steps open downloads on this computer from File Explorer , one folder at a time:
- Open File Explorer . Click its icon on the taskbar , or press the Win+E. A File Explorer window opens, showing either Home or Quick access, depending on your Windows 11 version.
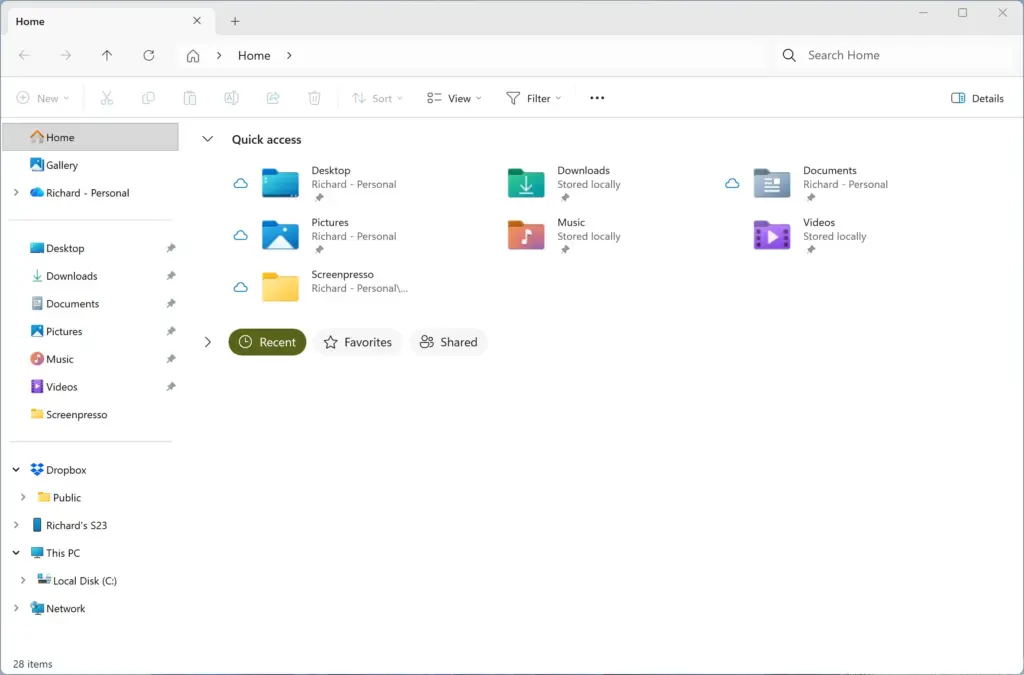
- Select This PC in the left-hand navigation pane. Your drives and standard folders appear on the right.
- Double-click your main operating system drive. It is usually labeled OS (C:).
- Open the Users folder. You will see one folder for each account on the PC.
- Open the folder that matches your account username. This is the same name that appears in the path 📁C:\
Users\ .USERNAME\ Downloads - Open the Downloads folder. Everything downloaded under your user account is listed here.
- Sort the files by date if the list looks jumbled. Right-click an empty area and choose Sort by > Date modified. The newest files move to the top.
There is also a faster route. Press the Win+R to open the Run dialog box, type shell:Downloads, and press Enter. The Downloads folder opens directly, even if you have moved it to another drive.
How to Change Where Your Web Browser Saves Files
Web browsers override the system default and manage their own download destination. That means a file you just downloaded may not be in the Windows Downloads folder at all. If you cannot find it, check the browser’s own setting first. You can also change the setting so files land where you want them automatically. The changes below affect new downloads only. Files you already downloaded stay where they are.
Changing Google Chrome Download Locations
Google Chrome lets you change where downloads are saved, so you do not have to dig through your main drive. You can also tell Chrome to ask you where to save every file before it starts downloading. The wording below matches current Chrome versions on Windows 11.
- Open Google Chrome. Then click the three vertical dots in the top-right corner to open the menu.
- Select Settings from the drop-down menu. A Settings tab opens.
- Click Downloads in the left-hand sidebar. The current save path appears under the Location heading.
- Select the Change button next to the current file path. A folder picker opens.
- Browse to the folder where you want your files saved and select it.
- Click Select Folder. The new path now shows under Location.
- Turn on the switch for Ask where to save each file before downloading. Do this only if you prefer to choose a destination every time.
To undo the change, repeat the steps and point Chrome back to your original Downloads folder. Files you already downloaded stay where they are.
Changing Mozilla Firefox Download Locations
Mozilla Firefox lets you pick a custom folder for all downloads instead of using the default system directory. The option is in the General settings. Putting everything in one folder keeps your incoming documents and programs easy to find.
- Open Mozilla Firefox. Then click the three horizontal lines in the top-right corner to open the menu.
- Select Settings. The settings page opens in a new tab.
- Scroll down the General panel to the Files and Applications section.
- Click the Browse button under the Downloads heading. It sits next to the Save files to field, and a folder picker opens.
- Choose your preferred folder and click Select Folder. The Save files to field now shows the new path.
- Select the radio button labeled Always ask you where to save files. Do this only if you want full manual control over every download.
To go back, click Browse again and choose your original Downloads folder.
Changing Microsoft Edge Download Locations
Microsoft Edge also lets you change where downloads go. You can point it to any drive or folder on your system. Edge is built on the same engine as Chrome, so the steps look similar.
- Open Microsoft Edge. Then click the three horizontal dots in the top-right corner to open the menu.
- Select Settings. A Settings tab opens.
- Click Downloads in the left-hand navigation column. The current save path appears on the page.
- Click the Change button next to the current file path. A folder picker opens.
- Navigate to your new preferred folder and click Select Folder. The new path appears on the Downloads page.
- Turn on the toggle for Ask what to do with each download. Do this if you want a prompt every time you start a download.
If you work on a PC managed by your employer or school, these options may be greyed out or locked because an administrator has set a policy for the browser. In that case, ask your IT department.
Moving Your System Downloads Folder to Another Drive
Moving the Downloads folder to a second drive frees up space on your main operating system drive. It does not break how Windows finds your files, because Windows and most apps keep using the Downloads folder by name. You do this from the folder's properties window, using the Location tab.
- Open File Explorer. Then click Quick access or Home to see your user folders.
- Right-click the Downloads folder and select Properties. The Downloads Properties window opens.
- Click the Location tab at the top of the properties window. The tab shows the current path of the folder.
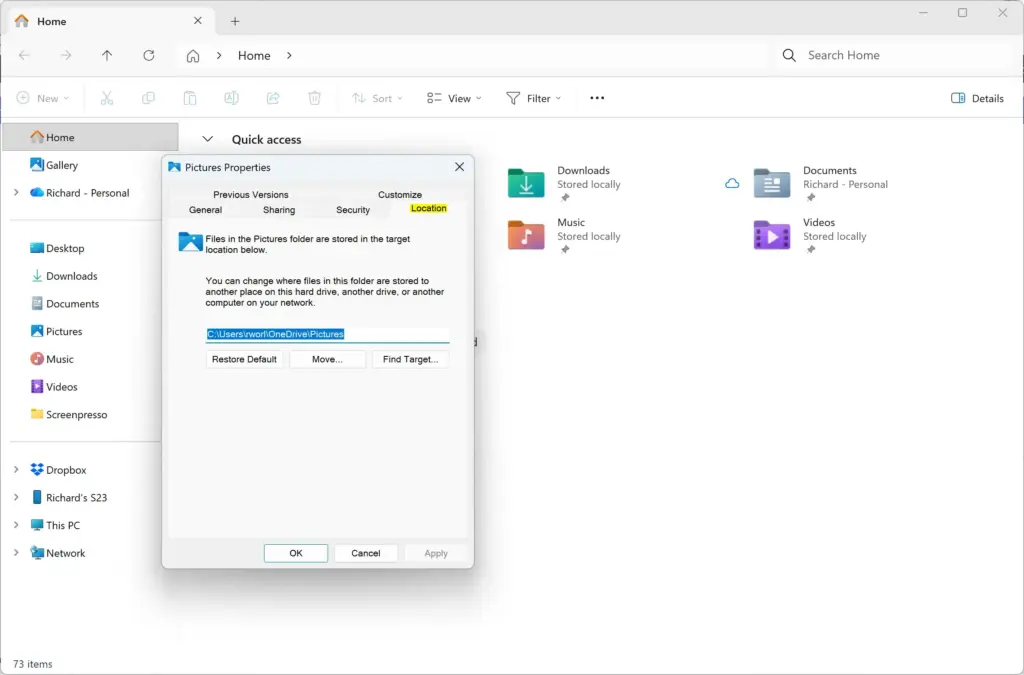
- Click the Move... button. A folder picker opens.
- Browse to the new location on your secondary drive. Create a new folder named Downloads there if one does not already exist.
- Select the folder and click Select Folder. The new path now shows on the Location tab.
- Click Apply at the bottom of the properties window. Windows asks whether to move your existing files to the new location.
- Click Yes to move all existing files. Large folders can take a while, so wait for the progress window to close.
If it is removed or fails, Windows cannot reach your Downloads folder. To undo the move, open the same Location tab and click Restore Default, then click Apply and move the files back when asked. No restart is needed in either direction.
Troubleshooting Missing or Blocked Downloads
Files sometimes fail to complete, or Windows or your browser blocks them for security reasons. Use the steps below if a downloaded file vanishes or refuses to open.
Unblocking Downloaded Files Flagged by Windows Security
Windows blocks some downloaded files from running if they came from another computer and it cannot vouch for them. You can fix this from the file's properties window. Look for the security note at the bottom of the General tab and select the Unblock box. Only do this for files from a source you trust.
- Open File Explorer. Then locate the downloaded file that will not run.
- Right-click the file and select Properties. The properties window opens on the General tab.
- Look at the bottom of the General tab for a security section. A blocked file shows this note: "This file came from another computer and might be blocked to help protect this computer."
- Check the box labeled Unblock if it is present. If there is no such note, the file is not blocked this way and the problem lies elsewhere.
- Click Apply, then click OK. Try running the file again.
Checking Browser Download History for Blocked Files
Browsers often hide or block downloads they think are unsafe. To check, open your browser's download history by pressing Control and J on your keyboard at the same time. This shows whether the file was flagged or blocked by the browser's security filters. The shortcut works in Chrome and Edge.
- Open Chrome or Edge, whichever browser you used for the download.
- Press Ctrl + J. The Downloads manager page opens.
- Find the file in question. A flagged file shows a warning such as "Infected with malware" or "Blocked: Potentially dangerous."
- Click the options menu next to the blocked file. Select Keep dangerous file or Recover file only if you trust the source.
If you are not sure about the source, leave the file blocked and download it again from the publisher's official site.
Cleaning Up Old Files with Storage Sense
Storage Sense is an automated maintenance tool that deletes temporary and unneeded files. The Temporary files page in Settings can also clear old downloads that take up drive space. Windows scans for junk files you no longer need, and you decide what gets removed.
- Open Settings. Click the Start menu and select Settings, or press the Windows Key + I.
- Click System in the left menu, then click Storage on the right. A breakdown of your drive usage appears.
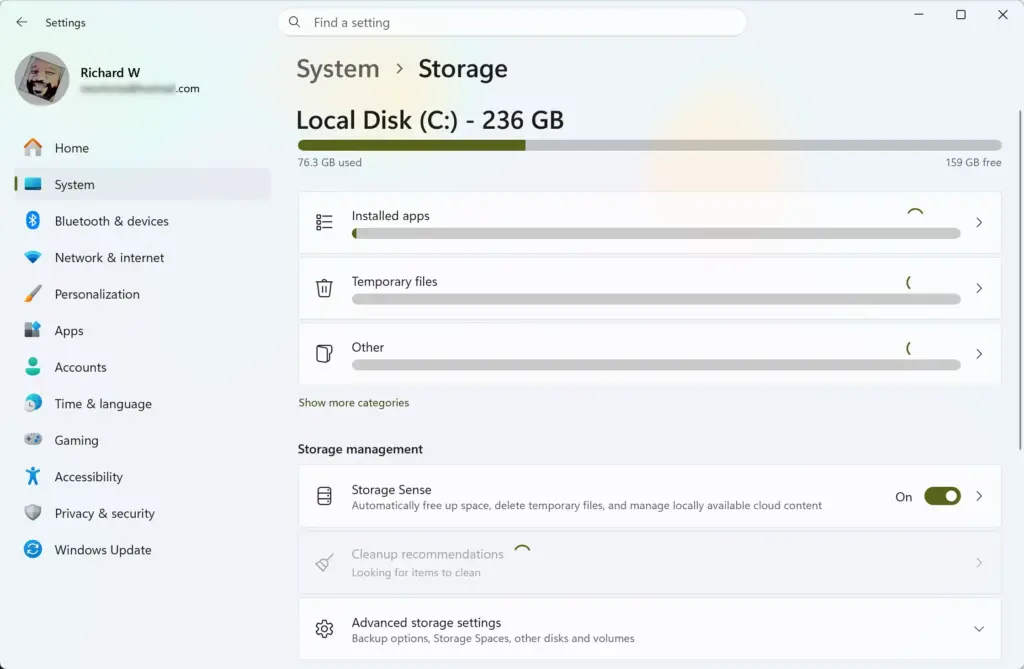
- Click Temporary files. Windows scans your drive for files that can be safely removed, so wait a moment while the list builds.
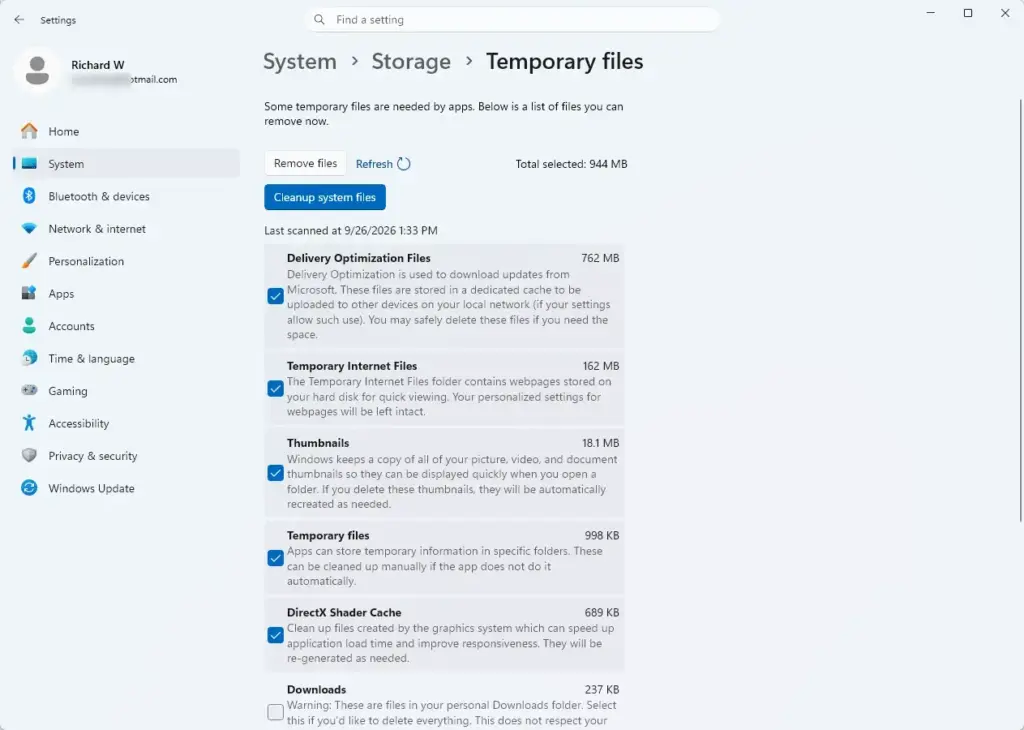
- Check the box next to Downloads only if you are certain you no longer need those files. It is not selected by default.
- Click Remove files at the top of the list. Windows clears out the selected data.
Back up anything important before you continue.
Two other problems come up often with downloads. The first is a file that keeps restarting or never finishes saving. This usually happens when your browser's default download location is set to a temporary folder or a directory that lacks write permissions. The browser cannot save the file permanently, so the transfer starts over each time you try to open it. Change the download directory in your browser settings, using the steps earlier in this guide, to fix this.
The second is strict file blocking by Windows itself. Adjust it in Windows Security: open Windows Security from your system tray, go to App & browser control, and check your Reputation-based protection settings. Lowering these thresholds slightly, or temporarily turning off SmartScreen, stops false positives from interrupting transfers. Turn the protection back on when you are done, because it is a useful safeguard against unsafe downloads.
What to do next
You should now be able to locate, organize, and manage every file that downloads to this computer. If you have files that fail to launch properly after downloading, learn how to extract compressed archives and manage program installer permissions next.
Frequently asked questions
Where can I find my Downloads on this device?
Open File Explorer and click Downloads in the left sidebar. Your downloads are stored at C:\Users\USERNAME\Downloads by default. You can also press Windows Key + R, type shell:Downloads, and press Enter to open the folder instantly.
Where do I locate my Downloads on my computer?
Open File Explorer from your taskbar or press Windows Key + E. Click Downloads on the left side. If you don't see it there, navigate to This PC, open your C: drive, then Users, your username folder, and Downloads.
Why are my Downloads not showing up?
Check if your browser is set to ask where to save files instead of using Downloads automatically. Open your browser settings and look for download location. Also verify files aren't being blocked by antivirus software. Search your entire drive using File Explorer's search bar.
How do I make downloaded files show up on my desktop?
Open your browser's download settings and change the save location to your Desktop folder. In most browsers, look for Settings or Preferences, then Downloads, and select Desktop as the default folder for new downloads.
Still have a question?
Answered by AI from this guide. Good questions may be added to this page — please don't include personal details.
Did this guide fix your problem?

About the Author
Richard
Tech Writer, IT Professional
Richard is a writer at Geek Rewind who turns complex IT tasks into clear, step-by-step guides. He draws on years of hands-on experience in system administration and enterprise IT operations, focusing on Windows, Linux and WordPress: the problems people actually run into, and the fixes that work. His server and WordPress guides come from systems he runs himself. Richard builds and maintains the platform behind Geek Rewind, from its Ubuntu servers and Nginx configuration to its custom WordPress plugins. Many new tutorials start with readers' questions, and he's always glad to answer them in the comments.
No comments yet — be the first to share your thoughts!