How to Change Where Windows 11 Saves Your Files and Apps

Changing where Windows 11 saves your files and apps stops your main 📁C:\
Default storage locations control where Windows puts new content the moment you download or create it. You can redirect these locations in the Settings app, so future files land on your chosen drive and you don’t have to move them by hand.
Open Settings , go to System Storage Advanced storage settings, then select “Where new content is saved”. Click the dropdown next to Documents and choose your preferred drive such as D: or E:, then click Apply. New documents save to that drive immediately without restart.
Step-by-Step: Change Default Save Location in 🪟 Windows 11
You change the default save location by opening the Settings app and going to the Storage section. There you pick a new drive for each type of content. Personal files and new apps then stop piling up on C: every time you save or install something. The steps are the same on Windows 11 Home and Pro, and you need an administrator account to change them.
If it isn’t listed there, it won’t appear in the dropdown menus later.
- Open Windows Settings : Press Win+I on your keyboard. Or click Start and then Settings. The Settings window opens, with a list of categories down the left side.

- In Settings, click System. The System page opens on the right and lists items such as Display, Sound and Storage.
- On the right side, select Storage. You should now see a bar showing how full your C: drive is, along with a breakdown of what is using the space. If C: is nearly full, this is the right fix for you.
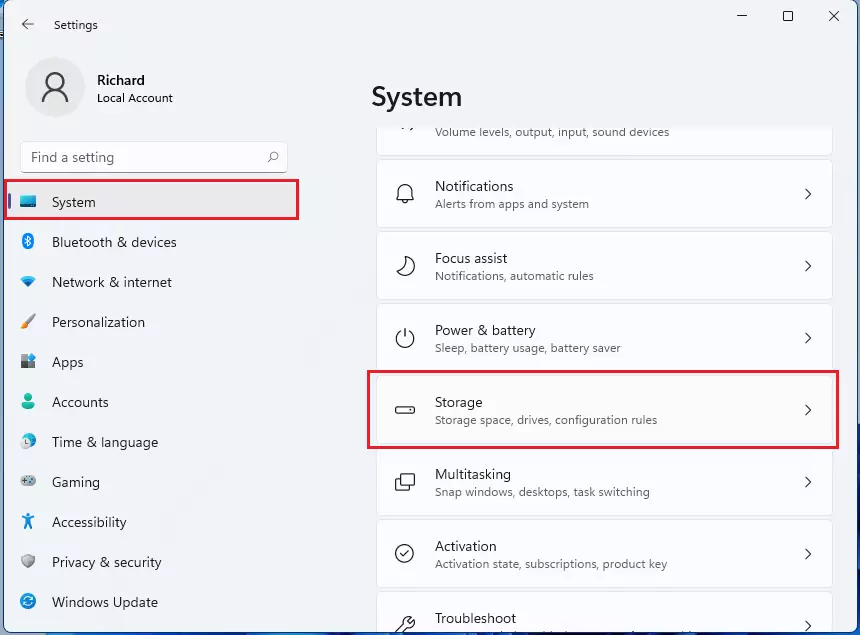
- Click Advanced storage settings. On most builds of Windows 11 this expands in place and shows a few more options. Scroll down the Storage page if you don’t see it straight away.
- Choose Where new content is saved. A new page opens with a list of content types, each with its own dropdown menu.
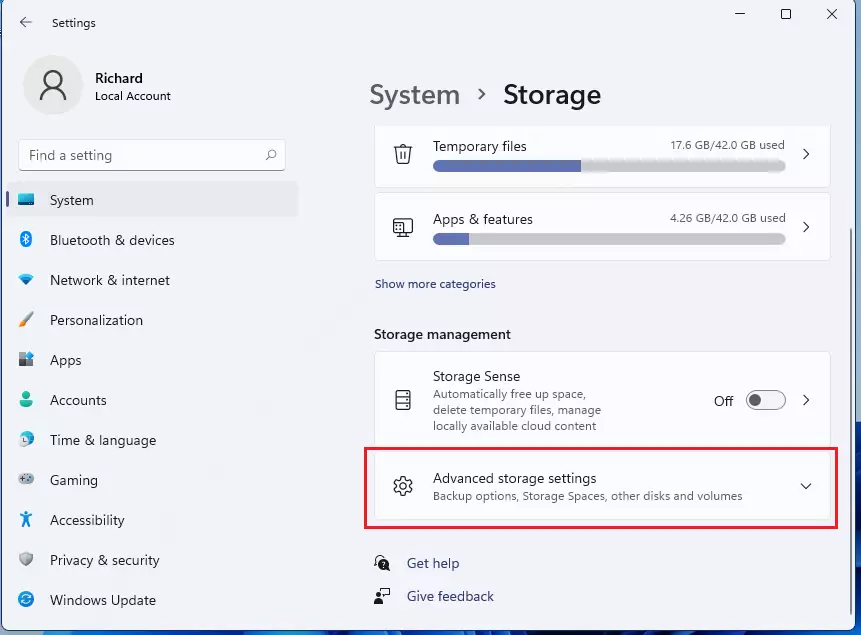
Options appear here for Documents, Music, Pictures, Videos, and Apps. The exact wording of the labels can differ slightly between Windows 11 versions, for example “New apps will save to” or “New documents will save to”. Each category defaults to the primary drive, typically Local Disk (C:).
- Click the dropdown menu next to the category you want to change. The list shows every drive Windows can currently use.
- Select your preferred drive, such as D: or E:. These secondary drives give you more capacity than C:.
A drive that hasn’t been initialised or formatted in Disk Management won’t be offered here.
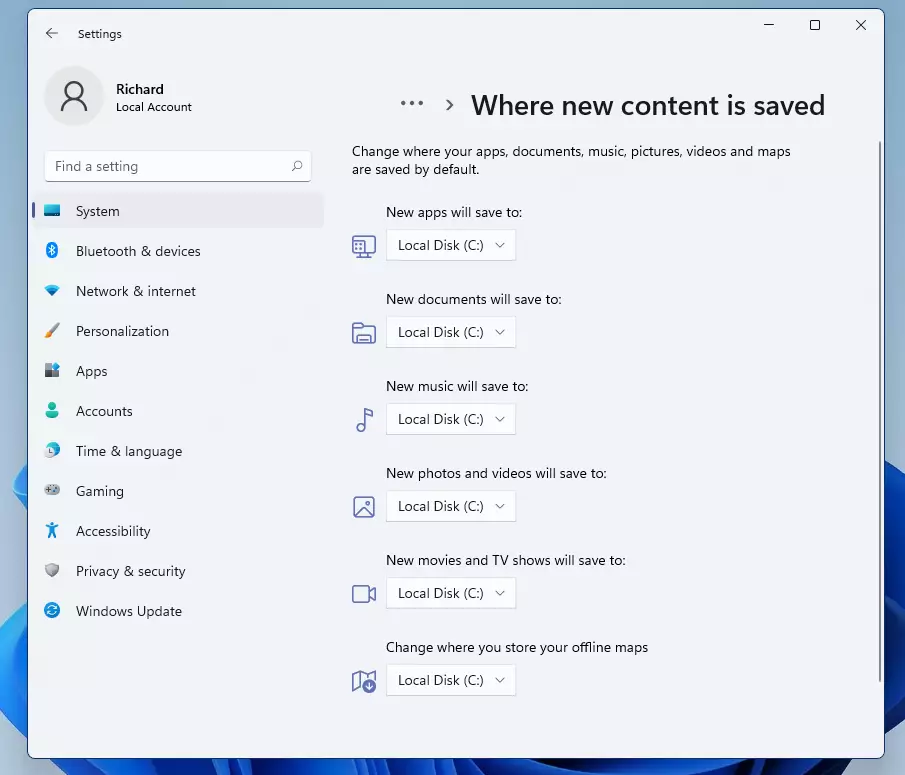
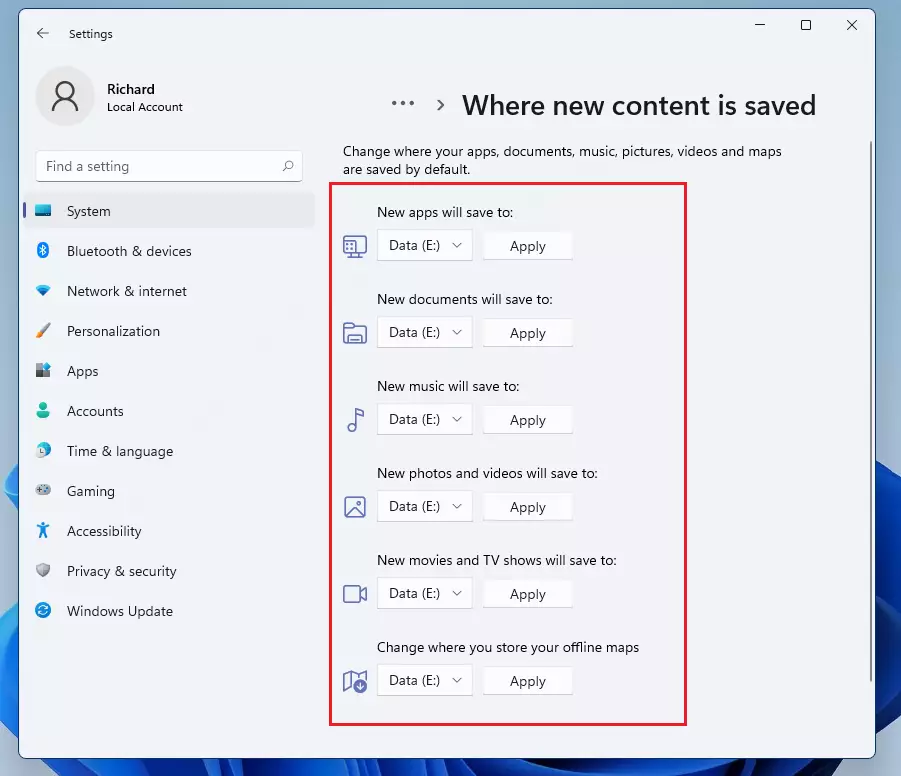
- After choosing a new save location, click the Apply button next to that category to confirm the change. Each category has its own Apply button, so repeat steps 6 to 8 for every category you want to move.
You don't normally need to restart. To undo a change, set the dropdown back to Local Disk (C:) and click Apply again. Anything saved to the other drive in the meantime stays there until you move it yourself.
Important Things to Know
Changing where Windows 11 saves your files affects only new items and future app installations, so your existing files stay where they are. You must also assign each file type to a single location. You cannot split one category across multiple drives at the same time. Keep these limits in mind:
- You can only pick one location at a time for each type of file (documents, music, etc.). If you want to use a different drive later, change the setting again.
- You cannot install apps on network drives (shared drives over the internet or local network).
- Only new apps you install after changing the location will save to the new drive. Old apps stay where they are. This setting mainly affects apps from the Microsoft Store. Traditional desktop installers usually ask you for an install folder, so choose the right drive there.
- You can install apps on external USB drives, but the drive must be plugged in whenever you use those apps.
- If the external drive is removed, apps installed on it won't work until you reconnect the drive. For apps you use every day, an internal second drive is the safer choice.
Why Change the Default Save Location?
Moving your default save location to a secondary drive frees up space on your main system drive when it starts running out of room. Windows keeps running smoothly because it has room to work and to install updates. Your personal documents and large apps go to a bigger drive without extra effort.
- More Space: Use a bigger or faster drive for your files and apps. A full C: drive is a common cause of slow performance and failed updates.
- Better Organization: Keep your files separated by drive. It also makes it easier to back up your data separately from Windows.
- Easy Setup: You don't have to move files manually every time you save something new.
Try this method when storage capacity runs low on the primary drive. The change takes only a few minutes, and new files go to the other drive straight away. Files already on C: still take up space there until you move or delete them.
Need more help? Visit the official Microsoft guide here: Change where new content is saved in Windows 11
Summary
Changing the default save location in Windows 11 relocates the destination for new documents, music, pictures, videos, and apps. This recovers capacity on the C: drive over time. New items go to the updated location, while existing files remain in place. If you ever want to go back, set each category to Local Disk (C:) and click Apply.
Did this guide fix your problem?

About the Author
Richard
Tech Writer, IT Professional
Richard is a writer at Geek Rewind who turns complex IT tasks into clear, step-by-step guides. He draws on years of hands-on experience in system administration and enterprise IT operations, focusing on Windows, Linux and WordPress: the problems people actually run into, and the fixes that work. His server and WordPress guides come from systems he runs himself. Richard builds and maintains the platform behind Geek Rewind, from its Ubuntu servers and Nginx configuration to its custom WordPress plugins. Many new tutorials start with readers' questions, and he's always glad to answer them in the comments.
No comments yet — be the first to share your thoughts!