Move Ubuntu WSL to Another Drive in Windows 11

Moving Ubuntu WSL (Windows Subsystem for Linux, a feature that lets you run Linux environments directly on Windows) to another drive frees up space on your main C: drive without losing your files. Windows 11 has built-in tools for this. You can move your whole Linux setup to a larger or faster drive in a few steps.
To move Ubuntu WSL to another drive in Windows 11, shut WSL down with wsl –shutdown in Windows Terminal run as administrator. Then open Settings, go to Apps Installed apps, click the three-dot menu next to Ubuntu, and choose Move. Or run wsl –manage Ubuntu –move 📁D:\
Transfer WSL distros to another drive
A WSL distro keeps its whole Linux file system on the drive where it was installed, and that file system grows as you add packages, projects and data. If your C: drive is filling up, moving the distro is one of the quickest ways to get space back. This guide covers three methods: the Settings app, a single command in Windows Terminal, and an export and import.
Moving a distro while it is running can corrupt its files. Also close any terminal windows or editors that are connected to Ubuntu.
Follow these steps to shut WSL down.
- Open Windows Terminal as an administrator. Windows Terminal is the Terminal app as an administrator mentioned here. Right-click it in the Start menu and choose Run as administrator.
- Run the shutdown command shown below. It stops every running distro and the WSL virtual machine.
wsl --shutdown
The command returns to the prompt with no message. That means WSL has stopped.
Now use the Settings app to move the distro.
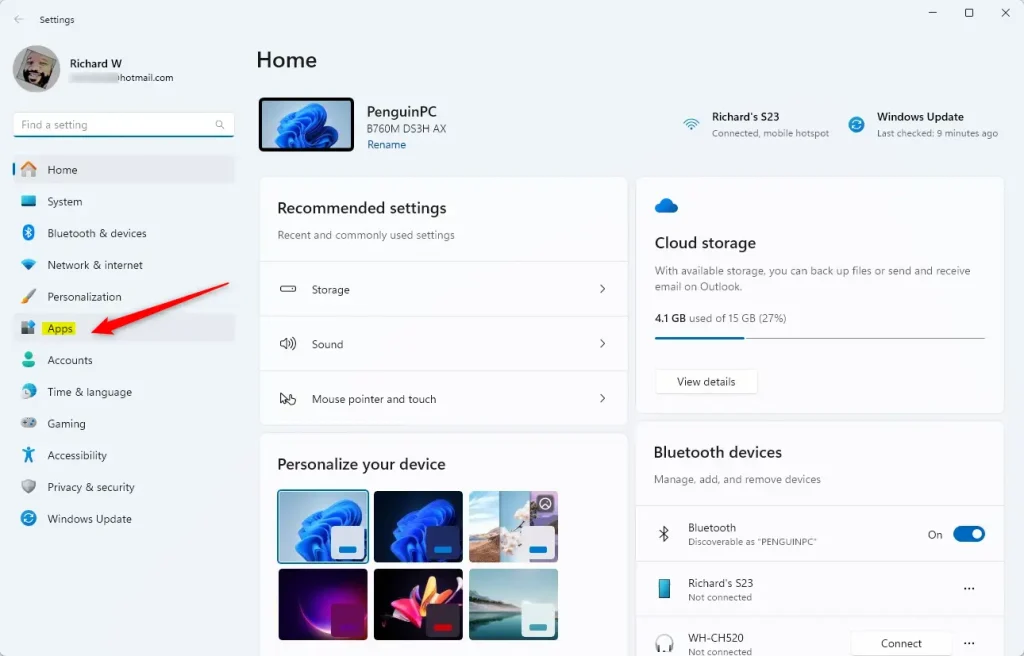
- Open Settings and go to Apps Installed apps
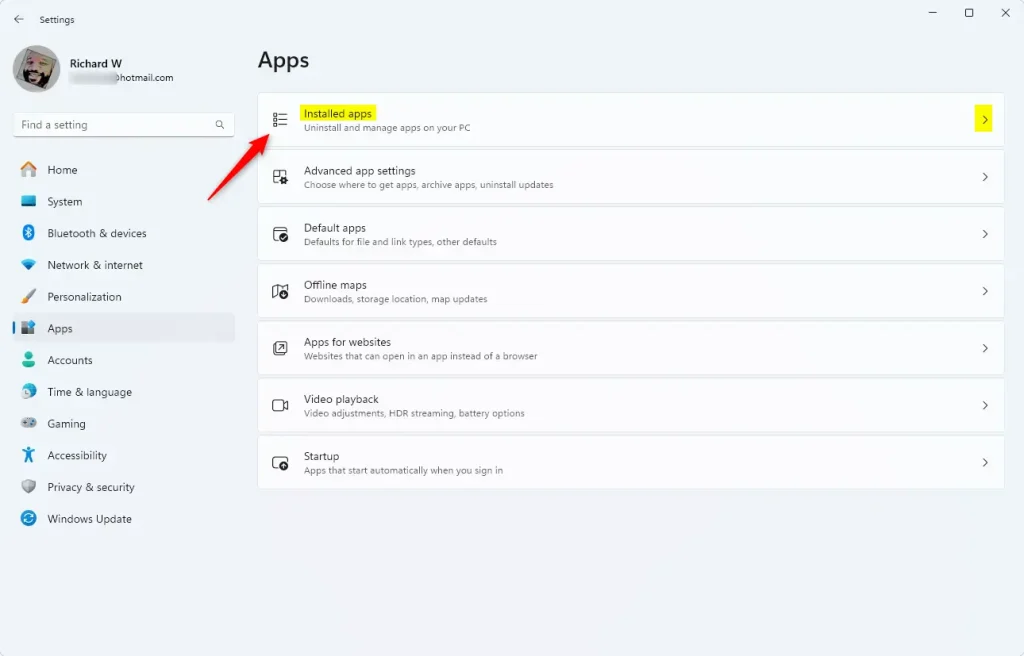
- Select the Install apps tile inside the Apps window. The view expands.
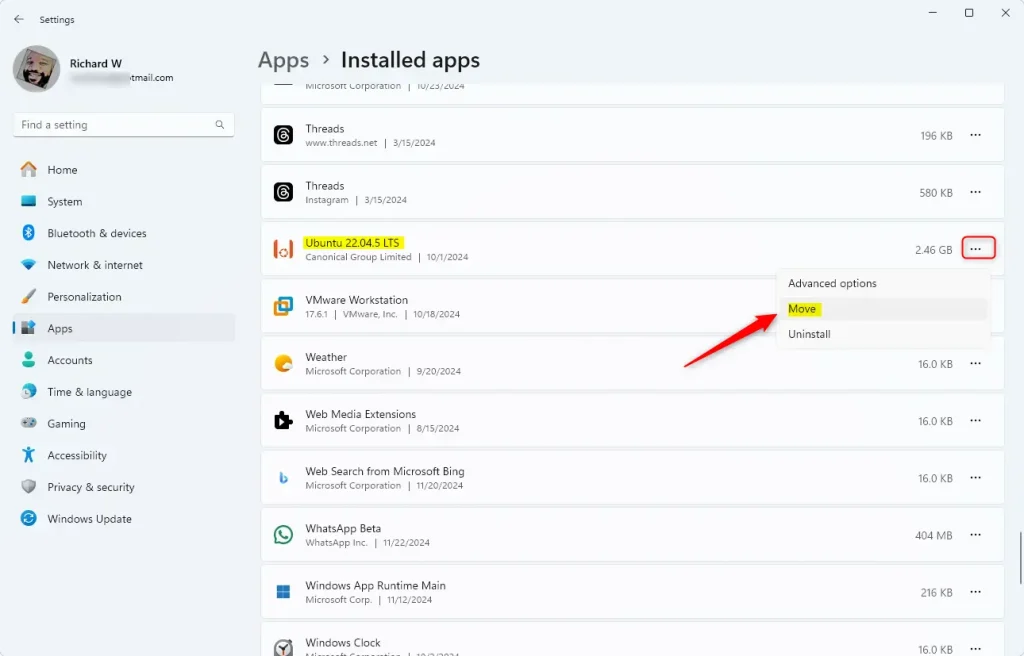
- Scroll down the installed apps list until you find Ubuntu, or whichever Linux distro you want to relocate.
- Click the three-dot menu next to the distro and choose Move from the drop-down list.
On some Windows 11 builds the button sits there. The Settings method only works for distros installed as apps, such as Ubuntu from the Microsoft Store. A distro you created by importing a tar file won't be in this list, so use the command line method below.
- Choose the new drive from the drop-down list.
- Click Move. Windows starts the transfer.
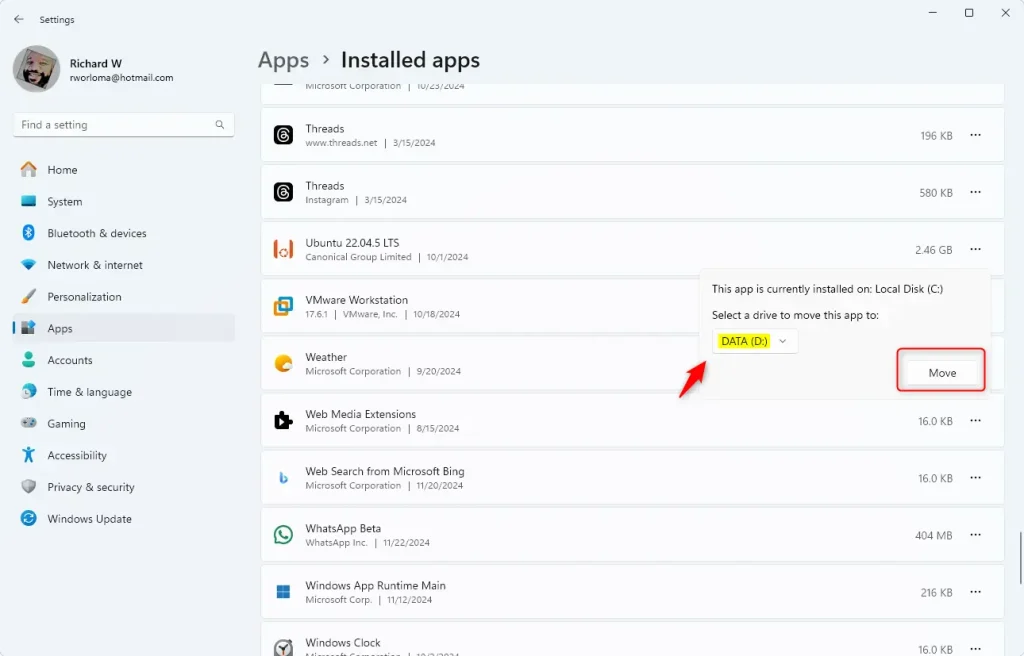
The transfer takes from a few seconds to several minutes, depending on how big your distro is and how fast the drives are. When it finishes, the distro is on the drive you selected.
Change the WSL drive using the Move command
The command line method moves the distro directly from Windows Terminal. You don't need to export any files by hand. It works for distros that don't show a Move button in Settings. It needs a reasonably recent WSL release, so if Windows doesn't recognize the command, update WSL first.
- Launch the Windows Terminal app as an administrator as an administrator.
- List the distros on your machine with the command below. Note the exact name of the one you want to move, because you need it in the final command.
wsl --list --all
- Shut down WSL with the command below.
wsl --shutdown
- Run the move command below. Replace the distro name and the destination folder with your own values. Make sure the destination drive has enough free space for the whole distro.
wsl --manage Ubuntu --move D:\WSL\Ubuntu
The command runs for a short time, then returns to the prompt. The distro is now on the new drive.
Use the Import command to change the WSL distro drive
The export and import method is the most manual of the three, but it is reliable. You back up your current Linux installation to a tar file, then restore it into a folder on the new drive. It also leaves you with a backup file. It takes more disk space while it runs, because the tar file and the new copy exist at the same time.
A separate guide explains how to export and import WSL distros. Follow it first to create the exported tar file.
After you finish that guide, import the distro to the new drive with the command below.
wsl --import Ubuntu D:\WSL\Ubuntu C:\Ubuntu-export.tar
In this example, the D: drive is the destination for the new distro files, and the C: drive holds the exported tar file. Change both paths to match your own setup.
The import runs for a short time, and the distro then appears at the location you gave.
Check these points before you clean up:
- Open the imported distro and confirm your files are there.
- An imported distro usually starts as the root user. If you want your normal user back, set it as the default user in the distro's wsl.conf file.
- The original copy is still registered under its old name. Don't remove it until you are sure the new copy works. Removing a distro deletes its data for good.
This completes the process.
Conclusion:
Moving Ubuntu WSL to another drive on Windows 11 manages storage well and can take load off your main drive. Keep these main points in mind:
- Multiple Methods: You can move your WSL distribution using the graphical interface in Settings or via the command line with the
--movecommand. - Shut Down WSL: Always shut down your WSL instance before making any moves to avoid data corruption.
- Use Windows Terminal: For advanced users, running commands in Windows Terminal is quick and gives you more control over the process.
- Export and Import: For a more manual approach, use the export and import commands to relocate your distribution. You also get a backup file out of it.
- Efficiency: Moving your WSL installation can improve performance, especially if you move to faster storage.
These steps help you keep your WSL installations tidy and your development environment well organized.
Have a question about this guide?
Answered by AI from this guide. Good questions may be added to this page — please don't include personal details.
Did this guide fix your problem?

About the Author
Richard
Tech Writer, IT Professional
Richard is a writer at Geek Rewind who turns complex IT tasks into clear, step-by-step guides. He draws on years of hands-on experience in system administration and enterprise IT operations, focusing on Windows, Linux and WordPress: the problems people actually run into, and the fixes that work. His server and WordPress guides come from systems he runs himself. Richard builds and maintains the platform behind Geek Rewind, from its Ubuntu servers and Nginx configuration to its custom WordPress plugins. Many new tutorials start with readers' questions, and he's always glad to answer them in the comments.
No comments yet — be the first to share your thoughts!