How to Mount Linux File System on Windows 11 via WSL

Accessing your Linux files directly from Windows 11 is now possible. This guide shows you how, using the Windows Subsystem for Linux (WSL).
Open PowerShell as administrator and run wsl –update. Then, run wsl –mount \\.\PHYSICALDRIVE# to mount the entire drive, or add –partition # to mount a specific partition. Your Linux files will then be accessible in File Explorer under \\wsl$\\mnt.
Why mount a Linux file system?
Mounting a Linux file system lets you read and write data from Linux drives directly on your Windows computer. This makes it easier to manage files and share information between operating systems.
What happens when you are done?
Once you finish, your Linux drive becomes part of your accessible storage. You can open, edit, and save files directly from your file manager. When you unmount the drive, the connection is safely closed, keeping your data protected and organized.
How to mount Linux file systems in native Linux
: Mounting a Linux file system means connecting a storage device, like a hard drive, to a folder so you can access its files. You do this in Linux using the ‘mount’ command, which needs administrator rights. You’ll usually type ‘sudo mount’ followed by the drive details and the folder you want to connect it to.
Basic syntax:
sudo mount -t ext4 /dev/sdb1 /mnt/mydata
Admin Privilege Required: This command requires root access. Always use sudo before the command.
How to check currently mounted drives
To see what's currently connected, use the lsblk or df -h commands. These tools list all active block devices and their mount points.
Permanent mounting via /etc/fstab
To make a Linux drive connect automatically every time you start your computer, add its details to a special file named /etc/fstab. Think of this file as a map that tells your system which drives to connect and where. Editing this file requires administrator permission to ensure the system's startup process is not disrupted.
/etc/fstab requires administrator permissions. Use a text editor like nano or vi to add your drive details, including its path, where it should appear (the mount point), and its file system type.Mounting specific media types
You can mount various media types using the same logic. For an ISO file, use the -o loop option. For network drives, you might use mount -t nfs to connect to a remote server.
Unmounting and troubleshooting
Always use the umount command before removing a physical drive. If you get a 'target is busy' error, it means a program is still using a file on that drive. Close all open folders or terminal windows pointing to that directory, then try again.
Mount Linux file system on 🪟 Windows 11 via WSL
You can mount a Linux file system on Windows 11 using WSL by first updating it with the 'wsl --update' command in PowerShell. You then need to find the specific identifier for the drive you want to connect, which looks something like \\.\PHYSICALDRIVE1. This identifier is crucial for proceeding with the mounting process to access your Linux files within Windows.
wsl --update
To see your connected drives, run this command in PowerShell:
Get-PhysicalDisk | Select-Object FriendlyName, DeviceId, Size
Look for the DeviceId of the drive you want to mount (for example, \\.\PHYSICALDRIVE1).
To mount the entire physical drive, use this command:
wsl --mount \\.\PHYSICALDRIVE1
If you prefer to mount a specific partition, add the partition number:
wsl --mount \\.\PHYSICALDRIVE1 --partition 1
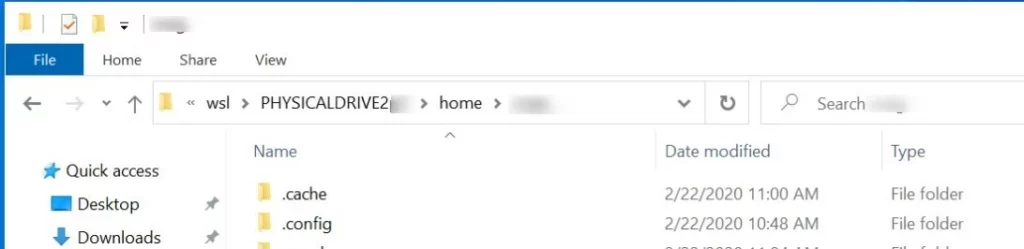
wsl --mount --vhd <PathToVHD>.Access the Linux file system in Windows File Explorer
After mounting your Linux drive, you can easily access its files in Windows File Explorer by looking for the Linux node in the left pane or typing '\\wsl$\\\\mnt' into the address bar.
\\wsl$\<DistroName>\mnt
Summary
Mounting a Linux file system lets you access your data across different operating systems, whether you use native Linux commands or WSL on Windows 11.
How do I mount a file system automatically at boot?
To mount a drive automatically, you must add an entry to the /etc/fstab file. This file tells your operating system which drives to connect during startup. You need to specify the device identifier, the folder where it should appear, and the file system type like ext4 or xfs.
What is the difference between mounting and unmounting?
Mounting is the process of attaching a storage device to your file system so you can access the files. Unmounting is the process of safely disconnecting that device. You must always unmount before physically removing a drive to prevent data corruption or loss of saved information.
Was this guide helpful?

About the Author
Richard
Tech Writer, IT Professional
Richard, a writer for Geek Rewind, is a tech enthusiast who loves breaking down complex IT topics into simple, easy-to-understand ideas. With years of hands-on experience in system administration and enterprise IT operations, he’s developed a knack for offering practical tips and solutions. Richard aims to make technology more accessible and actionable. He's deeply committed to the Geek Rewind community, always ready to answer questions and engage in discussions.

No comments yet — be the first to share your thoughts!