How to Uninstall Windows Subsystem for Linux (WSL) in Windows 11


Uninstalling the Windows Subsystem for Linux (WSL) on Windows 11 removes all Linux distributions you’ve installed, like Ubuntu 22.04 LTS, and frees up disk space. WSL lets you run Linux programs directly on your Windows PC.
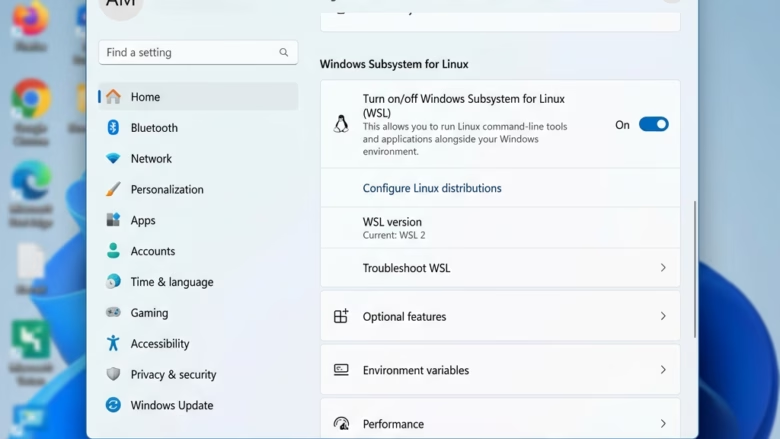
To uninstall Windows Subsystem for Linux (WSL), first uninstall your Linux distributions from Settings or File Explorer. Then, turn off the “Windows Subsystem for Linux” feature via Optional Features or by toggling it off in Settings.
You can remove WSL using either the built-in Settings app or PowerShell commands. Both methods completely delete your Linux files and installed distributions, so make sure you don’t need them anymore before proceeding.
The Settings app offers a straightforward way to turn off WSL for users who prefer not to use command lines.
Option 2Manual Uninstall
If the Settings app doesn’t show the option to uninstall WSL, you can manually remove your Linux distributions and the WSL feature. This manual uninstall process involves removing your installed Linux apps first, then turning off the WSL component. This is a good alternative if the standard Settings method isn’t available for uninstalling WSL Windows 11.
- Open the Start menu.
- Click the All apps button.
- Uninstall your Linux distributions:
- Open File Explorer (press ⊞ Win+E) and click Linux in the side panel to see your installed versions.
- Right-click your Linux distribution (e.g., “GenericLinux”) and select Uninstall. Confirm your choice.
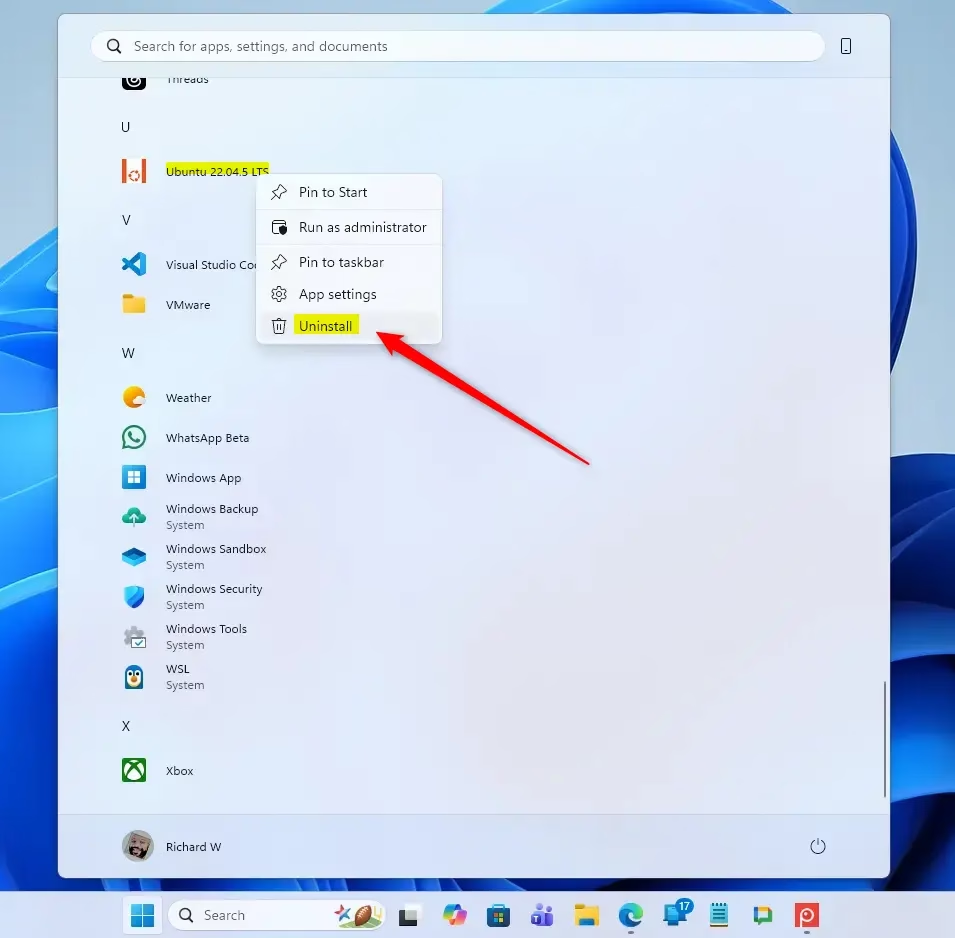
- Uninstall the Windows Subsystem for Linux app:
- Right-click the Windows Subsystem for Linux app in your app list.
- Select Uninstall and confirm.

- Press ⊞ Win+R, type
OptionalFeatures.exe, and press Enter. - Uncheck Windows Subsystem for Linux and click OK. (Admin privileges required).

- Click Restart now to finish the removal.
Summary
Uninstalling WSL is a manual process. You’ll delete your Linux apps and then turn off the feature in Windows settings. By following these steps, you can fully clean up the WSL environment from your system and reclaim your disk space.
Frequently Asked Questions
To completely uninstall the Windows Subsystem for Linux (WSL) on Windows, you have a couple of options. You can use the Settings app to remove the WSL feature entirely, or if you need to remove specific Linux distributions, you can use PowerShell commands. This section answers how to uninstall WSL Windows 11 completely, covering both methods.- How to completely uninstall the subsystem for Linux WSL on Windows?
Open Settings, go to System, and select Optional features. Find Windows Subsystem for Linux and select Uninstall. You can also use thewsl --unregistercommand in PowerShell to remove specific distributions. - How do I disable Windows Subsystem for Linux WSL?
Open the Start menu, search for “Turn Windows features on or off,” and uncheck the box for “Windows Subsystem for Linux.” Click OK and restart your computer. - How do I completely remove WSL2?
Uninstall all Linux distributions first. Then, go to “Turn Windows features on or off,” uncheck “Windows Subsystem for Linux” and “Virtual Machine Platform,” click OK, and restart your system. - How do I uninstall Apps on WSL?
Open your Linux terminal and use the package manager for your OS, such assudo apt remove. To remove the entire distribution, use thewsl --unregistercommand in Windows PowerShell.
Was this guide helpful?

About the Author
Richard
Tech Writer, IT Professional
Richard, a writer for Geek Rewind, is a tech enthusiast who loves breaking down complex IT topics into simple, easy-to-understand ideas. With years of hands-on experience in system administration and enterprise IT operations, he’s developed a knack for offering practical tips and solutions. Richard aims to make technology more accessible and actionable. He's deeply committed to the Geek Rewind community, always ready to answer questions and engage in discussions.

… liked this!