How to Enable or Disable Indexing File Contents by File Type In Windows 11

Windows 11 Search builds an index (a database of file details) so you can find documents, apps, and emails instantly. Indexing file contents by file type lets Windows read the actual words inside specific formats, like text files or Word documents, instead of only looking at file names.
Open Settings , go to Privacy & security, then Search, and click Advanced indexing options. In the Indexing Options window, click Advanced, select the File Types tab, choose a file extension, and then select either “Index Properties Only” or “Index Properties and File Contents.
You can change these settings to speed up searches or save disk space. By default, Windows indexes file properties for all items, but you get full control over which file extensions store searchable text.
- Index Properties Only: Windows will only record basic file information – its name, location, and other details. It will not read or store the content inside the file. You can still search for files by their names, but you won’t be able to search for words within the file’s text.
- Index Properties and File Contents: Windows will record the file’s properties *and* it will read and catalog the words and data inside the file, making that content searchable.
Choosing "Index Properties Only" creates a smaller search index, saving disk space. However, this setting makes finding files harder if you need to search for text within a document. For most users, indexing file contents provides the best search experience by examining the text of your documents.
How to Change File Indexing Settings
Windows Registry changes allow you to instruct Windows how you want specific file types to be indexed. You must be logged in as an administrator to make these changes.
Step 1Open Windows Settings
Press Win+I to open Settings .

Step 2Go to Search Settings
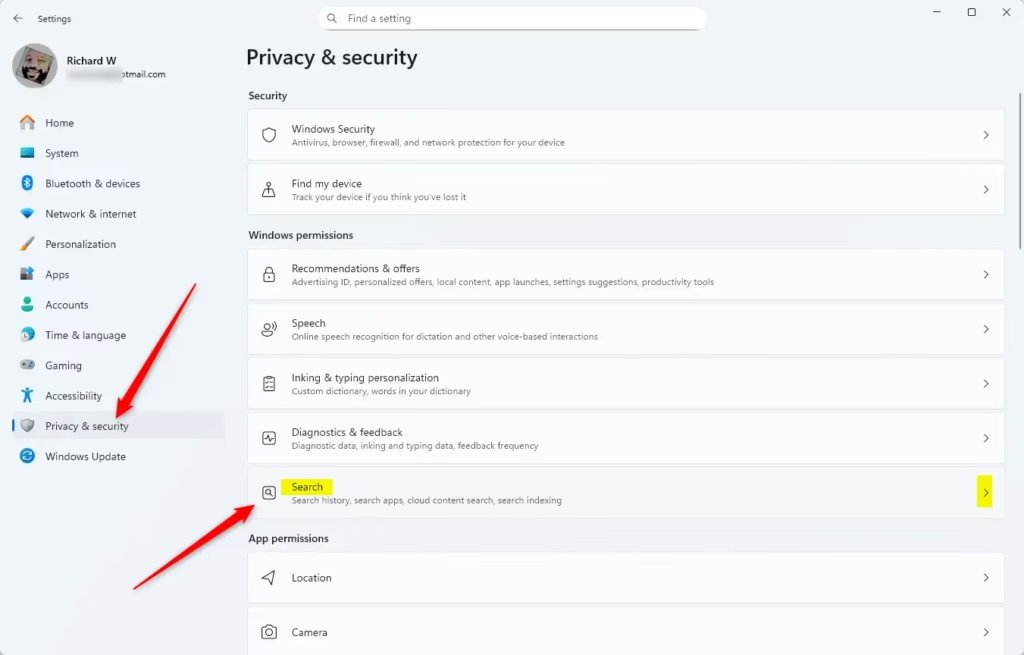
Within the Settings window, click on Privacy & security in the left-hand menu. Then, on the right side, locate and select Search.
Step 3Find Advanced Indexing Options
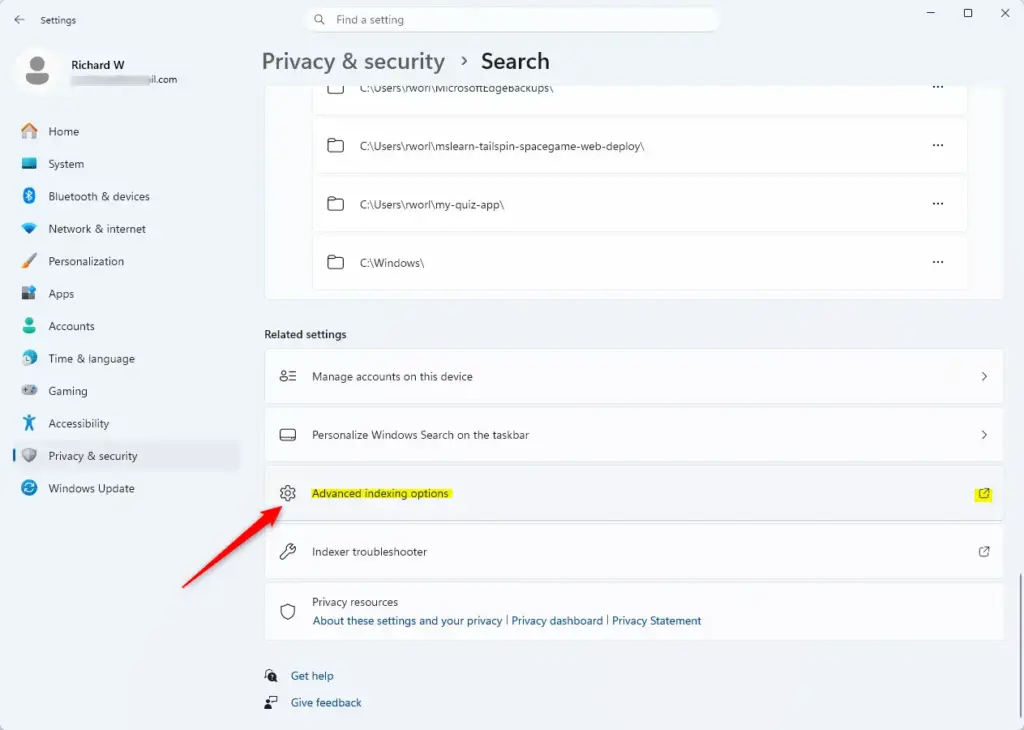
You are now in the Search settings. Scroll down the right side until you find a section titled Related settings. Within that section, click on Advanced indexing options.
Step 4Open the Indexing Options Window
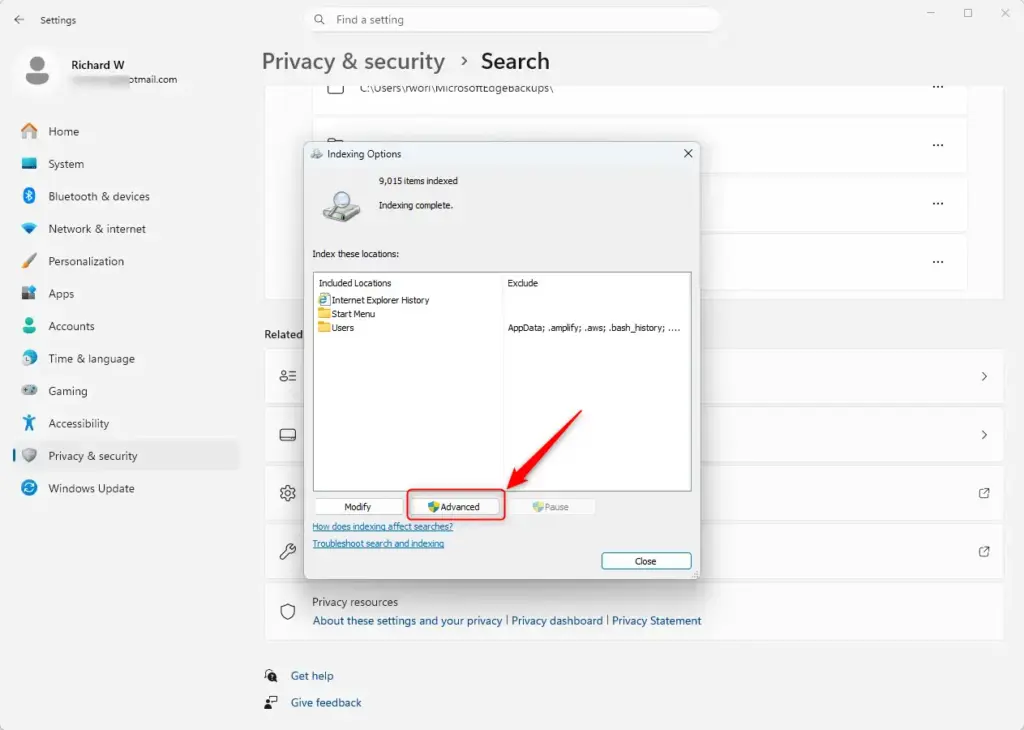
A User Account Control (UAC) message might appear, asking for permission to make changes – click Yes if prompted.
Step 5Select the File Types Tab
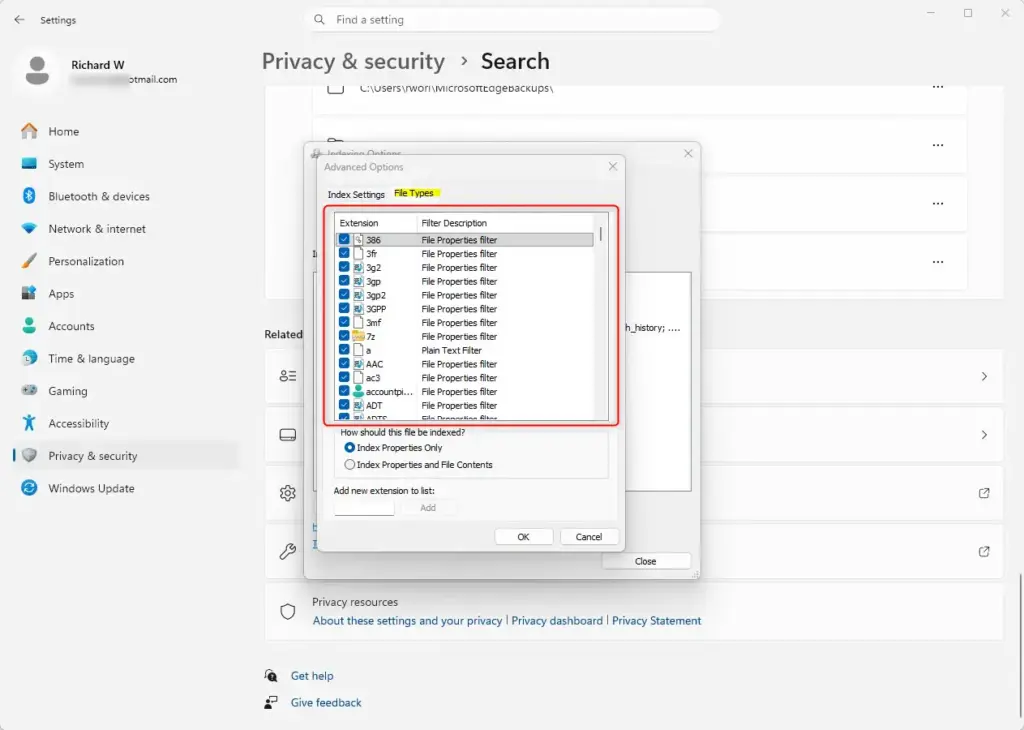
Within the "Advanced Indexing Options" window, you will notice two tabs at the top: Indexed Properties and File Types. Select the File Types tab.
Step 6Choose a File Type
Selecting a specific file extension in the Indexing Options menu lets you control windows 11 index file contents behaviour for that format. You can scroll through the list of extensions, such as .docx or .txt, and click the one you want to change so Windows knows whether to search inside it.
Step 7Choose How to Index
Deciding how to windows 11 index file contents requires choosing between searching only file names or scanning the text inside documents. You can pick Index Properties Only to track just names and dates, or select Index Properties and File Contents to let Windows search through the actual words written inside your files.
- Index Properties Only: If you choose this, Windows will only record basic information about files with the extension you selected. It will not read the contents. You will see "Filter Description: File Properties" next to this option.
- Index Properties and File Contents: Choose this if you want Windows to read and record the actual words and data inside files of this type. You will see "Filter Description: Plain Text Filter" next to this option.
Click the option that aligns with your desired indexing behavior for that particular file type.
Conversely, selecting "Index Properties and File Contents" enables Windows to read the text within those documents for search.
Step 8Repeat for Other File Types
You can adjust settings for many different file types, not just one. To select another file extension, like .pdf or .xlsx, go back to step 6. Then, repeat step 7 to choose whether Windows should index only the file's properties or both the file's properties and its contents.
Step 9Save Your Changes
After completing all desired changes for the selected file types, click the OK button located at the bottom of the "Advanced Indexing Options" window to apply your settings.
Step 10Close Windows
Closing the Indexing Options window saves your new settings and applies your windows 11 index file contents choices immediately. Windows runs the update in the background, so you can close out of the main Settings menu and continue using your computer while the search database updates.
That concludes the process! Windows will now implement your updated indexing preferences for the file types you modified. The changes take effect right away. The index may take some time to update in the background if you have many files.
Summary
Managing windows 11 index file contents helps you control whether search results include just basic file details or the actual text inside your documents. By adjusting these advanced options, you can speed up searches and make sure Windows only reads the specific file types you care about.
Was this guide helpful?

About the Author
Richard
Tech Writer, IT Professional
Richard is a writer at Geek Rewind who turns complex IT tasks into clear, step-by-step guides. He draws on years of hands-on experience in system administration and enterprise IT operations, focusing on Windows, Linux and WordPress: the problems people actually run into, and the fixes that work. His server and WordPress guides come from systems he runs himself. Richard builds and maintains the platform behind Geek Rewind, from its Ubuntu servers and Nginx configuration to its custom WordPress plugins. Many new tutorials start with readers' questions, and he's always glad to answer them in the comments.

No comments yet — be the first to share your thoughts!