How to Exclude Specific File Extensions from Backing Up to OneDrive in Windows 11


Stop specific file formats from syncing to keep local folders lean and cloud space free. OneDrive’s sync app has no per-extension filter in its normal Settings window. Exclusions are normally set through an administrator policy for the OneDrive sync app, so this works best on a PC where you can manage policies. That is usually Windows 11 Pro, Enterprise or Education, or a PC managed through your organization. Windows 11 Home has no Local Group Policy Editor, so Home users have fewer options. The most reliable one is to keep those files in a folder that OneDrive does not sync.
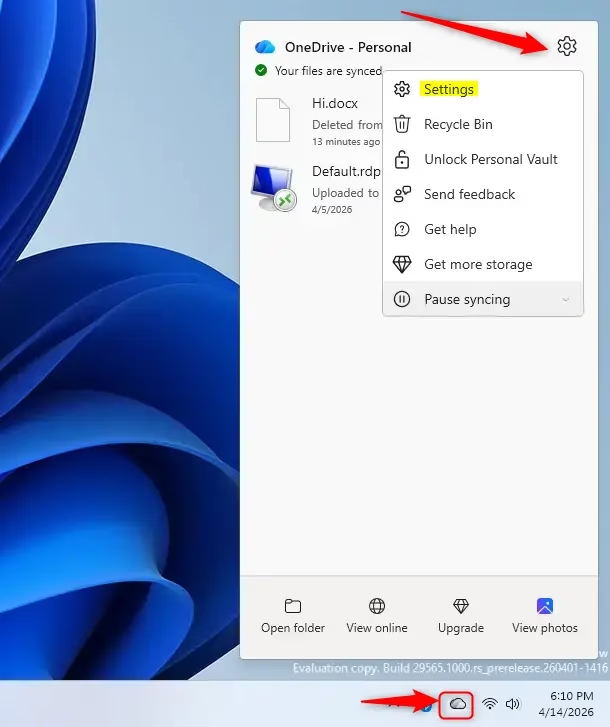
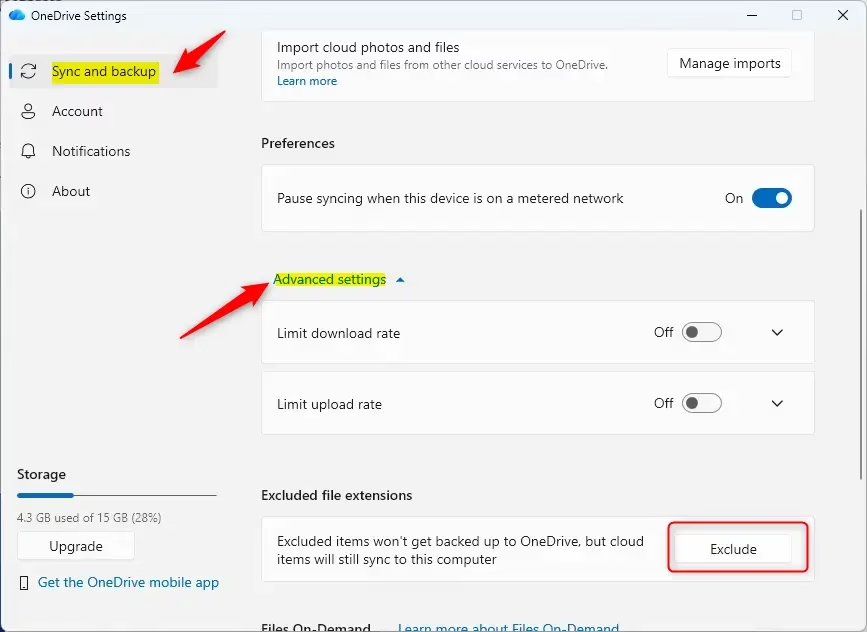
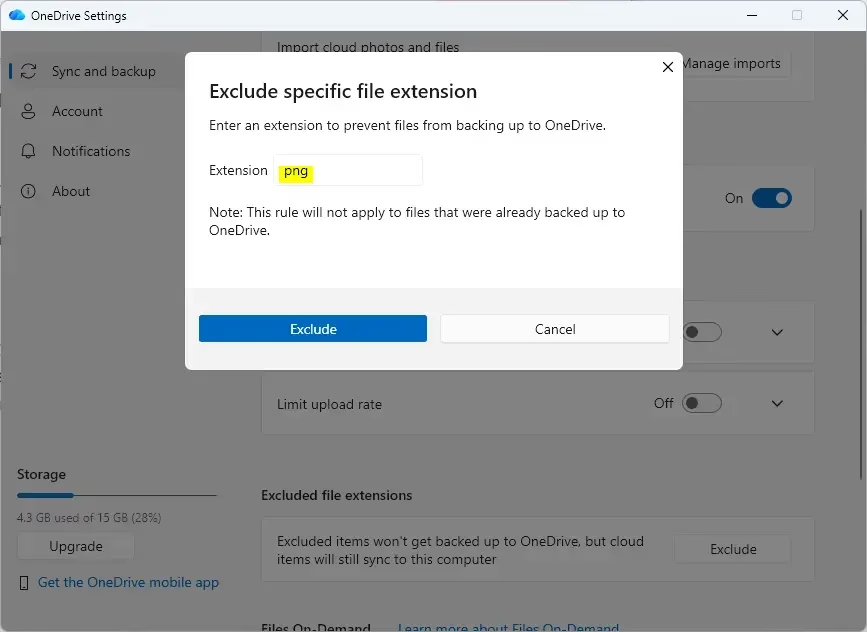
Click the OneDrive icon in your taskbar , select Help & Settings (gear) > Settings Sync and backup > Advanced settings. Under Excluded file extensions, click Exclude, type the file extension you want to block (for example: png), then click Exclude. The file type will no longer sync to OneDrive.
Why exclude files from OneDrive?
Heavy media projects, render caches, virtual machine disks and scratch files can fill a free or small OneDrive plan quickly. They also keep the sync client busy re-uploading files that change every few minutes. Excluding them has three practical benefits:
- Your storage quota goes to documents that need to travel between machines.
- Uploads finish sooner, because the client is not tied up with large, constantly changing files.
- Your local-only work stays on the PC where you created it.
Check that none of them are files you rely on having in the cloud. Excluded files are not backed up, so a failed drive means they are gone unless you have another backup.
What happens when you are done?
Adding an extension to the exclusion list tells OneDrive (cloud storage and file synchronization service) to stop uploading new files of that type to the cloud. Files already sitting in cloud storage remain untouched, so old items require manual cleanup.
After you apply the change, work through these checks:
- Restart the OneDrive sync app, or sign out and back in, so it picks up the new policy. If the setting still does not appear to apply, restart the PC.
- Save a test file with an excluded extension into a synced folder such as Documents or Desktop.
- Watch the file’s status icon in File Explorer . An excluded file should not show the syncing or cloud icons that normal files get.
- Open OneDrive on the web and confirm the test file is not there.
- Look for old files of the same type that were uploaded before the rule existed, and delete them from OneDrive yourself.
Deleting a synced file from your OneDrive folder removes it from the cloud and from every other device that syncs it. Copy anything you still need to a folder outside OneDrive first. Deleted items go to the OneDrive Recycle Bin for a limited time, but they still count against your storage until that bin is emptied.
To undo the change, remove the extension from the exclusion list and restart OneDrive. Files that were skipped should then be picked up and uploaded on the next sync.
How to exclude file types
You can easily exclude files OneDrive tries to sync by adding specific file extensions to the settings menu. Open the OneDrive app from your taskbar, go to your settings, and open the advanced sync options. From there, you can type in any file format you want to block so those types of files stay on your computer and never upload to your cloud storage.- Click the OneDrive icon in your taskbar.
- Select the Help & Settings (gear) icon and choose Settings.
- Click Sync and backup on the left side, then click the Advanced settings link.
- Find the Excluded file extensions section and click Exclude.
- Type the file extension you want to block (for example: "png") into the box and click Exclude.
How to stop excluding file types
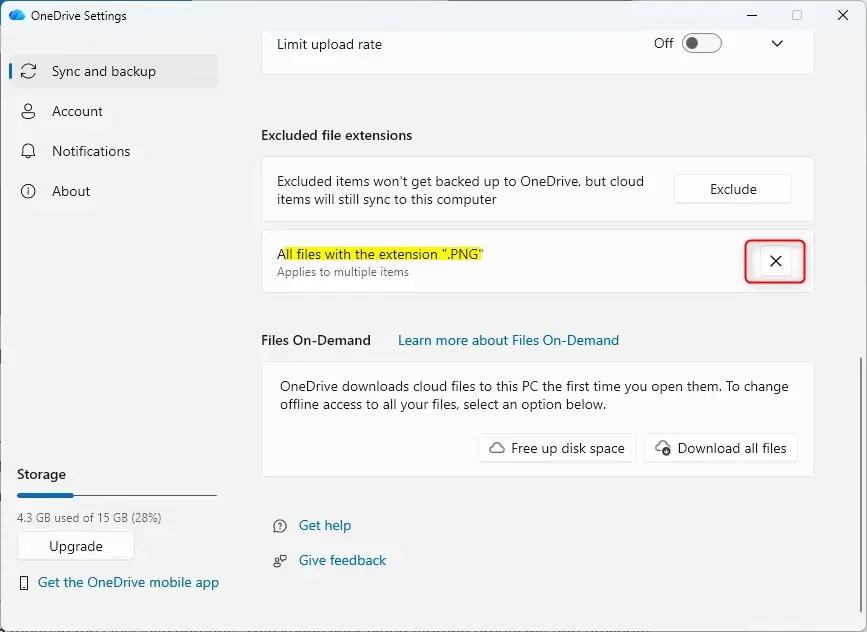
- Follow the steps above to return to the Excluded file extensions section.
- Look for the extension you want to allow again.
- Click the X button next to that extension.
- Click Ok to save your changes.
Summary
OneDrive syncs entire folders by default unless configured otherwise. Managing the Excluded file extensions menu stops unwanted items from crossing device boundaries.
Frequently asked questions
How do I exclude certain folders from my OneDrive backup?
Open OneDrive from your taskbar, select the gear icon, then Settings. Go to Sync and backup, click Advanced settings, and turn on the toggle for folders you want to exclude. You can also right-click any folder and choose 'Stop syncing' to remove it from backup.
How do I stop certain files from syncing to OneDrive?
Open OneDrive, select the gear icon, go to Settings, then Sync and backup. Click Advanced settings and scroll to 'Excluded file extensions'. Type the file extension you want to block—for example, .tmp or .psd—and OneDrive won't upload new files with that type.
How do I exclude a folder from a backup?
Right-click the folder you want to exclude and select 'Stop syncing' from the menu. OneDrive will stop backing up that folder to the cloud. You can also open OneDrive settings, go to Sync and backup, then Advanced settings, and toggle off specific folders.
How do I stop 🪟 Windows 11 from backing up to OneDrive?
Open OneDrive settings from the taskbar icon's gear menu. Go to Sync and backup, then toggle off 'Sync your OneDrive files to this PC'. This stops all synchronization. To disable it completely, you can also pause OneDrive or sign out of your Microsoft account.
Still have a question?
Answered by AI from this guide. Good questions may be added to this page — please don't include personal details.
Did this guide fix your problem?

About the Author
Richard
Tech Writer, IT Professional
Richard is a writer at Geek Rewind who turns complex IT tasks into clear, step-by-step guides. He draws on years of hands-on experience in system administration and enterprise IT operations, focusing on Windows, Linux and WordPress: the problems people actually run into, and the fixes that work. His server and WordPress guides come from systems he runs himself. Richard builds and maintains the platform behind Geek Rewind, from its Ubuntu servers and Nginx configuration to its custom WordPress plugins. Many new tutorials start with readers' questions, and he's always glad to answer them in the comments.
No comments yet — be the first to share your thoughts!