How to Restore Deleted OneDrive Files from Your Computer

You can restore deleted OneDrive files from your computer with the Windows Recycle Bin , and you don’t need to sign in to the OneDrive website. When you delete a file from your synced OneDrive folder in File Explorer , Windows 11 and earlier versions move it to the local Recycle Bin first. It doesn’t vanish right away.
The Recycle Bin is a temporary holding folder for recently deleted items. It gives you a safety net before the files are gone for good. The steps below work the same on Windows 11 Home and Pro.
Restore deleted OneDrive files by opening your computer’s Recycle Bin and locating the files. Select the files you wish to recover, then right-click and choose “Restore” from the menu. Verify the files are back in their original location.
Step 1Check Your Computer’s Recycle Bin
Files you delete from the OneDrive folder on your PC go to the Recycle Bin instead of being erased. Deleting also syncs to the cloud, so OneDrive removes the files from your online storage too. Restoring them locally puts them back, and OneDrive syncs them up again.
There are a few cases where a file will not be in the local Recycle Bin :
- Files you deleted on the OneDrive website or on another device. Those go to the OneDrive online recycle bin , not the one on this PC.
- Online-only files, the ones showing a cloud icon and not stored on your disk. They don’t pass through the Windows Recycle Bin either.
- Files too large for the Recycle Bin ’s size limit, and files you deleted with Shift+Delete. Windows removes these right away.
- Files someone already removed by choosing Empty Recycle Bin .
If your file falls into one of these groups, check the online recycle bin in your OneDrive account instead.

Step 2Find and Select Your Deleted OneDrive Files
First, open the Recycle Bin and find your files.
- Double-click the Recycle Bin icon on your desktop. You should see a list of deleted items, with the original location and deletion date shown for each.
- If the icon isn't on your desktop, open Settings Personalization Themes Desktop icon settings, tick Recycle Bin, and select OK. You can also type "Recycle Bin" into the Start menu search.
- Scroll through the list, or type a file name in the search box in the top-right corner. The list narrows to matching items.
- Click each file or folder you want back so it is highlighted. To pick several, hold Ctrl while you click. To pick a range, click the first item, hold Shift, and click the last.
Search works on file and folder names, so use part of the name you remember. If the list is long, sort it by Date deleted to bring the newest items to the top. The Original Location column helps too, since OneDrive files show a path that includes your OneDrive folder.
Step 3Restore the Selected Files or Folders
Now put the files back where they belong.
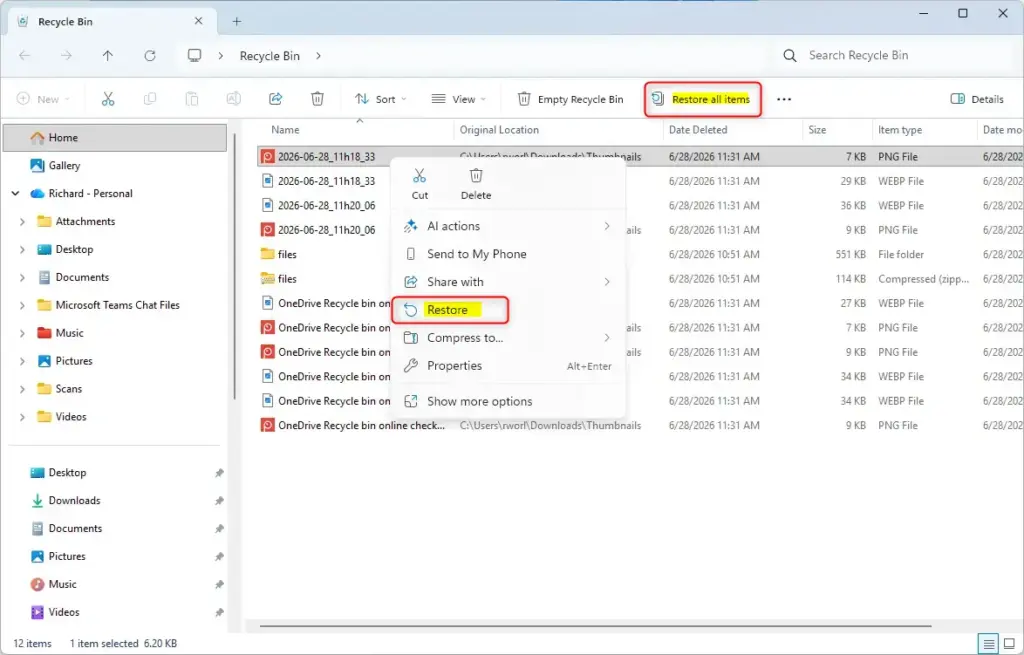
- With your files still highlighted, right-click one of them.
- Select Restore from the menu. The files disappear from the Recycle Bin.
Alternatively, with the items selected, choose Restore the selected items on the toolbar at the top of the window. To bring back everything in the bin, select nothing and choose Restore all items.
Windows returns each file to the folder it was deleted from. If that folder has since been deleted too, Windows recreates it. No restart is needed. Once the files are back in the OneDrive folder, OneDrive uploads them again, and you may see the sync icon briefly in the taskbar.
If you restored the wrong file, you can simply delete it again. It goes back into the Recycle Bin.
Step 4Check if the Files Are Back
Next, check that the files are back. Open File Explorer and go to the folder where they lived before, such as C:\Users\USERNAME\OneDrive, where USERNAME is your Windows account name. You can also select OneDrive in the File Explorer navigation pane.
- Browse to the original folder and look for the restored files or folders.
- Open a few of them and confirm they load correctly and contain your data. For a restored folder, open it and check that all the files inside are there.
- Look at the status icon next to each file. A green check mark means the file is synced. A blue circular-arrows icon means OneDrive is still uploading it, and the icon should change to a check mark after a short wait.
If a file you expected is missing, go back to the Recycle Bin and check again, or search the OneDrive online recycle bin. This confirms the restore finished properly and your files are safe.
Reference:
https://support.microsoft.com/en-US/onedrive/restore-deleted-files-or-folders-in-onedrive
Summary
To recap: open the Recycle Bin from your desktop, find the files you lost, select them, and right-click to choose Restore. The files go back to their original folders on your hard drive, and OneDrive syncs them again.
Don't wait too long. Items are kept for up to 30 days in the OneDrive online recycle bin, and the local Recycle Bin can also be cleared after 30 days if Storage Sense is set to do that. Restoring early avoids data loss. If you can't find a file locally, check the online recycle bin in your OneDrive account.
Have a question about this guide?
Answered by AI from this guide. Good questions may be added to this page — please don't include personal details.
Did this guide fix your problem?

About the Author
Richard
Tech Writer, IT Professional
Richard is a writer at Geek Rewind who turns complex IT tasks into clear, step-by-step guides. He draws on years of hands-on experience in system administration and enterprise IT operations, focusing on Windows, Linux and WordPress: the problems people actually run into, and the fixes that work. His server and WordPress guides come from systems he runs himself. Richard builds and maintains the platform behind Geek Rewind, from its Ubuntu servers and Nginx configuration to its custom WordPress plugins. Many new tutorials start with readers' questions, and he's always glad to answer them in the comments.
No comments yet — be the first to share your thoughts!