How to Safely Delete Your Old Windows Version

The Windows.old folder stores your previous operating system files on your main drive. After a major upgrade it can take up 20 GB or more of disk space. Windows keeps this backup folder for 10 days so you can roll back if something goes wrong, and then deletes it automatically.
You can delete the folder early to free up disk space right away. The built-in Disk Cleanup tool can do it, and so can the Storage page in Settings, which this tutorial uses. Do this only when you are completely sure you do not want to go back to your old version of Windows.
Before you start, make sure you are signed in with an administrator account. A standard account will be asked for administrator credentials. You do not need to restart afterward.
Delete your old Windows version by going to Settings System Storage. Click Temporary files, select “Previous version of Windows,” and then click Remove files. Confirm the deletion to reclaim disk space.
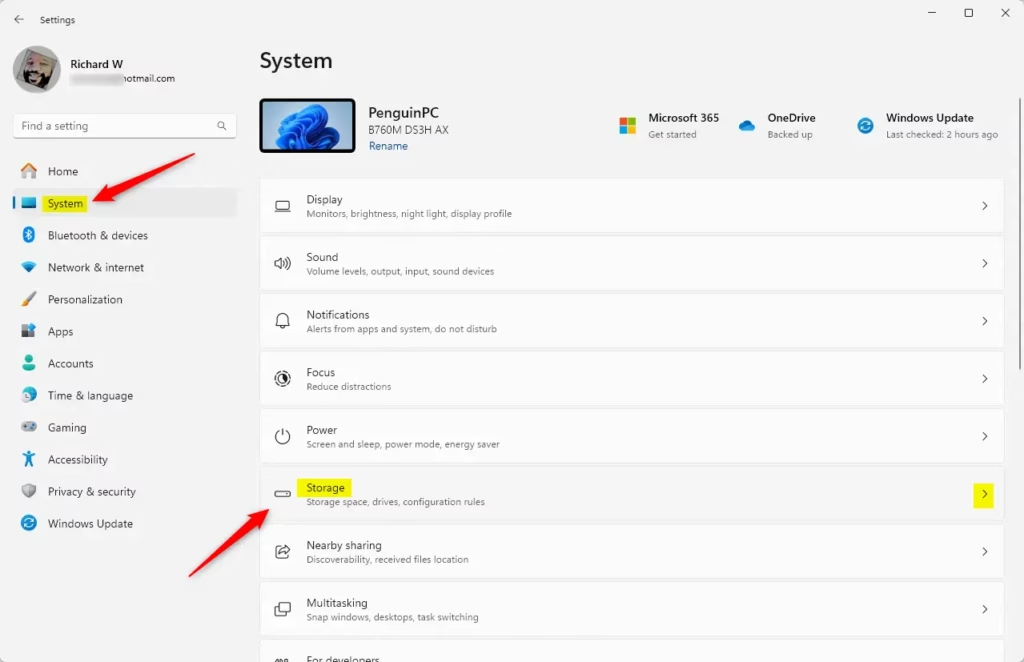
Step 1Go to Storage Settings
First, find the page where Windows shows how your disk space is being used.
- Press the Windows key or click the Start button.
- Click the Settings icon (it looks like a gear). The Settings window opens.
- Go to System Storage You should now see a bar showing how much of your main drive is used, with a list of categories below it.
If the Storage page is slow to fill in, wait a few seconds. Windows calculates the category sizes when the page opens.
Step 2Find Temporary Files
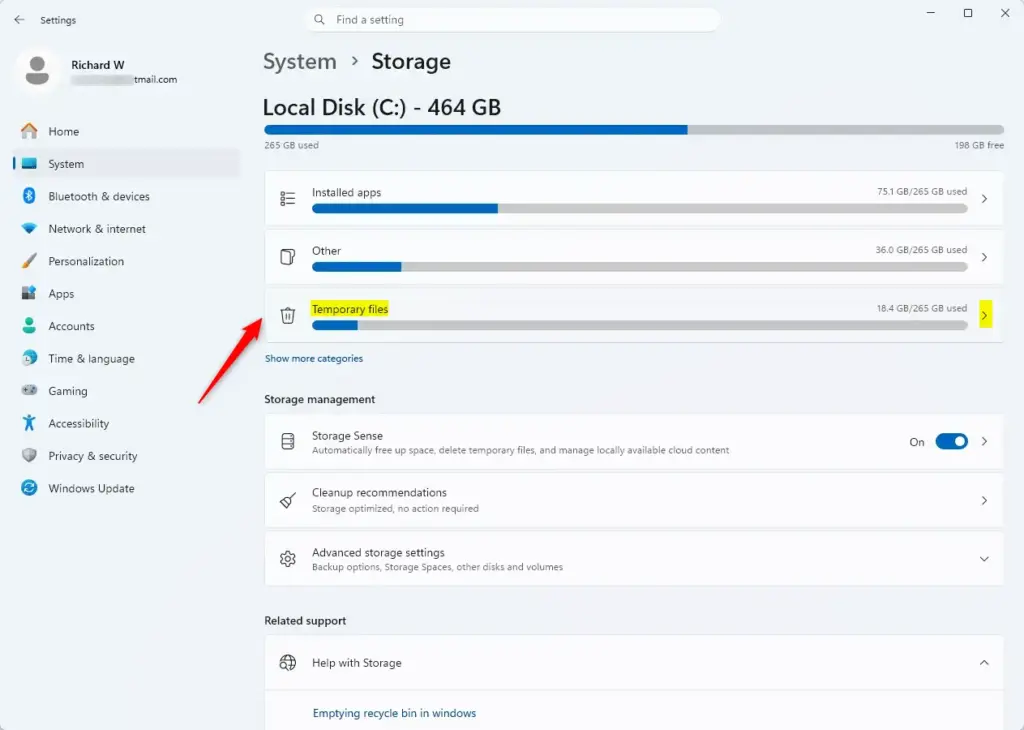
Temporary files on your main drive often include your old Windows installation data. That makes this the place to look when you need to delete old Windows files to free up space.
Your main drive is typically labeled "C:". Opening Temporary files starts a scan that identifies files Windows can safely remove. The scan can take a minute on a large drive, and the cleanup can free up 5 gigabytes of space or more.
- On the Storage page, click Temporary files. Windows starts scanning your drive.
- Wait until the scan finishes. You should see a list of file types with a size next to each one.
Step 3Choose the Old Windows Version to Delete
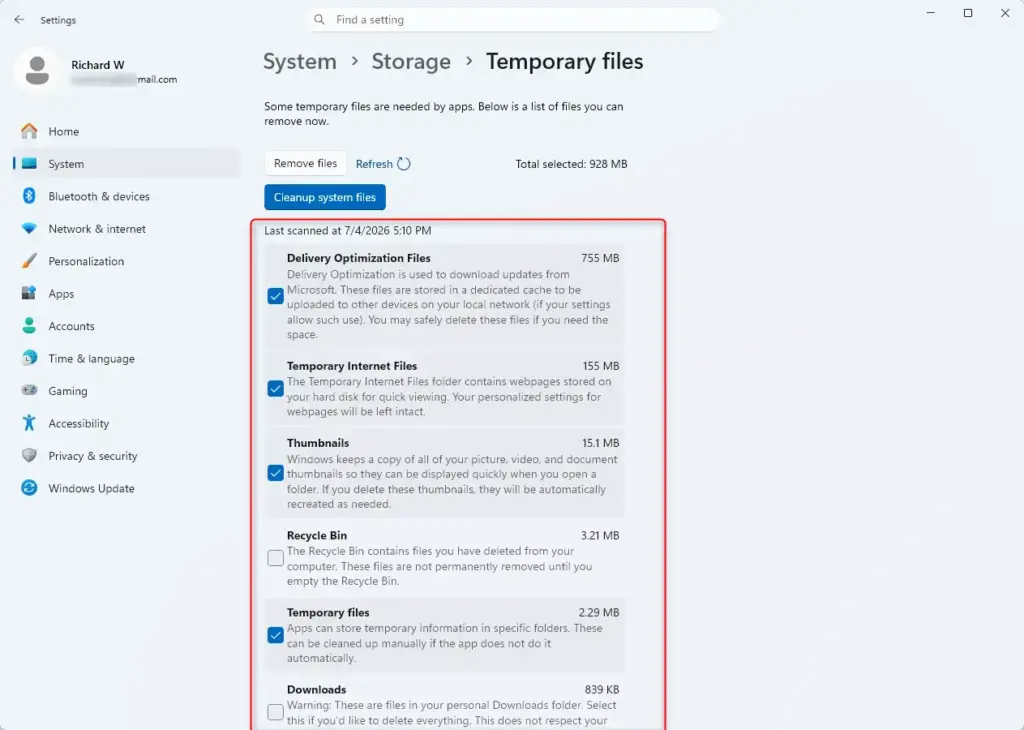
Now pick the old Windows installation from the list.
- Scroll through the list and find Previous version of Windows. On some builds it is labeled as a previous Windows installation instead.
- Tick the checkbox next to it. Its size shows beside it, and the total at the top updates.
- Click the Remove files button at the top of the list to clear out the old data.
Check the other boxes in the list before you click. Some may be ticked by default, such as the Recycle Bin or Downloads, and you may not want those removed. If you do not see the previous Windows entry at all, Windows has probably already deleted the folder after the 10-day period, or the PC was never upgraded. The same option is also available in Disk Cleanup under Clean up system files.
Step 4Confirm Deletion
Confirm the deletion to permanently remove your old Windows version and free up drive space. Once you confirm, you cannot go back to your old operating system.
- Make sure the box for the previous Windows installation is still ticked.
- Click Remove files. A confirmation window appears.
- Read the message. It reminds you that the deletion cannot be undone and that you will lose the ability to return to the previous version of Windows.
- If you are sure, click Delete. Windows removes the files, which can take a few minutes.
- When it finishes, look at the Storage page again. The used space should be lower by roughly the size you saw in the list.
Take a moment before you confirm. Deletion is permanent and cannot be undone, so make sure you have saved all necessary files and settings from the old Windows. If you are unsure about any data, cancel the process and give yourself more time to check. While the 10-day window is still open, you can roll back from the Recovery page in Settings. After you delete the folder, that option is gone.
Reference:
Summary
Deleting your old Windows version frees up storage space, though completing the task requires administrator rights. If the Remove files button is greyed out or asks for credentials, switch to an administrator account and repeat the steps.
Have a question about this guide?
Answered by AI from this guide. Good questions may be added to this page — please don't include personal details.
Did this guide fix your problem?

About the Author
Richard
Tech Writer, IT Professional
Richard is a writer at Geek Rewind who turns complex IT tasks into clear, step-by-step guides. He draws on years of hands-on experience in system administration and enterprise IT operations, focusing on Windows, Linux and WordPress: the problems people actually run into, and the fixes that work. His server and WordPress guides come from systems he runs himself. Richard builds and maintains the platform behind Geek Rewind, from its Ubuntu servers and Nginx configuration to its custom WordPress plugins. Many new tutorials start with readers' questions, and he's always glad to answer them in the comments.
No comments yet — be the first to share your thoughts!